
So you are using Chrome in Facebook or just Browsing the internet and you do not want to see all the ADS ! well get this Extention and All the ads in FB are blocked, I have not seen one ad in a long time. There is also one for Firefox.
And yes FREE !!
Click HERE for Chrome Users
Click HERE for Firefox users.
Click HERE for Internet Explorer
Showing posts with label XP. Show all posts
Showing posts with label XP. Show all posts
Sunday, November 28, 2010
Wednesday, September 22, 2010
how to make an ICS (Internet Connection Sharing) without a router.
Using ICS (Internet Connection Sharing)
In this articleHow does ICS work?
Enabling ICS
Configure TCP/IP
ICS and VPN connections
ICS and ad hoc networks
If you want to share one Internet connection among several computers, you have two options:
Use Internet Connection Sharing (ICS).
Use a router.
How does ICS work?
First, you'll need one computer, called the host computer, that's connected to the Internet and that has a separate connection to the other computers on your network. You'll enable ICS on the Internet connection. The other computers on your network then connect to the host computer, and from there to the Internet through the host computer's shared Internet connection.
A network using Internet Connection Sharing (ICS)
Enabling ICS
To enable ICS, on your host computer:
Click to open Network Connections.
Right-click the connection that you want to share, and then click Properties. If you're prompted for an administrator password or confirmation, type the password or provide confirmation.
Click the Sharing tab, and then select the Allow other network users to connect through this computer’s Internet connection check box.
Notes
The Sharing tab won't be available if you have only one network connection.
You can choose whether to select the Allow other network users to control or disable the shared Internet connection check box.
Optionally, to allow other network users to use services running on your network, click Settings, and then select the services you want to allow.
When you enable ICS, your local area network (LAN) connection gets a new static IP address and configuration, so you'll need to reestablish any TCP/IP connections between your host computer and the other network computers.
To test your network and Internet connection, see if you can share files between computers and make sure each computer can reach a website.
Configure TCP/IP
To use ICS, make sure the local area network (LAN) connection on each network computer is configured to get an IP address automatically. To do this:
Click to open Network Connections.
Right-click the LAN connection, and then click Properties. If you're prompted for an administrator password or confirmation, type the password or provide confirmation.
Click Internet Protocol Version 4 (TCP/IPv4) or Internet Protocol Version 6 (TCP/IPv6), and then click Properties.
Click Obtain an IP address automatically or Obtain an IPv6 address automatically, and then click OK.
The Internet options on your network computers should also be configured for ICS. For more information, see Change Internet settings for ICS (Internet Connection Sharing).
Don't use ICS on a network with domain controllers, DNS servers, gateways, or DHCP servers. And don't use ICS on systems configured for static IP addresses.
ICS and VPN connections
If you create a virtual private network (VPN) connection on your host computer to a corporate network and then enable ICS on that connection, all Internet traffic is routed to the corporate network and all of the computers on your home network can access the corporate network. If you don't enable ICS on the VPN connection, other computers won't have access to the Internet or corporate network while the VPN connection is active on the host computer.
ICS and ad hoc networks
If you share your Internet connection on an ad hoc network, ICS will be disabled if:
You disconnect from the ad hoc network.
You create a new ad hoc network without disconnecting from the ad hoc network for which you enabled ICS.
You log off and then log back on (without disconnecting from the ad hoc network).
In this articleHow does ICS work?
Enabling ICS
Configure TCP/IP
ICS and VPN connections
ICS and ad hoc networks
If you want to share one Internet connection among several computers, you have two options:
Use Internet Connection Sharing (ICS).
Use a router.
How does ICS work?
First, you'll need one computer, called the host computer, that's connected to the Internet and that has a separate connection to the other computers on your network. You'll enable ICS on the Internet connection. The other computers on your network then connect to the host computer, and from there to the Internet through the host computer's shared Internet connection.
A network using Internet Connection Sharing (ICS)
Enabling ICS
To enable ICS, on your host computer:
Click to open Network Connections.
Right-click the connection that you want to share, and then click Properties. If you're prompted for an administrator password or confirmation, type the password or provide confirmation.
Click the Sharing tab, and then select the Allow other network users to connect through this computer’s Internet connection check box.
Notes
The Sharing tab won't be available if you have only one network connection.
You can choose whether to select the Allow other network users to control or disable the shared Internet connection check box.
Optionally, to allow other network users to use services running on your network, click Settings, and then select the services you want to allow.
When you enable ICS, your local area network (LAN) connection gets a new static IP address and configuration, so you'll need to reestablish any TCP/IP connections between your host computer and the other network computers.
To test your network and Internet connection, see if you can share files between computers and make sure each computer can reach a website.
Configure TCP/IP
To use ICS, make sure the local area network (LAN) connection on each network computer is configured to get an IP address automatically. To do this:
Click to open Network Connections.
Right-click the LAN connection, and then click Properties. If you're prompted for an administrator password or confirmation, type the password or provide confirmation.
Click Internet Protocol Version 4 (TCP/IPv4) or Internet Protocol Version 6 (TCP/IPv6), and then click Properties.
Click Obtain an IP address automatically or Obtain an IPv6 address automatically, and then click OK.
The Internet options on your network computers should also be configured for ICS. For more information, see Change Internet settings for ICS (Internet Connection Sharing).
Don't use ICS on a network with domain controllers, DNS servers, gateways, or DHCP servers. And don't use ICS on systems configured for static IP addresses.
ICS and VPN connections
If you create a virtual private network (VPN) connection on your host computer to a corporate network and then enable ICS on that connection, all Internet traffic is routed to the corporate network and all of the computers on your home network can access the corporate network. If you don't enable ICS on the VPN connection, other computers won't have access to the Internet or corporate network while the VPN connection is active on the host computer.
ICS and ad hoc networks
If you share your Internet connection on an ad hoc network, ICS will be disabled if:
You disconnect from the ad hoc network.
You create a new ad hoc network without disconnecting from the ad hoc network for which you enabled ICS.
You log off and then log back on (without disconnecting from the ad hoc network).
Labels:
default programs,
hackers,
internet explorer,
Vista,
windows 7,
windows 8,
wireless,
XP
0
comments


Friday, September 17, 2010
Preventing low memory problems
When your computer doesn't have enough memory for all of the actions it's trying to perform, Windows and your programs can stop working. To help prevent information loss, Windows will notify you when your computer is low on memory. You can also learn to recognize the signs of low memory and take steps to prevent the problem.
Signs of low memory include poor performance, low-memory or out-of-memory notifications, and display problems. For example, if you try to open a menu in a program when your computer is low on memory, the program might respond slowly or appear to stop responding. If the menu appears, it might not respond when you try to click an item or it might not display all items. If you click a menu item, the menu might also disappear and leave a blank area on the screen instead of displaying the contents of the document or file you're working in.
Why do low memory problems occur?
Your computer has two types of memory, random access memory (RAM) and virtual memory. All programs use RAM, but when there isn't enough RAM for the program you're trying to run, Windows temporarily moves information that would normally be stored in RAM to a file on your hard disk called a paging file. The amount of information temporarily stored in a paging file is also referred to as virtual memory. Using virtual memory—in other words, moving information to and from the paging file—frees up enough RAM for programs to run correctly.
Low memory problems occur when your computer runs out of RAM and becomes low on virtual memory. This can happen when you run more programs than the RAM installed on the computer is designed to support. Low memory problems can also occur when a program doesn't free up memory that it no longer needs. This problem is called memory overuse or a memory leak.
How to prevent low memory problems
Running fewer programs at one time can help prevent low memory problems and information loss. It's a good idea to observe which programs show signs of low memory conditions and try not to run them at the same time.
However, it’s not always convenient or practical to run a limited number of programs. Signs of low memory can indicate that the computer needs more RAM to support the programs you use. Here are the recommended ways to solve or prevent low memory problems:
•Increase the paging file (virtual memory) size
Windows automatically attempts to increase the paging file size the first time your computer becomes low on memory, but you can also manually increase it up to a maximum size that is determined by the amount of RAM installed. Although increasing the paging file size can help prevent low memory problems, it can also make your programs run more slowly. Because your computer reads information from RAM much faster than from a hard disk (where the paging file is), making too much virtual memory available to programs will slow them down.
For more information, see Change the size of virtual memory.
•Install more RAM
If you see signs of low memory, or if Windows warns you about a low memory problem, check the information that came with your computer or contact the computer manufacturer to determine which type of RAM is compatible with your computer, and then install more RAM. To install RAM, check the information provided by the manufacturer.
For more information, see Find out how much RAM your computer has.
•Determine if a program overuses memory
If the computer becomes low on memory whenever you run certain programs, one or more of those programs might have a memory leak. To stop a memory leak, you need to close the program. To repair a memory leak, you need to check for updates for the program or contact the publisher of the software.
To determine which program is using the most memory, follow these steps:
1.Open Task Manager by right-clicking the taskbar, and then clicking Start Task Manager.
2.Click the Processes tab.
3.To sort programs by memory usage, click Memory (Private Working Set).
You can also check for program errors and troubleshooting information using Event Viewer.
1.Open Event Viewer by clicking the Start button , clicking Control Panel, clicking System and Security, clicking Administrative Tools, and then double-clicking Event Viewer. If you're prompted for an administrator password or confirmation, type the password or provide confirmation.
2.In the left pane, click Applications and Services Logs to view error events. To see a description of the problem, double-click the event. To see if troubleshooting information is available, look for a link to online Help.
What are the signs of low memory?
Signs of low memory include poor performance, low-memory or out-of-memory notifications, and display problems. For example, if you try to open a menu in a program when your computer is low on memory, the program might respond slowly or appear to stop responding. If the menu appears, it might not respond when you try to click an item or it might not display all items. If you click a menu item, the menu might also disappear and leave a blank area on the screen instead of displaying the contents of the document or file you're working in.
Why do low memory problems occur?
Your computer has two types of memory, random access memory (RAM) and virtual memory. All programs use RAM, but when there isn't enough RAM for the program you're trying to run, Windows temporarily moves information that would normally be stored in RAM to a file on your hard disk called a paging file. The amount of information temporarily stored in a paging file is also referred to as virtual memory. Using virtual memory—in other words, moving information to and from the paging file—frees up enough RAM for programs to run correctly.
Low memory problems occur when your computer runs out of RAM and becomes low on virtual memory. This can happen when you run more programs than the RAM installed on the computer is designed to support. Low memory problems can also occur when a program doesn't free up memory that it no longer needs. This problem is called memory overuse or a memory leak.
How to prevent low memory problems
Running fewer programs at one time can help prevent low memory problems and information loss. It's a good idea to observe which programs show signs of low memory conditions and try not to run them at the same time.
However, it’s not always convenient or practical to run a limited number of programs. Signs of low memory can indicate that the computer needs more RAM to support the programs you use. Here are the recommended ways to solve or prevent low memory problems:
•Increase the paging file (virtual memory) size
Windows automatically attempts to increase the paging file size the first time your computer becomes low on memory, but you can also manually increase it up to a maximum size that is determined by the amount of RAM installed. Although increasing the paging file size can help prevent low memory problems, it can also make your programs run more slowly. Because your computer reads information from RAM much faster than from a hard disk (where the paging file is), making too much virtual memory available to programs will slow them down.
For more information, see Change the size of virtual memory.
•Install more RAM
If you see signs of low memory, or if Windows warns you about a low memory problem, check the information that came with your computer or contact the computer manufacturer to determine which type of RAM is compatible with your computer, and then install more RAM. To install RAM, check the information provided by the manufacturer.
For more information, see Find out how much RAM your computer has.
•Determine if a program overuses memory
If the computer becomes low on memory whenever you run certain programs, one or more of those programs might have a memory leak. To stop a memory leak, you need to close the program. To repair a memory leak, you need to check for updates for the program or contact the publisher of the software.
To determine which program is using the most memory, follow these steps:
1.Open Task Manager by right-clicking the taskbar, and then clicking Start Task Manager.
2.Click the Processes tab.
3.To sort programs by memory usage, click Memory (Private Working Set).
You can also check for program errors and troubleshooting information using Event Viewer.
1.Open Event Viewer by clicking the Start button , clicking Control Panel, clicking System and Security, clicking Administrative Tools, and then double-clicking Event Viewer. If you're prompted for an administrator password or confirmation, type the password or provide confirmation.
2.In the left pane, click Applications and Services Logs to view error events. To see a description of the problem, double-click the event. To see if troubleshooting information is available, look for a link to online Help.
Wednesday, September 1, 2010
How to use the Backup utility to back up files and folders in Windows XP Home Edition
Before you can back up important information on your computer, you must install the Backup utility. The Backup utility is included on the Windows XP Home Edition CD.
Note If Windows XP Home Edition was preinstalled on your computer and you do not have the original Windows XP CD, contact the computer manufacturer or visit the manufacturer's Web site for more information. You can also use backup software that you purchase separately.
To install the Backup utility from the Windows XP CD:
Insert your Windows XP CD into the CD drive or DVD drive of the computer.
Click Exit.
Locate the CDDrive:\ValueAdd\Msft\Ntbackup folder on the CD.
Double-click Ntbackup.msi to install the Backup utility.
When the Backup or Restore Wizard prompts you, click Finish.
Remove the Windows XP CD.
Now that you have installed the Backup utility, you are ready to back up your important information.
How to back up files and foldersTo back up your files and folders, follow these steps: Note In order to back up...To back up your files and folders, follow these steps:
Note In order to back up files and folders, you must be logged on to the computer as an administrator or as a user who is part of the Administrators group. To verify that you are logged on to Windows with a user account that is a computer administrator, visit the following Microsoft Web site:
http://support.microsoft.com/gp/admin (http://support.microsoft.com/gp/admin)
Note The following steps explain how to use the Backup utility to back up your files and folders manually. You can also use the Backup and Restore Wizard to back up your files and folders. However, the steps will be slightly different from those that are listed in the following section.
Step 1: Start the Backup utility
Click Start, and then click Run.
Type ntbackup.exe in the Open box, and then click OK.
Note If you receive the following error message, make sure that you followed the steps in the "How to install the Backup utility" section correctly:
Windows cannot find 'ntbackup.exe'
Step 2: Select items to back up and select the location for the backup file
Click Advanced Mode.
Note If the Backup and Restore Wizard starts, the utility is running in Wizard mode. You can click to clear the Always start in wizard mode check box, and then restart the Backup utility. If you continue to use the Backup and Restore Wizard, the steps will be slightly different from those that are listed in the following section.
Click the Backup tab.
On the Job menu, click New.
Select the check boxes next to the drives that you want to back up. If you select specific files or folders, expand the drive where these files or folders are located. Then, select the check boxes for the files or for the folders that you want to back up.
Select the System State check box that is located under My Computer in the navigation pane.
Note If you want to back up system settings and data files, back up all the data on your computer and the System State data. The System State data includes the registry, the COM+ class registration database, files that are under Windows File Protection, boot files, and other system files.
If the Backup destination list is available, click the backup destination that you want to use.
Note If you selected File in this step, type the full path and file name for which you want to back up data in the Backup media or file name box.
You can specify a network share as a destination for the backup file. Typically, backup files have the .bkf file name extension. However, you can use any file name extension that you want.
Step 3: Start the backup
Click Start Backup to open the Backup Job Information dialog box.
Under If the media already contains backups, do either of the following:
If you want to append this backup file to previous backup files, click Append this backup to the media. This option adds the new backup to the existing backup file so that you can maintain all previous backups in one file. This option is useful if you ever want to restore a backup from a specific day. Be aware that the size of the backup file will grow with each new backup. You might want to monitor the file size to make sure that it does not fill up your hard disk over time. If the file becomes too large, you might consider saving the file to an external hard disk. Or, if you are concerned about the file using too much hard disk space, select Replace the data on the media with this backup instead.
If you want to overwrite previous backup files with this backup file, click Replace the data on the media with this backup. This option is useful if you only want to maintain the current backup and do not care about keeping the previous backups. Or, use this option if you are concerned about the file using too much hard disk space on your computer.
Click Advanced.
Select the Verify data after backup check box.
In the Backup Type box, click the kind of backup that you want to create. For a description of each backup type, click the backup type and the description appears under "Description." You can select any of the following backup types:
Normal
Copy
Incremental
Differential
Daily
Click OK, and then click Start Backup. A Backup Progress dialog box is displayed, and the backup starts.
Step 4: Exit the Backup utility
When the backup is complete, click Close.
On the Job menu, click Exit.
NEXT STEPS If these steps do not work or you have problems during the backup, you can use t...If these steps do not work or you have problems during the backup, you can use the Microsoft Customer Support Services Web site to find solutions to your problem. You can also visit this Web site to learn more about how to back up your important information on your computer. Some services that the Microsoft Customer Support Services Web site provides include the following:
Searchable Knowledge Base (http://support.microsoft.com/search/?adv=1) : Search technical support information and self-help tools for Microsoft products.
Solution Centers (http://support.microsoft.com/select/?target=hub) : View product-specific frequently asked questions and support highlights.
Microsoft Customer Support Newsgroups (http://www.microsoft.com/communities/newsgroups/default.mspx) : Contact counterparts, peers, and Microsoft Most Valuable Professionals (MVPs).
Other Support Options (http://support.microsoft.com/default.aspx?pr=csshome) : Use the Web to ask a question, contact Microsoft Customer Support Services, or provide feedback.
If you cannot find the help you are looking for through the Microsoft Customer Support Services Web site, you might want to contact Support:
http://support.microsoft.com/contactus
Note If Windows XP Home Edition was preinstalled on your computer and you do not have the original Windows XP CD, contact the computer manufacturer or visit the manufacturer's Web site for more information. You can also use backup software that you purchase separately.
To install the Backup utility from the Windows XP CD:
Insert your Windows XP CD into the CD drive or DVD drive of the computer.
Click Exit.
Locate the CDDrive:\ValueAdd\Msft\Ntbackup folder on the CD.
Double-click Ntbackup.msi to install the Backup utility.
When the Backup or Restore Wizard prompts you, click Finish.
Remove the Windows XP CD.
Now that you have installed the Backup utility, you are ready to back up your important information.
How to back up files and foldersTo back up your files and folders, follow these steps: Note In order to back up...To back up your files and folders, follow these steps:
Note In order to back up files and folders, you must be logged on to the computer as an administrator or as a user who is part of the Administrators group. To verify that you are logged on to Windows with a user account that is a computer administrator, visit the following Microsoft Web site:
http://support.microsoft.com/gp/admin (http://support.microsoft.com/gp/admin)
Note The following steps explain how to use the Backup utility to back up your files and folders manually. You can also use the Backup and Restore Wizard to back up your files and folders. However, the steps will be slightly different from those that are listed in the following section.
Step 1: Start the Backup utility
Click Start, and then click Run.
Type ntbackup.exe in the Open box, and then click OK.
Note If you receive the following error message, make sure that you followed the steps in the "How to install the Backup utility" section correctly:
Windows cannot find 'ntbackup.exe'
Step 2: Select items to back up and select the location for the backup file
Click Advanced Mode.
Note If the Backup and Restore Wizard starts, the utility is running in Wizard mode. You can click to clear the Always start in wizard mode check box, and then restart the Backup utility. If you continue to use the Backup and Restore Wizard, the steps will be slightly different from those that are listed in the following section.
Click the Backup tab.
On the Job menu, click New.
Select the check boxes next to the drives that you want to back up. If you select specific files or folders, expand the drive where these files or folders are located. Then, select the check boxes for the files or for the folders that you want to back up.
Select the System State check box that is located under My Computer in the navigation pane.
Note If you want to back up system settings and data files, back up all the data on your computer and the System State data. The System State data includes the registry, the COM+ class registration database, files that are under Windows File Protection, boot files, and other system files.
If the Backup destination list is available, click the backup destination that you want to use.
Note If you selected File in this step, type the full path and file name for which you want to back up data in the Backup media or file name box.
You can specify a network share as a destination for the backup file. Typically, backup files have the .bkf file name extension. However, you can use any file name extension that you want.
Step 3: Start the backup
Click Start Backup to open the Backup Job Information dialog box.
Under If the media already contains backups, do either of the following:
If you want to append this backup file to previous backup files, click Append this backup to the media. This option adds the new backup to the existing backup file so that you can maintain all previous backups in one file. This option is useful if you ever want to restore a backup from a specific day. Be aware that the size of the backup file will grow with each new backup. You might want to monitor the file size to make sure that it does not fill up your hard disk over time. If the file becomes too large, you might consider saving the file to an external hard disk. Or, if you are concerned about the file using too much hard disk space, select Replace the data on the media with this backup instead.
If you want to overwrite previous backup files with this backup file, click Replace the data on the media with this backup. This option is useful if you only want to maintain the current backup and do not care about keeping the previous backups. Or, use this option if you are concerned about the file using too much hard disk space on your computer.
Click Advanced.
Select the Verify data after backup check box.
In the Backup Type box, click the kind of backup that you want to create. For a description of each backup type, click the backup type and the description appears under "Description." You can select any of the following backup types:
Normal
Copy
Incremental
Differential
Daily
Click OK, and then click Start Backup. A Backup Progress dialog box is displayed, and the backup starts.
Step 4: Exit the Backup utility
When the backup is complete, click Close.
On the Job menu, click Exit.
NEXT STEPS If these steps do not work or you have problems during the backup, you can use t...If these steps do not work or you have problems during the backup, you can use the Microsoft Customer Support Services Web site to find solutions to your problem. You can also visit this Web site to learn more about how to back up your important information on your computer. Some services that the Microsoft Customer Support Services Web site provides include the following:
Searchable Knowledge Base (http://support.microsoft.com/search/?adv=1) : Search technical support information and self-help tools for Microsoft products.
Solution Centers (http://support.microsoft.com/select/?target=hub) : View product-specific frequently asked questions and support highlights.
Microsoft Customer Support Newsgroups (http://www.microsoft.com/communities/newsgroups/default.mspx) : Contact counterparts, peers, and Microsoft Most Valuable Professionals (MVPs).
Other Support Options (http://support.microsoft.com/default.aspx?pr=csshome) : Use the Web to ask a question, contact Microsoft Customer Support Services, or provide feedback.
If you cannot find the help you are looking for through the Microsoft Customer Support Services Web site, you might want to contact Support:
http://support.microsoft.com/contactus
Monday, August 23, 2010
Customizing windows
Did you know that you can customize the Links bar in Windows XP SP2,SP3 and Windows Vista? You can add, remove, or rearrange shortcuts to your Favorites and folders of Favorites. Customizing the Links bar gives you one-click access to your favorite folders, and webpages.
Here's how:
To enable the Links bar in Windows XP SP2,SP3 and Windows Vista
• Right-click on the Windows Taskbar. Click on Toolbars, and then click Links to select it (a checkmark will be displayed beside it)


To add a shortcut to the Links bar
• Drag the webpage's icon from the Address bar of the browser
• Drag a link from a webpage directly to the Links bar
• Drag a folder path from a search window to the Links bar
• In the Add to Favorites dialog box, click the Create In dropdown list, and then select Links
To remove a shortcut from the Links bar
• On the Links bar, drag a shortcut to a new location
To enable the Links bar in your browser
• In the Favorites Center, drag a shortcut to a new location in the Links folder
Here's how:
To enable the Links bar in Windows XP SP2,SP3 and Windows Vista
• Right-click on the Windows Taskbar. Click on Toolbars, and then click Links to select it (a checkmark will be displayed beside it)

You will now see "Links" added just to the left of the system tray on the taskbar.

• Drag the webpage's icon from the Address bar of the browser
• Drag a link from a webpage directly to the Links bar
• Drag a folder path from a search window to the Links bar
• Click the Add to Favorites/Bookmarks button in your browser, and then click Add to Favorites/Bookmarks. NOTE: If you are using a different browser this feature may not be implemented, or may work differently
• In the Add to Favorites dialog box, click the Create In dropdown list, and then select Links
To remove a shortcut from the Links bar
• Right-click the shortcut in the Links bar, and then click Delete
To rearrange how your Favorites show on the Links bar
• On the Links bar, drag a shortcut to a new location
To enable the Links bar in your browser
NOTE: This feature may not be implemented, or may work differently, in different browsers.
• Click the Tools button, click Toolbars, and then click Links
To add a shortcut to the Links bar
• Click the Add to Favorites button, and then click Add to Favorites
• In the Add to Favorites dialog box, click the Create In dropdown list, and then select Links
You can also drag the webpage's icon from the Address bar or drag a link from a webpage directly to the Links bar.
• In the Favorites Center, drag a shortcut to a new location in the Links folder
Thursday, July 15, 2010
Use Windows Easy Transfer to copy your files, photos, music, e-mail, settings, and more from a computer running Windows XP to a computer running Windows 7. You can transfer data using an Easy Transfer Cable, removable media, or across a network
Use Windows Easy Transfer to copy your files, photos, music, e-mail, settings, and more from a computer running Windows XP to a computer running Windows 7. You can transfer data using an Easy Transfer Cable, removable media, or across a network

Download details: Windows Easy Transfer for transferring from Windows XP (32 bit) to Windows 7
www.microsoft.com
Use Windows Easy Transfer to copy your files, photos, music, e-mail, settings, and more from a computer running Windows XP to a computer running Windows 7. You can transfer data using an Easy Transfer Cable, removable media, or across a network
Monday, July 12, 2010
HP Refurbished SALE: $244 250GB Netbook . $539 Core i3 500GB Laptop . $395 Quad-Core 6GB PC


HP
HP Pavilion Elite 2.8GHz Phenom II Quad-Core Desktop w/ Blu-ray Player and 1TB Hard Drive - Model HPE-112y - VT637AAR#ABA
Only $594.99

2.8GHz Phenom II X4-925 Quad-Core Processor, 8GB RAM, 1TB Hard Drive, DVD+RW w/ LightScribe, Blu-ray Player, Wirless 802.11 a/b/g/n, ATI Radeon HD4350, Windows 7 Home Premium 64-Bit - HP Refurbished / Recertified
eCOST Part# 55494773

Dell
Dell Latitude D620 1.83GHz Intel Core 2 Duo Notebook - D620
Only $297.99
1.83GHz Intel 2 Core Duo, 1GB RAM, 60GB Hard Disk Drive, DVD/CD-RW, 14.1" LCD, Wi-Fi, Windows XP Professional - Refurbished / Recertified
eCOST Part# 56388340

HP
This is a great site to get computers from and parts, I have and still do use this site, I signed up as a member and get great offers through my email. So sign up today and checthem out,
Thanks,
MD4URPC.com
Labels:
Anti-spyware,
CD/DVD,
desktop,
hard drive,
md4urpc.com,
network,
PC accessories,
Tech support,
Utilities,
Vista,
Windows,
windows 7,
windows 7 starter,
wireless,
word,
XP
0
comments
Saturday, June 19, 2010
How to remove the Fake Windows Activation screen
This seems to be going around a lot more these days then a Fake Anti-virus program, Due to the Authenticity of the look and how convincing it really looks.
2. Once you have activated your Windows You will never be asked to do it again.
3. Never Put you Credit card number or personal Information into a Window from a pop up unless you have requested it and or have a direct Phone Number to call or contact someone.
4. The Windows Fake Activation Looks pretty real, And it's a Trojan, Ransom malware.
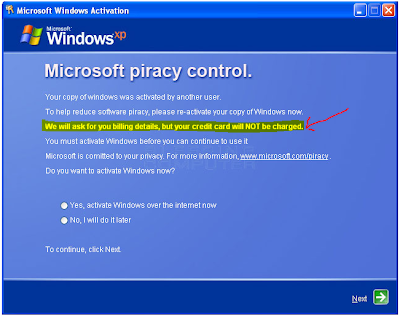
To make sure this is a fake
1. It will ask you for a Credit card period !
Microsoft will not do this on the actual Activation, They give you a choice of calling them over the phone or going to their website.
Now how to remove it.
1.Reboot your computer into Safe Mode with Networking. To do this, turn your computer off and then back on and immediately when you see anything on the screen, start tapping the F8 key on your keyboard. Eventually you will be brought to a menu similar to the one below:

2. Using the arrow keys on your keyboard, select Safe Mode with Networking and press Enter on your keyboard. See Video on how to get into Safe Mode if you need more Help Click HERE
3. By selecting with networking This should let you get on the Internet, So now you will need to Download Malwarebytes Click HERE
4. Once downloaded, close all programs and Windows on your computer.
5. Double-click on the icon on your desktop named mbam-setup.exe. This will start the installation of MBAM onto your computer.
6. Once the Install is Finished Malwarebytes will open automatically.
(make sure you have clicked on update when doing install if not you can update it NOW)
7. Once open you will see the options, Do a Full system Scan.
Note: This can take 5 min, or two hours Depending on how bad your system is infected and how fast it is.
8. When Malwarebytes has finished the scan you will get a pop up window telling you that it is complete. Click OK
9. Now you should see the results from the scan, As seen below

Just a reminder
1. Microsoft will not ask for your Credit Card Ever while installing windows Any version.2. Once you have activated your Windows You will never be asked to do it again.
3. Never Put you Credit card number or personal Information into a Window from a pop up unless you have requested it and or have a direct Phone Number to call or contact someone.
4. The Windows Fake Activation Looks pretty real, And it's a Trojan, Ransom malware.

Notice The highlighted area, They Will charge you.
To make sure this is a fake
1. It will ask you for a Credit card period !
Microsoft will not do this on the actual Activation, They give you a choice of calling them over the phone or going to their website.
Now how to remove it.
1.Reboot your computer into Safe Mode with Networking. To do this, turn your computer off and then back on and immediately when you see anything on the screen, start tapping the F8 key on your keyboard. Eventually you will be brought to a menu similar to the one below:

3. By selecting with networking This should let you get on the Internet, So now you will need to Download Malwarebytes Click HERE
4. Once downloaded, close all programs and Windows on your computer.
5. Double-click on the icon on your desktop named mbam-setup.exe. This will start the installation of MBAM onto your computer.
6. Once the Install is Finished Malwarebytes will open automatically.
(make sure you have clicked on update when doing install if not you can update it NOW)
7. Once open you will see the options, Do a Full system Scan.
Note: This can take 5 min, or two hours Depending on how bad your system is infected and how fast it is.
8. When Malwarebytes has finished the scan you will get a pop up window telling you that it is complete. Click OK
9. Now you should see the results from the scan, As seen below

10. Click on Remove selected.
11. It will open a scan log in NotePad, You can save this log or Just close it all together.
12. Once Notepad is closed scan is finished you can close Malwarebytes and Reboot your Computer in Normal Mode.
13. Now back in to Normal mode and if things seem to be running fine, Open Malwarebytes again and do a Quick scan. Should take 5-10 min. if nothing is found you should be ok and no need for another reboot.
See our website for More great Offers and Video Tutorials.
Comments welcome
Monday, June 14, 2010
Disconnect unused network connections
Do you have alot of these on your Computer ?


Well you can shut these off as well if you do not use them.
Click Start, and then click My Computer.

On the Tools menu, click Disconnect Network Drive.

select the network drives that you no longer need, and then click OK
By Shutting these off this will speed up your system Due to when your Computer starts up it has to Connect to each one and load the drivers for each of these an in doing so it slows you PC down.
Tired of chasing your mouse? Use keyboard shortcuts
Tired of chasing your mouse? Use keyboard shortcuts
You can use your keyboard instead of your mouse to do these three tasks:
• Start a program
• Navigate menus
• Minimize, maximize, and close windows
Start a program using a keyboard shortcut
The Start menu is great for finding programs, but its multiple levels of folders can be time consuming to navigate. If there is a program you start frequently, you should set a keyboard shortcut for it so that you can start the program without taking your hands off the keyboard.
To set a keyboard shortcut to start a program
1.Click the Start menu, and then click All Programs. Right-click the program that you want to start with a keyboard shortcut, and then click Properties.

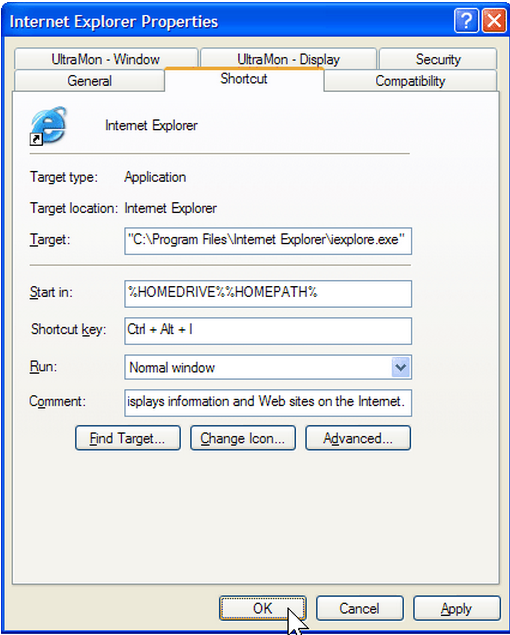
2.Click in the Shortcut key box. Now press the letter on your keyboard that you want to use to start the program. Make it easy to remember—for example, press I for Microsoft Internet Explorer.
Note: You can use either uppercase or lowercase letters when creating your keyboard shortcuts—and when accessing them later. In the Shortcut key box, Microsoft Windows XP automatically adds Ctrl + Alt + before the key you pressed. When you want to start the program, hold down both the CTRL and ALT keys simultaneously, while also pressing the letter you chose. This way, your program won't start every time you type that letter.

3. Click OK.

4.Now test your shortcut. Hold down the CTRL and ALT keys, and then press the letter you chose. If you find it difficult to hold down two keys at once, read Turn on the Sticky Keys feature. Your program should start.
Here Is a fast Cheat Sheet
Control windows using your keyboard
If you like to keep four or five windows open while you work (or play) on your computer, you'll appreciate knowing these keyboard shortcuts. You can quickly switch between your Web browser, e-mail, instant message windows, and other programs without taking your hands off the keyboard.
Action Shortcut
Minimize a window to your taskbar
ALT, SPACEBAR, N
Maximize a window so it takes up your whole desktop
ALT, SPACEBAR, X
Restore a window so it's visible but doesn't take up your whole desktop
ALT, SPACEBAR, R
Close a window
ALT+F4
Switch to the last window you had open
ALT+TAB
Switch to any window
Hold down the ALT key, and press TAB until the window you want is active
Programs often start up in a "restored" state, where the window takes up only part of the screen. To maximize the window so that it takes up the entire screen, press the ALT key, press the SPACEBAR, and then press X. This will feel natural after you do it a few times, and you will feel much more efficient while using your computer.
This also helps if your mouse is wireless and getting weak on power.
1. To activate mouse keys all you do is press Alt+Left shift key (the one below the caps lock key) and the Num Lock key.
To deactivate just press the above combination again.
All you do is use your numeric keypad to move the mouse pointer.
Here are some tips that might improve the Mouse Keys experience:
- You might want to set your options to something like the following (to change the options just double click on the mouse icon in the systray and click on settings)
1) Select ‘Hold down Ctrl to speed up Shift to slow down’ (this might be helpful if you want to go to a point quickly with your cursor)
2) Change the option to ‘off‘ where it says ‘Use Mouse Keys when NumLock is:‘ (this way you can use your numeric keypad to key in numbers)
And here are the functions that you can do with the Numeric Keypad:
5 = a left click on your normal mouse
Press 0 and navigate the pointer= Selecting the text in a normal keyboard
Pressing * or - and then pressing 5 = right click on your normal mouse (to use 5 to perform the left click action press the / key).
To scroll up and down you can either use arrow keys or the Page Up and Page Down keys. You can also use the spacebar to get to the bottom of the page.
You can use your keyboard instead of your mouse to do these three tasks:
• Start a program
• Navigate menus
• Minimize, maximize, and close windows
Start a program using a keyboard shortcut
The Start menu is great for finding programs, but its multiple levels of folders can be time consuming to navigate. If there is a program you start frequently, you should set a keyboard shortcut for it so that you can start the program without taking your hands off the keyboard.
To set a keyboard shortcut to start a program
1.Click the Start menu, and then click All Programs. Right-click the program that you want to start with a keyboard shortcut, and then click Properties.

2.Click in the Shortcut key box. Now press the letter on your keyboard that you want to use to start the program. Make it easy to remember—for example, press I for Microsoft Internet Explorer.
Note: You can use either uppercase or lowercase letters when creating your keyboard shortcuts—and when accessing them later. In the Shortcut key box, Microsoft Windows XP automatically adds Ctrl + Alt + before the key you pressed. When you want to start the program, hold down both the CTRL and ALT keys simultaneously, while also pressing the letter you chose. This way, your program won't start every time you type that letter.

3. Click OK.
4.Now test your shortcut. Hold down the CTRL and ALT keys, and then press the letter you chose. If you find it difficult to hold down two keys at once, read Turn on the Sticky Keys feature. Your program should start.
Here Is a fast Cheat Sheet
Control windows using your keyboard
If you like to keep four or five windows open while you work (or play) on your computer, you'll appreciate knowing these keyboard shortcuts. You can quickly switch between your Web browser, e-mail, instant message windows, and other programs without taking your hands off the keyboard.
Action Shortcut
Minimize a window to your taskbar
ALT, SPACEBAR, N
Maximize a window so it takes up your whole desktop
ALT, SPACEBAR, X
Restore a window so it's visible but doesn't take up your whole desktop
ALT, SPACEBAR, R
Close a window
ALT+F4
Switch to the last window you had open
ALT+TAB
Switch to any window
Hold down the ALT key, and press TAB until the window you want is active
Programs often start up in a "restored" state, where the window takes up only part of the screen. To maximize the window so that it takes up the entire screen, press the ALT key, press the SPACEBAR, and then press X. This will feel natural after you do it a few times, and you will feel much more efficient while using your computer.
This also helps if your mouse is wireless and getting weak on power.
1. To activate mouse keys all you do is press Alt+Left shift key (the one below the caps lock key) and the Num Lock key.
To deactivate just press the above combination again.
All you do is use your numeric keypad to move the mouse pointer.
Here are some tips that might improve the Mouse Keys experience:
- You might want to set your options to something like the following (to change the options just double click on the mouse icon in the systray and click on settings)
1) Select ‘Hold down Ctrl to speed up Shift to slow down’ (this might be helpful if you want to go to a point quickly with your cursor)
2) Change the option to ‘off‘ where it says ‘Use Mouse Keys when NumLock is:‘ (this way you can use your numeric keypad to key in numbers)
And here are the functions that you can do with the Numeric Keypad:
5 = a left click on your normal mouse
Press 0 and navigate the pointer= Selecting the text in a normal keyboard
Pressing * or - and then pressing 5 = right click on your normal mouse (to use 5 to perform the left click action press the / key).
To scroll up and down you can either use arrow keys or the Page Up and Page Down keys. You can also use the spacebar to get to the bottom of the page.
Sunday, June 13, 2010
System Shortcuts,
There are thousands of programs out their that you can get for free and or pay for, But did you know on you PC there are programs all ready on it.
Windows XP ( Vista and windows 7 Just type it in the Search window on the start button
1. Click Start
2. Click Run
3. Type in cleanmgr.exe
This cleans the Hard Drive the same way as if you were to Go to My computer and right click your C:\ drive and then to properties. Just a faster way of doing it.
To make a shortCut on your Desktop Just
1. Right click the Wall paper ( Empty spot)
2. New ShortCut
3.Copy and Past
4. C:\Windows\System32\cleanmgr.exe
 Simple.
Now lets get creative.
If you open the Folder ( Click Start> My Computer" Computer for Vista an 7" Then double Click the drive with your Operating System ( C:\ normally) then scroll down to Windows then open it then scroll down to System32
C:\Windows\System32
you will see a few Applications, These are some of the applications you can use to make shortcuts, What ever you do , Don't Delete them
On any of them you can Double Click it and it will open the program related to it, If it does not open then it is a Command lind program, Meaning another program Needed to run it it short term
If it does open then if you like what it is you can Right click it and scroll down to Make a shortCut
it will make the shortCut in the same folder then you can drag and drop it to the desktop
To see a video Visit our YouTune channel
http:\\youtube.com/md4urpc
Here is a list of some of the ones that will Run Just copy and past these into the New shortCut
C:\Windows\System32\Netplwiz.exe ( all )
 C:\Windows\System32\resmon.exe (Vista and win 7)
 C:\Windows\System32\msconfig.exe (all)

charmap ( shows you all the Characters )
lpksetup
 chkdsk ( check the Hard Drive for errors )
calc ( Calculator )
cmd ( Command Line )
UAC ( User Account Control ) Vista win 7
C:\Windows\System32\CompMgmtLauncher.exe ( Computer Management Launcher )
taskmgr ( Task Manager )
SoundRecorder ( record sound from a mic to your PC )
perfmon ( Performance Monitor ) Vista and 7
psr ( Problem Steps Recorder ) Windows 7 only
osk ( On screen KeyBoard )
Magnify ( Magnifys the Screen )
OptionalFeatures ( Lets you see other options you may have not installed on your PC)
MdSched ( Windows Memory Diagnostics )

Well Enjoy.
To see a short Video Click HERE
Windows XP ( Vista and windows 7 Just type it in the Search window on the start button
1. Click Start
2. Click Run
3. Type in cleanmgr.exe
This cleans the Hard Drive the same way as if you were to Go to My computer and right click your C:\ drive and then to properties. Just a faster way of doing it.
To make a shortCut on your Desktop Just
1. Right click the Wall paper ( Empty spot)
2. New ShortCut
3.Copy and Past
4. C:\Windows\System32\cleanmgr.exe

Now lets get creative.
If you open the Folder ( Click Start> My Computer" Computer for Vista an 7" Then double Click the drive with your Operating System ( C:\ normally) then scroll down to Windows then open it then scroll down to System32
C:\Windows\System32
you will see a few Applications, These are some of the applications you can use to make shortcuts, What ever you do , Don't Delete them
On any of them you can Double Click it and it will open the program related to it, If it does not open then it is a Command lind program, Meaning another program Needed to run it it short term
If it does open then if you like what it is you can Right click it and scroll down to Make a shortCut
it will make the shortCut in the same folder then you can drag and drop it to the desktop
To see a video Visit our YouTune channel
http:\\youtube.com/md4urpc
Here is a list of some of the ones that will Run Just copy and past these into the New shortCut
C:\Windows\System32\Netplwiz.exe ( all )


charmap ( shows you all the Characters )
lpksetup

calc ( Calculator )
cmd ( Command Line )
UAC ( User Account Control ) Vista win 7
C:\Windows\System32\CompMgmtLauncher.exe ( Computer Management Launcher )
taskmgr ( Task Manager )
SoundRecorder ( record sound from a mic to your PC )
perfmon ( Performance Monitor ) Vista and 7
psr ( Problem Steps Recorder ) Windows 7 only
osk ( On screen KeyBoard )
Magnify ( Magnifys the Screen )
OptionalFeatures ( Lets you see other options you may have not installed on your PC)
MdSched ( Windows Memory Diagnostics )

Well Enjoy.
To see a short Video Click HERE
Wednesday, June 9, 2010
How To Revert Back To XP Or Vista From Windows 7.
If the computer has the Windows.old folder - Reverting Windows 7 back to a previous Windows system:
http://support.microsoft.com/default.aspx/kb/971760
Windows.old on your C: drive - Usually, but not always, after installing Windows 7 you will have a Windows.old folder on your C: drive that contains data from the previous Windows installation. Open Windows Explorer and under "Computer" click on the C: drive - if the Windows.old folder is there you should be able to revert back to XP/Vista.
If it's not there, make sure you can see the Windows.old folder:
1. Click Start, type: hidden
2. Click "Show hidden files and folders"
3. Click to select "Show hidden files and folders"
4. Uncheck the next three items:
Hide empty drives
Hide extensions from known file types
Hide protected operating system files
5. Click OK and look for the folder
(Note: after you are done go back and recheck "Hide protected operating system files." If you want to change the other settings back do so.)
If there is no Windows.old folder:
If you have a restore partition (check your manual) you can use that, or if you have XP/Vista disks you can use those. If you don't have either and Windows came installed on your computer contact the OEM computer manufacturer and ask them to send you an install disk - they may or may not do it. If they agree to send you one they may charge a small fee.
___
STEP 1 – Locate Windows folder
The first step is to open the Windows 7 drive and locate the Windows.old folder in the drive. This is essential to change from Windows 7 to Vista and without it, this process would not be possible. Now you need to ensure that ample free space is available in the Windows 7 drive as all contents of Windows 7 is moved to a folder and the Vista contents from the Windows.old folder is copied.
STEP 2 – Reboot your PC
Now it is time to insert the Windows 7 installation disk in the DVD drive. Once this is done, reboot your PC. When the first screen shows up select your language, time and currency format and keyboard input method and click the ‘Next’ button.
Step 3 – Launching Windows7
Now the Install Windows window appears. Simply click on the ‘Repair your computer’ option to launch System Recovery Options dialog-box. You now need to select your Window 7 OS and click the ‘Next’ button again. Now you click on ‘Command Prompt’ to launch it.
STEP 4 – Move Windows 7 folders
In the next step, you will type the following commands in a serial manner and hit ‘Enter’ after typing each one of them. This action moves all the contents of Windows 7 to a new folder.
C:
Md Win7
Move Windows Win7\Windows
Move “Program Files” “Win7\Program Files”
Move Users Win7\Users
Attrib –h –s –r ProgramData
Move ProgramData Win7\ProgramData
Rd “Documents and Settings”
Step 5 – Copy Windows Vista files
Again the same process is repeated with a different set of commands that are given below and this ensures that the contents from Windows.old folder are copied to the drive.
move /y c:\Windows.old\Windows c:\
move /y “c:\Windows.old\Program Files” c:\
move /y c:\Windows.old\ProgramData c:\
move /y c:\Windows.old\Users c:\
move /y “c:\Windows.old\Documents and Settings” c:\
STEP 6 – Restore the Boot Sector
You have to restore the boot sector of your Vista OS by giving the following command.
D:\boot\bootsect /nt60 c:
Finally type ‘Exit’ to reboot your PC
http://support.microsoft.com/default.aspx/kb/971760
Windows.old on your C: drive - Usually, but not always, after installing Windows 7 you will have a Windows.old folder on your C: drive that contains data from the previous Windows installation. Open Windows Explorer and under "Computer" click on the C: drive - if the Windows.old folder is there you should be able to revert back to XP/Vista.
If it's not there, make sure you can see the Windows.old folder:
1. Click Start, type: hidden
2. Click "Show hidden files and folders"
3. Click to select "Show hidden files and folders"
4. Uncheck the next three items:
Hide empty drives
Hide extensions from known file types
Hide protected operating system files
5. Click OK and look for the folder
(Note: after you are done go back and recheck "Hide protected operating system files." If you want to change the other settings back do so.)
If there is no Windows.old folder:
If you have a restore partition (check your manual) you can use that, or if you have XP/Vista disks you can use those. If you don't have either and Windows came installed on your computer contact the OEM computer manufacturer and ask them to send you an install disk - they may or may not do it. If they agree to send you one they may charge a small fee.
___
STEP 1 – Locate Windows folder
The first step is to open the Windows 7 drive and locate the Windows.old folder in the drive. This is essential to change from Windows 7 to Vista and without it, this process would not be possible. Now you need to ensure that ample free space is available in the Windows 7 drive as all contents of Windows 7 is moved to a folder and the Vista contents from the Windows.old folder is copied.
STEP 2 – Reboot your PC
Now it is time to insert the Windows 7 installation disk in the DVD drive. Once this is done, reboot your PC. When the first screen shows up select your language, time and currency format and keyboard input method and click the ‘Next’ button.
Step 3 – Launching Windows7
Now the Install Windows window appears. Simply click on the ‘Repair your computer’ option to launch System Recovery Options dialog-box. You now need to select your Window 7 OS and click the ‘Next’ button again. Now you click on ‘Command Prompt’ to launch it.
STEP 4 – Move Windows 7 folders
In the next step, you will type the following commands in a serial manner and hit ‘Enter’ after typing each one of them. This action moves all the contents of Windows 7 to a new folder.
C:
Md Win7
Move Windows Win7\Windows
Move “Program Files” “Win7\Program Files”
Move Users Win7\Users
Attrib –h –s –r ProgramData
Move ProgramData Win7\ProgramData
Rd “Documents and Settings”
Step 5 – Copy Windows Vista files
Again the same process is repeated with a different set of commands that are given below and this ensures that the contents from Windows.old folder are copied to the drive.
move /y c:\Windows.old\Windows c:\
move /y “c:\Windows.old\Program Files” c:\
move /y c:\Windows.old\ProgramData c:\
move /y c:\Windows.old\Users c:\
move /y “c:\Windows.old\Documents and Settings” c:\
STEP 6 – Restore the Boot Sector
You have to restore the boot sector of your Vista OS by giving the following command.
D:\boot\bootsect /nt60 c:
Finally type ‘Exit’ to reboot your PC
Monday, June 7, 2010
Services ! Speeding up your PC
There are system services that you can disable to free up the system's load. To access the interface that permits you to make changes to system's services, type services.msc and the command prompt.
This is a list of services that are *usually* useless and can be safely disabled.
Application Layer Gateway Service,
Background Intelligent Transfer
Clipbook
Distributed Link Tracking Client
Distributed Transaction Coordinater
Error Reporting Service
Fast User Switching Compatibility
IMAPI CD-Burning
Indexing Service
IPSEC Services
Messenger
Net Logon
Net Meeting
Remote Desktop Sharing
Network DDE
Network DDE DSDM
Portable Media Serial Number
Remote Desktop Help Session Manager
Remote Registry
Secondary Logon
Smartcard
SSDP Discovery Service
Uninterruptible Power Supply
Universal Plug and Play Device Host
Upload Manager
Webclient
Wireless Zero Configuration (If you have Wirelss Internet LEAVE this on)
WMI Performance Adaptor
Read all of the descriptions on each service to determine if you need it or not, Most things you will not if on
a desktop. Do one at a time and make sure your PC does not start acting funny or things not working properly before ending the Service's session.


This is a list of services that are *usually* useless and can be safely disabled.
Alerter
Application Management
Automatic Updates
Background Intelligent Transfer
Clipbook
Distributed Link Tracking Client
Distributed Transaction Coordinater
Error Reporting Service
Fast User Switching Compatibility
IMAPI CD-Burning
Indexing Service
IPSEC Services
Messenger
Net Logon
Net Meeting
Remote Desktop Sharing
Network DDE
Network DDE DSDM
Portable Media Serial Number
Remote Desktop Help Session Manager
Remote Registry
Secondary Logon
Smartcard
SSDP Discovery Service
Uninterruptible Power Supply
Universal Plug and Play Device Host
Upload Manager
Webclient
Wireless Zero Configuration (If you have Wirelss Internet LEAVE this on)
WMI Performance Adaptor
Read all of the descriptions on each service to determine if you need it or not, Most things you will not if on
a desktop. Do one at a time and make sure your PC does not start acting funny or things not working properly before ending the Service's session.
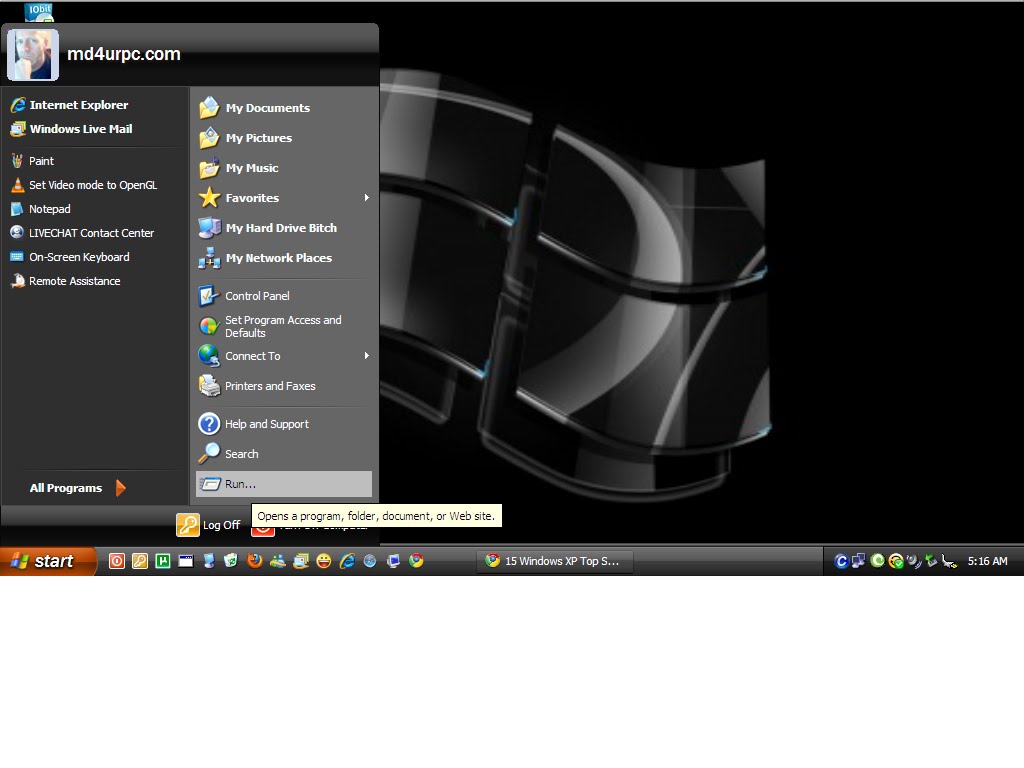
1. Click Start
2. Click RUN

Once you click on Run the Above Box should open, TYPE in the Box
services.msc then hit ENTER

Then the above Window will open, Then scroll down to the above list to any single one, And double click on it. It will open another small window, With a drop down window for Automatic, Disable, Stop, start, manual.
On most you can put to manual, The ones you know your not going to use you can select Disable or stop.
Remember to read what it is before stopping it.
you can Email us with any questions
Windows 7 and Vista
1. click Start
2. in the seach window type in services.msc
3. Foloow the above directions.
Sunday, May 23, 2010
Phone Services
Their is alot to chose from. Just type in Voip in goole and you get a long list of Phone services, But how and who to chose ?
Well in this Blog i have a couple that I like and is user friendly
My Number one pick is Tuktomi .
Why ?
1. It just works great on my PC. and laptop.
2. Can foreward my calls to Any cell phone while in a converstion.
3. I can screen my callers an not even answer the phone.
4. Can have a Local Number and a Toll Free number.
Go mobile by adding a 2nd number with voice mail to your cell phone - business and personal numbers on one phone.
Save money with unlimited calls throughout the U.S. and Canada. Traveling internationally? Use toktumi to call numbers back home for free.
And another Good one for local an toll free Numbers is Evoice
I like this one as well , About the same thing , But you do not get the software for your PC
But you do get 6 months free.
Our professional, full-featured voicemail system allows you to receive messages by phone, email—even transcribed text. ( I like the Text part.) Both of these services are Good and both Give you Email alerts when you get a voicemail.
Tuktomi also Gives you a program that runs on your PC/laptop you can answer calls with, and Check Voice mail. Foreward calls to another phone or decline a call. You can set up Business hours and have calls sent to Voice mail or to another Phone Lan line or cell phone Anywhere in the US or Canada
Try it today nothing to lose an no more searching for the perfect phone service,
Well in this Blog i have a couple that I like and is user friendly
My Number one pick is Tuktomi .
Why ?
1. It just works great on my PC. and laptop.
2. Can foreward my calls to Any cell phone while in a converstion.
3. I can screen my callers an not even answer the phone.
4. Can have a Local Number and a Toll Free number.
Go mobile by adding a 2nd number with voice mail to your cell phone - business and personal numbers on one phone.
Save money with unlimited calls throughout the U.S. and Canada. Traveling internationally? Use toktumi to call numbers back home for free.
And another Good one for local an toll free Numbers is Evoice
I like this one as well , About the same thing , But you do not get the software for your PC
But you do get 6 months free.
Our professional, full-featured voicemail system allows you to receive messages by phone, email—even transcribed text. ( I like the Text part.) Both of these services are Good and both Give you Email alerts when you get a voicemail.
Tuktomi also Gives you a program that runs on your PC/laptop you can answer calls with, and Check Voice mail. Foreward calls to another phone or decline a call. You can set up Business hours and have calls sent to Voice mail or to another Phone Lan line or cell phone Anywhere in the US or Canada
Try it today nothing to lose an no more searching for the perfect phone service,
Monday, May 17, 2010
Online Banking Are You safe ?
When you access your bank account online you probably don't think that at that exact moment there may be a hacker, somewhere in the world, trying to steal your bank information and your money.
• Beware the Risks of Joint Bank Accounts
• A Cheat Sheet on Tipping Do's and Don'ts
• Learn Grocery Pricing Secrets and Save
Your bank offers secure online banking, so why should you worry, right?
Despite banks' efforts to protect accounts from the online crooks, hacker attacks remain a serious threat that cost Americans millions of dollars each year. The Internet Crime Complaint Center reported that Americans lost about $559 million to Internet thieves in 2009. That is more than twice the 2008 figure, when $268 million was stolen on the Internet, according to the center.
"Last year there were more online bank robberies than there were actual on-site bank robberies," says Sean Sullivan, a security adviser at F-Secure, an Internet security firm. "Banks have become very proactive in protecting accounts from hackers, but it's still quite a large problem. We see all types of new attempts every day."
--------------------------------------------------------------------------------
Biggest Threat
Banking Trojans -- malicious code specifically designed for banking fraud -- are one of the biggest threats to consumers who bank online, Sullivan says. They are invisible and can steal multiple types of data, including passwords. Some more advanced types of Trojans can make fraudulent transfers and drain your account while you are logged on to the account online, he says.
Is Your Bank Safe?
The more questions and passwords you are asked to enter in order to log in to your account, the safer is your bank's website.
If your bank only asks you to enter a username and password to log in its website is not as secure as it should be, Sullivan says.
Some banks require customers to create a username, a site key name and use personalized pictures or symbols that appear during the login process. In addition, banks should ask customers to answer a security question before gaining access to their account.
"The more layers you have before you get to your account, the safer you are," Sullivan says.
Who's Liable?
In the event you become a victim of online theft, act quickly and know your rights. The general rule for consumer checking and savings accounts is the bank is liable for most of the damage, as long as you report the illicit transfer in a timely manner. But if you have a line of credit account or a business account, you need to be extra careful, because the bank will not always be obligated to pay for your loss.
"It is based on whether the customer's conduct with respect to security was reasonable," he says. In that case the court will ultimately determine who was more at fault for the breach -- the bank or the consumer.
Business Accounts
Business accounts are the most vulnerable to hacker attacks and the least protected by the law. Hackers are much more inclined to break into a six-figure business account than a consumer account with a few thousand dollars, Sullivan says.
"There are hundreds of cases of thefts of money from small business deposit accounts each year," Johnson says.
Business accounts are regulated by the Uniform Commercial Code, or UCC, which requires banks to maintain "commercial reasonable authentication security procedures," in any kind of wire transfer, he says.
"If the bank can show the breach was caused by something the customer did the bank is not liable," Johnson says.
California attorney Nada Alnajafi says most small businesses don't understand the risk they are taking when they use wire-transfer accounts.
"I don't think a lot of them understand they are taking almost full risk for any potential issues," she says.
She is representing a small Los Angeles business owner who lost $50,000 after a hacker committed a fraudulent transfer from his Bank of America account to a Croatian Bank. She filed a lawsuit on behalf of her client against Bank of America in February because the bank refused to take responsibility for the theft, she says.
Bank of America claims it is not liable for the illicit transfer. The lawsuit is pending.
How to Help Protect Your Account
• Don't access your account from a shared computer.
• Be certain your computer has anti-virus, firewall and anti-spyware programs, including security software with automatic updates.
• If you are using wireless service, check the settings on your computer to make sure the connection is encrypted. Don't connect to your account using a public network, like the ones you find at a coffee shop or at the airport.
• Review your statements regularly and carefully, and report any suspicious activity to your bank immediately.
• Use a strong password with letters and numbers combined. Don't use the same password for multiple accounts.
• Log out after every session.
• Beware the Risks of Joint Bank Accounts
• A Cheat Sheet on Tipping Do's and Don'ts
• Learn Grocery Pricing Secrets and Save
Your bank offers secure online banking, so why should you worry, right?
Despite banks' efforts to protect accounts from the online crooks, hacker attacks remain a serious threat that cost Americans millions of dollars each year. The Internet Crime Complaint Center reported that Americans lost about $559 million to Internet thieves in 2009. That is more than twice the 2008 figure, when $268 million was stolen on the Internet, according to the center.
"Last year there were more online bank robberies than there were actual on-site bank robberies," says Sean Sullivan, a security adviser at F-Secure, an Internet security firm. "Banks have become very proactive in protecting accounts from hackers, but it's still quite a large problem. We see all types of new attempts every day."
--------------------------------------------------------------------------------
Biggest Threat
Banking Trojans -- malicious code specifically designed for banking fraud -- are one of the biggest threats to consumers who bank online, Sullivan says. They are invisible and can steal multiple types of data, including passwords. Some more advanced types of Trojans can make fraudulent transfers and drain your account while you are logged on to the account online, he says.
Is Your Bank Safe?
The more questions and passwords you are asked to enter in order to log in to your account, the safer is your bank's website.
If your bank only asks you to enter a username and password to log in its website is not as secure as it should be, Sullivan says.
Some banks require customers to create a username, a site key name and use personalized pictures or symbols that appear during the login process. In addition, banks should ask customers to answer a security question before gaining access to their account.
"The more layers you have before you get to your account, the safer you are," Sullivan says.
Who's Liable?
In the event you become a victim of online theft, act quickly and know your rights. The general rule for consumer checking and savings accounts is the bank is liable for most of the damage, as long as you report the illicit transfer in a timely manner. But if you have a line of credit account or a business account, you need to be extra careful, because the bank will not always be obligated to pay for your loss.
"It is based on whether the customer's conduct with respect to security was reasonable," he says. In that case the court will ultimately determine who was more at fault for the breach -- the bank or the consumer.
Business Accounts
Business accounts are the most vulnerable to hacker attacks and the least protected by the law. Hackers are much more inclined to break into a six-figure business account than a consumer account with a few thousand dollars, Sullivan says.
"There are hundreds of cases of thefts of money from small business deposit accounts each year," Johnson says.
Business accounts are regulated by the Uniform Commercial Code, or UCC, which requires banks to maintain "commercial reasonable authentication security procedures," in any kind of wire transfer, he says.
"If the bank can show the breach was caused by something the customer did the bank is not liable," Johnson says.
California attorney Nada Alnajafi says most small businesses don't understand the risk they are taking when they use wire-transfer accounts.
"I don't think a lot of them understand they are taking almost full risk for any potential issues," she says.
She is representing a small Los Angeles business owner who lost $50,000 after a hacker committed a fraudulent transfer from his Bank of America account to a Croatian Bank. She filed a lawsuit on behalf of her client against Bank of America in February because the bank refused to take responsibility for the theft, she says.
Bank of America claims it is not liable for the illicit transfer. The lawsuit is pending.
How to Help Protect Your Account
• Don't access your account from a shared computer.
• Be certain your computer has anti-virus, firewall and anti-spyware programs, including security software with automatic updates.
• If you are using wireless service, check the settings on your computer to make sure the connection is encrypted. Don't connect to your account using a public network, like the ones you find at a coffee shop or at the airport.
• Review your statements regularly and carefully, and report any suspicious activity to your bank immediately.
• Use a strong password with letters and numbers combined. Don't use the same password for multiple accounts.
• Log out after every session.
Saturday, May 1, 2010
Activate the administrator account
This Video will show you how to get to the User Account and also how to Active your Administrator account within windows.
I mean how many times have you tryed to make an account withe name ADMINISTRATOR ?
In this short Video I will show you how to do it.
Net user administrator active:/yes
You can Also see the Video and others at on my youtube Channel
By clicking HERE
Or at the Bottom left of this Blog you can Click on the youtube ICON and my videos pop up, Select the one you want to see.
Also make them Full screen Much Better Viewing.
Friday, April 30, 2010
Add AeroSnap to XP, Vista FREE
If you have Seen Window7, Then you know About the AeroSnap.
This is where you can Snap the Explorer and/or IE window to one side or the other to make it Tile, Or from top to bottom.
Now you can have the same thing on windows Vista or XP.
Free
What is AeroSnap?
AeroSnap is a simple but powerful application that allows you to resize, arrange or maximize your desktop windows with just drag'n'drop.
Simple drag a window to a side of your desktop to snap it or drag it to the top to maximize.
It also works with multiple monitors!
Click HERE to get it today.
This is where you can Snap the Explorer and/or IE window to one side or the other to make it Tile, Or from top to bottom.
Now you can have the same thing on windows Vista or XP.
Free
What is AeroSnap?
AeroSnap is a simple but powerful application that allows you to resize, arrange or maximize your desktop windows with just drag'n'drop.
Simple drag a window to a side of your desktop to snap it or drag it to the top to maximize.
It also works with multiple monitors!
Click HERE to get it today.
Wednesday, April 28, 2010
Microsoft Security Essentials 1.0
Microsoft Security Essentials 1.0 Part One: A detailed look at UI.
For years Microsoft has been releasing different iterations of their Windows OS and people have been using it pleasantly. But none of the OS till the date, even Windows 7 latest in Windows Family, don’t have any anti-virus solution built directly inside them. Though Microsoft made Windows Defender, which comes integrated in Windows Vista and Windows 7 and freely available for Windows XP was a merely a anti-spyware solution that was not strong too. So users had to rely on 3rd party anti-virus solutions for years. It seems Microsoft has finally heard the critics and users feedbacks. Now they have come with their own anti-virus solution for Windows, christened as Microsoft Security Essentials. Yeah, there was another solution was available for Windows known as Windows Live OneCare from Microsoft, but it was subscription based service and users would have to buy it. This was disappointing given the fact users had already paid enough for Windows license and it’s MSs responsibility to provide users with anti-virus solution for their OS since Windows Operating Systems are favorite among hackers too. But MS-SE (Microsoft Security Essentials) is totally free for Windows users given that they are running genuine copies of Windows OS. That doesn’t mean user of pirated copies can buy it.

The home screen of MS-SE isn’t much to talk about. It’s very simple but not exciting and intuitive as I was expecting it to be. On top of this screen, you can see computer status. It turns red if your computer has un-attended infected item or update is not latest, otherwise it’ll be green. Just below that you’ll find status of real time protection and virus definition. On right side you can get three scan options Quick, Full and Custom. If you’re expecting ‘Custom’ scan to be really custom scan then you’ll be disappointed. ‘Custom’ scan doesn’t have any option to select ‘Scan Intensity’ or any other special ‘action’ for RAR files. It just have list of locations to scan as you can see in screenshot below. And on the bottom you’ll see scan details like schedule of scan and when last scan was performed.


MS-SE History click to see Image
The History tab in MS-SE is same as ‘Quarantine Items’ page found in other anti-virus solutions. As usual you can see list of detected infected items/files. Here you get three views for your convenience. You can choose to see all detected items, quarantined and allowed, in one list or you can see them in individual lists. Allowed items are those which are detected as malware or PUPS (potentially unwanted programs). Sometimes anti-virus detects harmless items as malware. So if user trusts those items and allows them to stay on computer then such items will be displayed in detected items list.
In my honest opinion, in any anti-virus ‘Settings’ page is the most interesting thing rather it must be. But as with rest of the UI even this part of the MS-SE continues to disappoint.
MS-SE Settings click to see image
Under ‘Settings’ tab you’ll find another eight pages starting with schedule page. Schedule page as the name suggests you’ll get option to schedule computer scan. You can enable or disable schedule scan. Other options are date, time, type of scan like quick scan, when it should run on your computer like when your computer is idle.
MS-SE Settings – Default Actions click to see Image
Next page is ‘Default Actions’ page. Here you get to choose action for detected items at different intensity levels. You get four actions to choose from for all levels except for ‘Severe’ and ‘High’ level alert where you don’t get ‘Allow’ option.
MS-SE Real Time Protection Click to see Image
‘Real Time Protection’ page has very little to offer. An option to turn on or off Real time protection, whether or not MS-SE monitor file and programs on your PC, and option to keep eye on file downloads.
MS-SE Exclusions Lists
Next three pages under ‘Settings’ tab are almost similar except that they are used to exclude different kind of items. First is to exclude specific files and locations, second is to exclude specific file types and third is to exclude specific processes.
MS-SE Settings – Advanced
‘Advanced’ page, but even there I didn’t find ant ‘wow’ thing. I was expecting some really advanced settings here but was disappointed again. It has option to include compressed files in scan. USB drives and other removable media to be included in full scan, option to create restore point. The last option when unchecked, limits the view of history page for non-admin accounts on system.
MS-SE Settings-Microsoft SpyNet
On this page you get two options, Basic membership and Advanced membership. When I first saw these options I thought Microsoft has paid version too. But when I read the description it turned out to be something different and unexpected. Even at early stage this anti-virus system has facility to send suspected files to Microsoft automatically. This was something which I had seen in some other mature anti-virus systems like ESET NOD32. Beware this can sometimes send personal information to MS, mostly unintentionally (that’s what MS says, unintentionally!). There’s no way you can disable this.
To Download This Free program Click HERE
http://www.microsoft.com/security_essentials/
For years Microsoft has been releasing different iterations of their Windows OS and people have been using it pleasantly. But none of the OS till the date, even Windows 7 latest in Windows Family, don’t have any anti-virus solution built directly inside them. Though Microsoft made Windows Defender, which comes integrated in Windows Vista and Windows 7 and freely available for Windows XP was a merely a anti-spyware solution that was not strong too. So users had to rely on 3rd party anti-virus solutions for years. It seems Microsoft has finally heard the critics and users feedbacks. Now they have come with their own anti-virus solution for Windows, christened as Microsoft Security Essentials. Yeah, there was another solution was available for Windows known as Windows Live OneCare from Microsoft, but it was subscription based service and users would have to buy it. This was disappointing given the fact users had already paid enough for Windows license and it’s MSs responsibility to provide users with anti-virus solution for their OS since Windows Operating Systems are favorite among hackers too. But MS-SE (Microsoft Security Essentials) is totally free for Windows users given that they are running genuine copies of Windows OS. That doesn’t mean user of pirated copies can buy it.

(Click to Enlarge)
The home screen of MS-SE isn’t much to talk about. It’s very simple but not exciting and intuitive as I was expecting it to be. On top of this screen, you can see computer status. It turns red if your computer has un-attended infected item or update is not latest, otherwise it’ll be green. Just below that you’ll find status of real time protection and virus definition. On right side you can get three scan options Quick, Full and Custom. If you’re expecting ‘Custom’ scan to be really custom scan then you’ll be disappointed. ‘Custom’ scan doesn’t have any option to select ‘Scan Intensity’ or any other special ‘action’ for RAR files. It just have list of locations to scan as you can see in screenshot below. And on the bottom you’ll see scan details like schedule of scan and when last scan was performed.

Next tab in the UI is ‘Update’ tab.

As in every antivirus solution you will definition download date and time, definition version of both virus and spyware definition. Later is not usually seen in others softwares. And one usual thing you’ll get is button to update definitions. So here ends this second tab.
MS-SE History click to see Image
The History tab in MS-SE is same as ‘Quarantine Items’ page found in other anti-virus solutions. As usual you can see list of detected infected items/files. Here you get three views for your convenience. You can choose to see all detected items, quarantined and allowed, in one list or you can see them in individual lists. Allowed items are those which are detected as malware or PUPS (potentially unwanted programs). Sometimes anti-virus detects harmless items as malware. So if user trusts those items and allows them to stay on computer then such items will be displayed in detected items list.
In my honest opinion, in any anti-virus ‘Settings’ page is the most interesting thing rather it must be. But as with rest of the UI even this part of the MS-SE continues to disappoint.
MS-SE Settings click to see image
Under ‘Settings’ tab you’ll find another eight pages starting with schedule page. Schedule page as the name suggests you’ll get option to schedule computer scan. You can enable or disable schedule scan. Other options are date, time, type of scan like quick scan, when it should run on your computer like when your computer is idle.
MS-SE Settings – Default Actions click to see Image
Next page is ‘Default Actions’ page. Here you get to choose action for detected items at different intensity levels. You get four actions to choose from for all levels except for ‘Severe’ and ‘High’ level alert where you don’t get ‘Allow’ option.
MS-SE Real Time Protection Click to see Image
‘Real Time Protection’ page has very little to offer. An option to turn on or off Real time protection, whether or not MS-SE monitor file and programs on your PC, and option to keep eye on file downloads.
MS-SE Exclusions Lists
Next three pages under ‘Settings’ tab are almost similar except that they are used to exclude different kind of items. First is to exclude specific files and locations, second is to exclude specific file types and third is to exclude specific processes.
MS-SE Settings – Advanced
‘Advanced’ page, but even there I didn’t find ant ‘wow’ thing. I was expecting some really advanced settings here but was disappointed again. It has option to include compressed files in scan. USB drives and other removable media to be included in full scan, option to create restore point. The last option when unchecked, limits the view of history page for non-admin accounts on system.
MS-SE Settings-Microsoft SpyNet
On this page you get two options, Basic membership and Advanced membership. When I first saw these options I thought Microsoft has paid version too. But when I read the description it turned out to be something different and unexpected. Even at early stage this anti-virus system has facility to send suspected files to Microsoft automatically. This was something which I had seen in some other mature anti-virus systems like ESET NOD32. Beware this can sometimes send personal information to MS, mostly unintentionally (that’s what MS says, unintentionally!). There’s no way you can disable this.
To Download This Free program Click HERE
http://www.microsoft.com/security_essentials/
Make FireFox Even Faster
Tricks To Tweak Firefox
Everybody’s favorite open-source browser, Firefox, is great right out of the box. And by adding some of the awesome extensions available out there, the browser just gets better and better.
But look under the hood, and there are a bunch of hidden (and some not-so-secret) tips and tricks available that will crank Firefox up and pimp your browser. Make it faster, cooler, more efficient. Get to be a Jedi master with the following cool Firefox tricks.
1) More screen space. Make your icons small. Go to View - Toolbars - Customize and check the “Use small icons” box
2) Smart keywords. If there’s a search you use a lot (let’s say IMDB.com’s people search), this is an awesome tool that not many people use. Right-click on the search box, select “Add a Keyword for this search”, give the keyword a name and an easy-to-type and easy-to-remember shortcut name (let’s say “actor”) and save it. Now, when you want to do an actor search, go to Firefox’s address bar, type “actor” and the name of the actor and press return. Instant search! You can do this with any search box.
3) Keyboard shortcuts
This is where you become a real Jedi. It just takes a little while to learn these, but once you do, your browsing will be super fast. Here are some of the most common (and my personal favs):
* Spacebar (page down)
* Shift-Spacebar (page up)
* Ctrl+F (find)
* Alt-N (find next)
* Ctrl+D (bookmark page)
* Ctrl+T (new tab)
* Ctrl+K (go to search box)
* Ctrl+L (go to address bar)
* Ctrl+= (increase text size)
* Ctrl+- (decrease text size)
* Ctrl-W (close tab)
* F5 (reload)
* Alt-Home (go to home page)
4) Auto-complete
This is another keyboard shortcut, but it’s not commonly known and very useful. Go to the address bar (Control-L) and type the name of the site without the “www” or the “.com”. Let’s say “google”. Then press Control-Enter, and it will automatically fill in the “www” and the “.com” and take you there - like magic! For .net addresses, press Shift-Enter, and for .org addresses, press Control-Shift-Enter.
5) Tab navigation.
Instead of using the mouse to select different tabs that you have open, use the keyboard. Here are the shortcuts:
* Ctrl+Tab (rotate forward among tabs)
* Ctrl+Shft+Tab (rotate to the previous tab)
* Ctrl+1-9 (choose a number to jump to a specific tab)
6) Mouse shortcuts.
Sometimes you’re already using your mouse and it’s easier to use a mouse shortcut than to go back to the keyboard. Master these cool ones:
* Middle click on link (opens in new tab)
* Shift-scroll down (previous page)
* Shift-scroll up (next page)
* Ctrl-scroll up (decrease text size)
* Ctrl-scroll down (increase text size)
* Middle click on a tab (closes tab)
7) Delete items from address bar history.
Firefox’s ability to automatically show previous URLs you’ve visited, as you type, in the address bar’s drop-down history menu is very cool. But sometimes you just don’t want those URLs to show up (I won’t ask why). Go to the address bar (Ctrl-L), start typing an address, and the drop-down menu will appear with the URLs of pages you’ve visited with those letters in them. Use the down-arrow to go down to an address you want to delete, and press the Delete key to make it disappear.
1. About:config - fetch only the content you view Firefox 2.0 and later likes to prepare itself for the next link you may click; to make clicked links load fast, it pre-loads content from pages which are linked to the page you’re currently viewing. Pre-fetching only occurs when the browser is idle, so it shouldn’t affect your bandwidth. Bear in mind that the makers of browser extension Fasterfox seem to think pre-fetching speeds things up. If you find this pointless and/or creepy, you can turn it off.-In about:config, pull up network.prefetch-next.
-The default value is true. Right click and toggle it to false. Restart Firefox and enjoy.
2. About:config - limit memory usage On both Macs and PCs, our favorite browser can be quite the RAM hog. Tame the beast with browser.cache.memory.capacity. This preference must be added to your list; it won’t appear by default.
-First, check your memory usage with about:cache?device=memory in the URL bar. The window will display your current settings and the current cache contents. In the settings below, Firefox’s current maximum storage size is 1 percent of the RAM capacity of the computer.
Type about:config in the address bar, Then look for the following entries, and make the corresponding changes.
1.network.http.max-connections = 64
2.network.http.max-connections-per-server =32
3.network.http.max-persistent-connections-per-proxy =16
4.network.http.max-persistent-connections-per-server = 10
5.network.http.pipelining = true
6.network.http.pipelining.maxrequests = 200
7.network.http.proxy.pipelining = true
8.network.http.proxy.version = 1.0
9.network.http.request.max-start-delay = 0
Lastly right-click anywhere and select New- Integer. Name it nglayout.initialpaint.delay and set its value to 0. This value is the amount of time the browser waits before it acts on information it recieves.
Move or remove the close tab button.
Do you accidentally click on the close button of Firefox’s tabs? You can move them or remove them, again through about:config. Edit the preference for “browser.tabs.closeButtons”. Here are the meanings of each value:
* 0: Display a close button on the active tab only
* 1:(Default) Display close buttons on all tabs
* 2:Don’t display any close buttons
* 3:Display a single close button at the end of the tab bar (Firefox 1.x behavior)
Lastly right-click anywhere and select New- Integer. Name it nglayout.initialpaint.delay and set its value to 0. This value is the amount of time the browser waits before it acts on information it recieves.
Friday, April 23, 2010
Play Your Media on Any Device
There are so many different file formats available, and each song or video always seems to be in a format that's not playable unless you jump through hoops and install new software and codecs each time. With a file conversion program, you can take a media file and make it playable on almost any device. That comes in very handy when you want to email videos or songs you've made to your friends, but they don't have the program that can play the format you saved it in.
With Convert Genius, you can just change it into a format everyone has, like Quicktime, and never have to worry about your friends not being able to see the wonderful two hours of family movies you just sent them. For me, that means I can take my Flip Video movies and play them back on my iPhone.
Convert Genius is an easy-to-use media conversion tool that allows us to handle a variety of media files, providing good quality results. The application stands out mainly for the wide number of formats supported. It is possible to convert among popular audio files like MP3, WAV, WMA, OGG and other formats, and also among the most widely used video file types, such as DiVX, WMV, MP4, MOV, 3GP and more. For each output format we can specify the video/audio encoder, audio and video bit rate, aspect ratio, and other advanced settings.
The application's interface has a quite sophisticated look, and is very intuitive; you simply have to select the files you want to convert, choose the output format, and click a button to start the conversion. This process, depending on the size of the media file, is relatively fast, I can even say that it's faster than with other applications of the kind, and the results are of high quality. Besides, it is possible to convert a number of media files simultaneously with the batch conversion option. From the program's settings, you can also set other advanced features like adjusting thread options and log level.
Click HERE to get yours

With Convert Genius, you can just change it into a format everyone has, like Quicktime, and never have to worry about your friends not being able to see the wonderful two hours of family movies you just sent them. For me, that means I can take my Flip Video movies and play them back on my iPhone.
Convert Genius is an easy-to-use media conversion tool that allows us to handle a variety of media files, providing good quality results. The application stands out mainly for the wide number of formats supported. It is possible to convert among popular audio files like MP3, WAV, WMA, OGG and other formats, and also among the most widely used video file types, such as DiVX, WMV, MP4, MOV, 3GP and more. For each output format we can specify the video/audio encoder, audio and video bit rate, aspect ratio, and other advanced settings.
The application's interface has a quite sophisticated look, and is very intuitive; you simply have to select the files you want to convert, choose the output format, and click a button to start the conversion. This process, depending on the size of the media file, is relatively fast, I can even say that it's faster than with other applications of the kind, and the results are of high quality. Besides, it is possible to convert a number of media files simultaneously with the batch conversion option. From the program's settings, you can also set other advanced features like adjusting thread options and log level.
Click HERE to get yours

Subscribe to:
Posts (Atom)


