Search This Blog

GeoString

Showing posts with label Tips. Show all posts

Monday, August 30, 2010

Why won't my computer turn on or off quickly?

If your computer seems to shut down slowly (or not at all) or start up slowly, or if it doesn't enter power-saving modes, it's possible that a program or device driver is interfering with Windows power settings. You can use Performance Information and Tools to try to detect these programs or device drivers.


To check for performance issues

1.Click to open Performance Information and Tools.
Control Panel\All Control Panel Items\Performance Information and Tools


2. In the left pane, click Advanced tools.


3.In Advanced Tools, under Performance issues, click any issues that are listed.


4.Read the information in the dialog box that appears to learn which programs or drivers are causing problems.


If a program or driver prevents your computer from turning on quickly

You can try the following tasks to fix the problem:
Manage the programs that run at startup. Some programs start automatically when you start Windows. Too many of these programs opening at the same time can slow down your computer. To disable these programs from startup and improve performance, use Windows Defender. For more information, see Stop a program from running automatically when Windows starts.


Check with the manufacturer of the program or driver for an update. A newer version of the program might include a resolution to the problem.


If a program or driver prevents your computer from turning off quickly

You can try the following tasks to fix the problem:
Close the program before shutting down. It's possible that the problem occurs only if the program is running. Try closing the program before shutting down Windows, and then see if your computer turns off properly.
Check with the manufacturer of the program or driver for an update. A newer version of the program might include a resolution to the problem.


If these options don't solve the problem, then the program or driver might be incompatible with Windows. If you installed the program or device yourself and you no longer use it, consider removing the device, or uninstalling the program or driver.

In windows 7 you can also Generate a System health report.
This comes in handy to let you know how your PC is doing. If you do one you first get your PC and do one every few motnhs and then you can see how and if your computer is going to crash
you can find it here
Control Panel\All Control Panel Items\Performance Information and Tools\Advanced Tools
This will run for 60 seconds or longer depending on your system.
In most cases 60 secs is default.
You can check the warnings and follow the links with-in the warnings, Also you can check memory, hard drive and pretty much your whole Computer.
 
Good Luck
Thanks
MD4URPC.com

Sunday, August 29, 2010

10 tips to help you with windows 7

1.Minimise quickly with shake If you have multiple windows open on your desktop and things are getting too cluttered, it used to be a time-consuming process to close them all down. In Windows 7 you can use the Aero Shake feature to minimise everything in seconds, using a cool mouse gesture. Grab the title bar of the window you wish to keep open and give it a shake, and rejoice in a clear desktop area.


2. Configure your favourite music
The Windows 7 Media Centre now comes with an option to play your favourite music, which by default creates a changing list of songs based on your ratings, how often you play them, and when they were added (it's assumed you'll prefer songs you've added in the last 30 days). If this doesn't work then you can tweak how Media Centre decides what a "favourite" tune is- click Tasks > Settings > Music > Favourite Music and configure the program to suit your needs.

3. Customise System Restore
There was very little you could do to configure System Restore in Vista, but Windows 7 improves the situation with a couple of useful setup options.

Click the Start orb, right-click Computer and select Properties > System Protection > Configure, and set the Max Usage value to a size that suits your needs (larger to hold more restore points, smaller to save disk space).

And if you don't need System Restore to save Windows settings then choose the "Only restore previous versions of files" option. Windows 7 won't back up your Registry, which means you'll squeeze more restore points and file backups into the available disk space. System Restore is much less likely to get an unbootable PC working again, though, so use this trick at your own risk.

4. Run As
Hold down Shift, right-click any program shortcut, and you'll see an option to run the program as a different user, handy if you're logged in to the kids' limited account and need to run something with higher privileges. This isn't really a new feature - Windows XP had a Run As option that did the same thing - but Microsoft stripped it out of Vista, so it's good to see it's had a change of heart.

5. Search privacy
By default Windows 7 will remember your PC search queries, and display the most recent examples when searching in Windows Explorer. If you're sharing a PC and don't want everyone to see your searches, then launch GPEDIT.MSC, go to User Configuration > Administrative Templates > Windows Components > Windows Explorer, double-click "Turn off display of recent search entries..." and click Enabled > OK.

6. Tweak PC volume
By default Windows 7 will now automatically reduce the volume of your PC's sounds whenever it detects you're making or receiving PC-based phone calls. If this proves annoying (or maybe you'd like it to turn off other sounds altogether) then you can easily change the settings accordingly. Just right-click the speaker icon in your taskbar, select Sounds > Communications, and tell Windows what you'd like it to do.

7. Rearrange the system tray
With Windows 7 we finally see system tray icons behave in a similar way to everything else on the taskbar. So if you want to rearrange them, then go right ahead, just drag and drop them into the order you like. You can even move important icons outside of the tray, drop them onto the desktop, then put them back when you no longer need to keep an eye on them.

8. Extend your battery life
Windows 7 includes new power options that will help to improve your notebook's battery life. To see them, click Start, type Power Options and click the Power Options link, then click Change Plan Settings for your current plan and select Change Advanced Settings. Expand Multimedia Settings, for instance, and you'll see a new "playing video" setting that can be set to optimise power savings rather than performance. Browse through the other settings and ensure they're set up to suit your needs.

9. Write crash dump files
Windows 7 won't create memory.dmp crash files if you've less than 25GB of free hard drive space, annoying if you've installed the Windows debugging tools and want to diagnose your crashes. You can turn this feature off, though: browse to HKEY_LOCAL_MACHINE\SYSTEM\CurrentControlSet\Control\CrashControl, create a new DWORD value called AlwaysKeepMemoryDump, set it to 1, and the crash dump file will now always be saved.

10. Find bottlenecks
From what we've seen so far Windows 7 is already performing better than Vista, but if your PC seems sluggish then it's now much easier to uncover the bottleneck. Click Start, type RESMON and press Enter to launch the Resource Monitor, then click the CPU, Memory, Disk or Network tabs. Windows 7 will immediately show which processes are hogging the most system resources.


The CPU view is particularly useful, and provides something like a more powerful version of Task Manager. If a program has locked up, for example, then right-click its name in the list and select Analyze Process. Windows will then try to tell you why it's hanging - the program might be waiting for another process, perhaps - which could give you the information you need to fix the problem.

To have quik access to Resmon you can make a Desktop shortcut
1. Right click the desktop
2. click on NEW then create shortcut
3. Type in resmon
4. click ok

Monday, July 19, 2010

PAyPal Security Through EMAILS .Don't get scammed

Use this checklist to make sure your email came from
 PayPal:

 Check the greeting:
 We always address you by your first and last name, or by
 the business
 name on your PayPal account.

 Check the link before you click:
 Before you click a link in an email, hover your cursor over
 the link and
 check the web address. If the web address doesn't start
 with
 "https://www.paypal.com," don't click the link.( Try it here)

 Check for requests for your personal information:
 We?ll never use a PayPal email to ask you for any of the
 following:
 * Your bank account numbers
 * Your debit and credit card numbers
 * Your driver's license number
 * Your email addresses
 * Your full name

 Check for a shipping number request:
 Be on alert for emails that ask you to provide the shipping
 number
 before the buyer pays you.

 Check for attachments or software updates:
 We?ll never send an email with an attachment, or ask you to
 install
 software updates on your computer.

 If anything on this checklist matches your email, someone
 may be trying
 to "spoof" or "phish" your account. Spoofing and phishing
 are illegal
 attempts to steal your identity, passwords, or other
 personal or
 financial information. If you?ve already clicked on a link
 in the email
 and entered personal information, you should change your
 PayPal account
 password and security questions immediately.

 Just to be on the safe side, you should also review your
 most recent
 payment history for anything unusual or unauthorized. If
 anything on
 your account looks out of the ordinary, please let us know
 about it as
 soon as you can.

 Here?s how you can report an unauthorized transaction:

 1. Log into your PayPal account.
 2. Select "Resolution Center.?
 3. Click "Open a dispute."
 4. Select "Unauthorized transaction," and then click
 "Continue."
 5. Enter or select the transaction ID for the transaction
 you want to
 dispute, and then click "Continue."
 6. Complete the report for Unauthorized Use on a PayPal
 Account, and
 then click "Continue."
 7. Confirm that the claim is correct, and then click
 "Submit."

 To learn more about protecting your account, click
 "Security Center" on
 any PayPal webpage.


 PayPAls office
 Registered Office:
 5th Floor 22-24 Boulevard Royal L-2449, Luxembourg RCS
 Luxembourg B 118
 349.

Saturday, June 19, 2010

How to remove the Fake Windows Activation screen

This seems to be going around a lot more these days then a Fake Anti-virus program, Due to the Authenticity of the look and how convincing it really  looks.

Just a reminder
1. Microsoft will not ask for your Credit Card Ever while installing windows Any version.
2. Once you have activated your Windows You will never be asked to do it again.
3. Never Put you Credit card number or personal Information into a Window  from a pop up unless you have requested it and or have a direct Phone Number to call or contact someone.
4. The Windows Fake Activation Looks pretty real, And it's a Trojan, Ransom malware.
Notice The highlighted area, They Will charge you.


To make sure this is a fake 
1. It will ask you for a Credit card period !
Microsoft will not do this on the actual Activation, They give you a choice of calling them over the phone or going to their website.

Now how to remove it.

1.Reboot your computer into Safe Mode with Networking. To do this, turn your computer off and then back on and immediately when you see anything on the screen, start tapping the F8 key on your keyboard. Eventually you will be brought to a menu similar to the one below:


2. Using the arrow keys on your keyboard, select Safe Mode with Networking and press Enter on your keyboard. See Video on how to get into Safe Mode if you need more Help Click  HERE

3. By selecting with networking This should let you get on the Internet, So now you will need to Download Malwarebytes  Click HERE 

4. Once downloaded, close all programs and Windows on your computer.

5. Double-click on the icon on your desktop named mbam-setup.exe. This will start the installation of MBAM onto your computer.

6. Once the Install is Finished Malwarebytes will open automatically.
(make sure you have clicked on update when doing install if not you can update it NOW)

7. Once open you will see the options, Do a Full system Scan.

Note: This can take 5 min, or two hours Depending on how bad your system is infected and how fast it is.

8. When Malwarebytes has finished the scan you will get a pop up window telling you that it is complete. Click OK

9. Now you should see the results from the scan, As seen below


10. Click on Remove selected.

11. It will open a scan log in NotePad, You can save this log or Just close it all together.

12. Once Notepad is closed scan is finished you can close Malwarebytes and Reboot your Computer in Normal Mode.

13. Now back in to Normal mode and if things seem to be running fine, Open Malwarebytes again and do a Quick scan. Should take 5-10 min. if nothing is found you should be ok and no need for another reboot.

See our website for More great Offers and Video Tutorials.
Comments welcome

Sunday, June 13, 2010

System Shortcuts,

There are thousands of programs out their that you can get for free and or pay for, But did you know on you PC there are programs all ready on it.

Windows XP ( Vista and windows 7 Just type it in the Search window on the start button

1. Click Start
2. Click Run
3. Type in cleanmgr.exe
This cleans the Hard Drive the same way as if you were to Go to My computer and right click your C:\ drive and then to properties. Just a faster way of doing it.
To make a shortCut on your Desktop Just

1. Right click the Wall paper ( Empty spot)
2. New ShortCut
3.Copy and Past
4. C:\Windows\System32\cleanmgr.exe

Simple.

Now lets get creative.
If you open the Folder ( Click Start> My Computer" Computer for Vista an 7" Then double Click the drive with your Operating System  ( C:\  normally) then scroll down to Windows then open it then scroll down to System32

C:\Windows\System32
you will see a few Applications, These are some of the applications you can use to make shortcuts, What ever you do , Don't Delete them

On any of them you can Double Click it and it will open the program related to it, If it does not open then it is a Command lind program, Meaning another program Needed to run it it short term

If it does open then if you like what it is you can Right click it and scroll down to Make a shortCut
it will make the shortCut in the same folder then you can drag and drop it to the desktop
To see a video Visit our YouTune channel
http:\\youtube.com/md4urpc

Here is a list of some of the ones that will Run Just copy and past these into the New shortCut
C:\Windows\System32\Netplwiz.exe ( all )

C:\Windows\System32\resmon.exe  (Vista and win 7)

C:\Windows\System32\msconfig.exe (all)


charmap ( shows you all the Characters )

lpksetup

chkdsk ( check the Hard Drive for errors )

calc ( Calculator )

cmd ( Command Line )

UAC ( User Account Control ) Vista win 7

C:\Windows\System32\CompMgmtLauncher.exe  ( Computer Management Launcher )

taskmgr ( Task Manager )

SoundRecorder ( record sound from a mic to your PC )

perfmon ( Performance Monitor ) Vista and 7

psr ( Problem Steps Recorder ) Windows 7 only

osk ( On screen KeyBoard )

Magnify ( Magnifys the Screen )

OptionalFeatures ( Lets you see other options you may have not installed on your PC)

MdSched ( Windows Memory Diagnostics )


Well Enjoy.

To see a short Video Click HERE

Tuesday, May 11, 2010

Start here to set up a network in Windows 7

There are six steps in the process of setting up a home or small office network. Each step is listed below along with links to detailed information about that step. For an overview of the process, see Setting up a wireless network.


1. Plan your network

Decide what type of network you want. We recommend using a wireless network so that you have the option of using wired or wireless connections. Wireless connections give you the most mobility since they use radio waves to send information between computers. For more information, see What you need to set up a home network.


2. Get the necessary hardware and an (optional) ISP

At a minimum, you'll need a router
and a network adapter for each computer (most laptops come with a wireless network adapter already installed). If you want to connect to the Internet, you'll need to have an account set up with an Internet service provider (ISP). For more information, see Selecting a wireless router or another wireless network device.


3. Set up the router

If your router displays the Windows 7 logo or the phrase "Compatible with Windows 7," you can set it up automatically using the latest version of Windows Connect Now (WCN) on Windows 7 or Windows Vista Service Pack 2. Otherwise, most routers come with a setup CD that will assist you in setting it up. Follow the instructions that came with your router. For more information, see Set up a wireless router.


4. Connect the router to the Internet (optional)

You don't have to do this step, but we highly recommend it. Most people find it very valuable to have an Internet connection. To connect the router to the Internet, follow the instructions provided by your ISP, or see Set up a broadband (DSL or cable) connection.


5. Connect computers and devices to the network

For the easiest setup, buy devices that display the Windows 7 logo or the phrase "Compatible with Windows 7," and then follow the instructions that came with the device. For more information, see Set up a wireless router, and refer to the section entitled "Connect other computers to the network." Also, search Help and Support for "Add a device or computer to a network."


6. Create a homegroup or turn on file and printer sharing

If you're setting up a home network, creating a homegroup is the easiest way to share files and printers. All homegroup computers must be running Windows 7. For more information, search Help and Support for "Create a homegroup." Also, see Join a homegroup and What is a homegroup?


If you have different versions of Windows on your network computers or you're setting up a small office network, you'll need to turn on file and printer sharing. For more information, see Networking home computers running different versions of Windows.


How to set up a wireless using Linksys on DSL Click HERE for more information.

How do I set up a router with Cable? Click HERE


How do I access the router’s web-based setup page? Click HERE

Another thing you can and should do is Upgrade your Firmware.

Mine was Three(3) years old, And after I updated it, My router Signal was just a bit stronger.
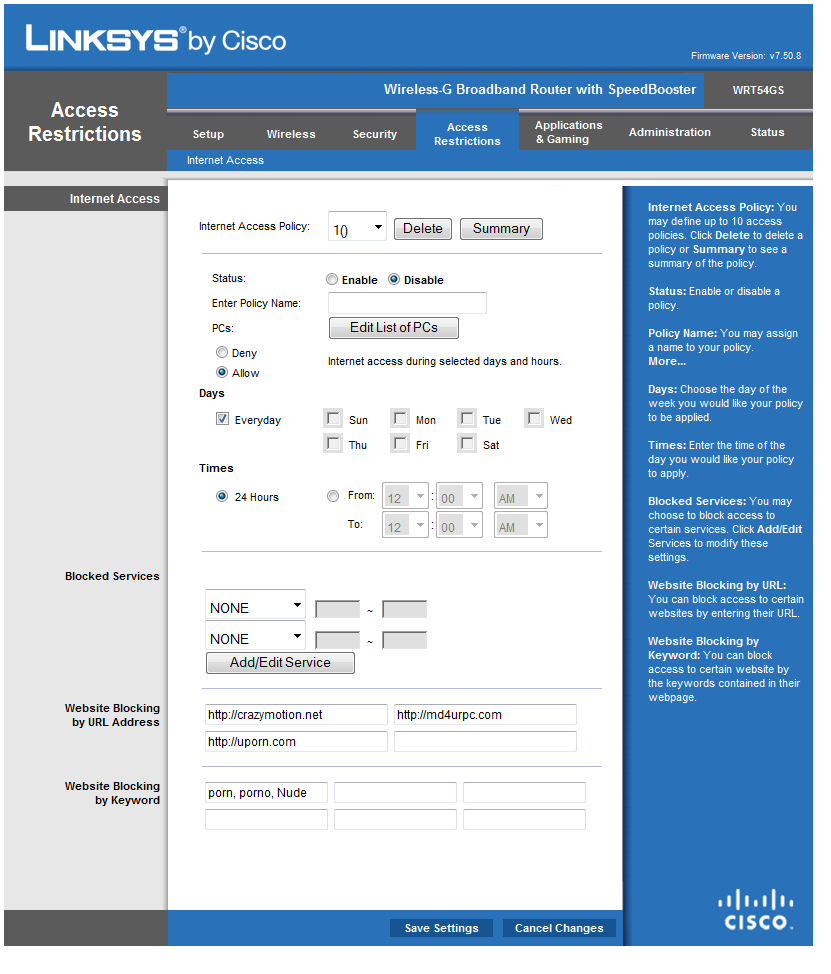
In the above pic as you can see using the Linksys (Cisco) Wireless router You can also set it to block certain websites or Keywords on a website.

Wednesday, April 28, 2010

Microsoft Security Essentials 1.0

Microsoft Security Essentials 1.0 Part One: A detailed look at UI.

For years Microsoft has been releasing different iterations of their Windows OS and people have been using it pleasantly. But none of the OS till the date, even Windows 7 latest in Windows Family, don’t have any anti-virus solution built directly inside them. Though Microsoft made Windows Defender, which comes integrated in Windows Vista and Windows 7 and freely available for Windows XP was a merely a anti-spyware solution that was not strong too. So users had to rely on 3rd party anti-virus solutions for years. It seems Microsoft has finally heard the critics and users feedbacks. Now they have come with their own anti-virus solution for Windows, christened as Microsoft Security Essentials. Yeah, there was another solution was available for Windows known as Windows Live OneCare from Microsoft, but it was subscription based service and users would have to buy it. This was disappointing given the fact users had already paid enough for Windows license and it’s MSs responsibility to provide users with anti-virus solution for their OS since Windows Operating Systems are favorite among hackers too. But MS-SE (Microsoft Security Essentials) is totally free for Windows users given that they are running genuine copies of Windows OS. That doesn’t mean user of pirated copies can buy it.

(Click to Enlarge)


The home screen of MS-SE isn’t much to talk about. It’s very simple but not exciting and intuitive as I was expecting it to be. On top of this screen, you can see computer status. It turns red if your computer has un-attended infected item or update is not latest, otherwise it’ll be green. Just below that you’ll find status of real time protection and virus definition. On right side you can get three scan options Quick, Full and Custom. If you’re expecting ‘Custom’ scan to be really custom scan then you’ll be disappointed. ‘Custom’ scan doesn’t have any option to select ‘Scan Intensity’ or any other special ‘action’ for RAR files. It just have list of locations to scan as you can see in screenshot below. And on the bottom you’ll see scan details like schedule of scan and when last scan was performed.


Next tab in the UI is ‘Update’ tab.


As in every antivirus solution you will definition download date and time, definition version of both virus and spyware definition. Later is not usually seen in others softwares. And one usual thing you’ll get is button to update definitions. So here ends this second tab.

MS-SE History click to see Image
The History tab in MS-SE is same as ‘Quarantine Items’ page found in other anti-virus solutions. As usual you can see list of detected infected items/files. Here you get three views for your convenience. You can choose to see all detected items, quarantined and allowed, in one list or you can see them in individual lists. Allowed items are those which are detected as malware or PUPS (potentially unwanted programs). Sometimes anti-virus detects harmless items as malware. So if user trusts those items and allows them to stay on computer then such items will be displayed in detected items list.


In my honest opinion, in any anti-virus ‘Settings’ page is the most interesting thing rather it must be. But as with rest of the UI even this part of the MS-SE continues to disappoint.


MS-SE Settings click to see image


Under ‘Settings’ tab you’ll find another eight pages starting with schedule page. Schedule page as the name suggests you’ll get option to schedule computer scan. You can enable or disable schedule scan. Other options are date, time, type of scan like quick scan, when it should run on your computer like when your computer is idle.

MS-SE Settings – Default Actions click to see Image
Next page is ‘Default Actions’ page. Here you get to choose action for detected items at different intensity levels. You get four actions to choose from for all levels except for ‘Severe’ and ‘High’ level alert where you don’t get ‘Allow’ option.


MS-SE Real Time Protection Click to see Image

‘Real Time Protection’ page has very little to offer. An option to turn on or off Real time protection, whether or not MS-SE monitor file and programs on your PC, and option to keep eye on file downloads.


MS-SE Exclusions Lists
Next three pages under ‘Settings’ tab are almost similar except that they are used to exclude different kind of items. First is to exclude specific files and locations, second is to exclude specific file types and third is to exclude specific processes.


MS-SE Settings – Advanced
‘Advanced’ page, but even there I didn’t find ant ‘wow’ thing. I was expecting some really advanced settings here but was disappointed again. It has option to include compressed files in scan. USB drives and other removable media to be included in full scan, option to create restore point. The last option when unchecked, limits the view of history page for non-admin accounts on system.

MS-SE Settings-Microsoft SpyNet


On this page you get two options, Basic membership and Advanced membership. When I first saw these options I thought Microsoft has paid version too. But when I read the description it turned out to be something different and unexpected. Even at early stage this anti-virus system has facility to send suspected files to Microsoft automatically. This was something which I had seen in some other mature anti-virus systems like ESET NOD32. Beware this can sometimes send personal information to MS, mostly unintentionally (that’s what MS says, unintentionally!). There’s no way you can disable this.

To Download This Free program Click HERE

http://www.microsoft.com/security_essentials/


Make FireFox Even Faster

Tricks To Tweak Firefox

Everybody’s favorite open-source browser, Firefox, is great right out of the box. And by adding some of the awesome extensions available out there, the browser just gets better and better.

But look under the hood, and there are a bunch of hidden (and some not-so-secret) tips and tricks available that will crank Firefox up and pimp your browser. Make it faster, cooler, more efficient. Get to be a Jedi master with the following cool Firefox tricks.
1) More screen space. Make your icons small. Go to View - Toolbars - Customize and check the “Use small icons” box
2) Smart keywords. If there’s a search you use a lot (let’s say IMDB.com’s people search), this is an awesome tool that not many people use. Right-click on the search box, select “Add a Keyword for this search”, give the keyword a name and an easy-to-type and easy-to-remember shortcut name (let’s say “actor”) and save it. Now, when you want to do an actor search, go to Firefox’s address bar, type “actor” and the name of the actor and press return. Instant search! You can do this with any search box.
3) Keyboard shortcuts
This is where you become a real Jedi. It just takes a little while to learn these, but once you do, your browsing will be super fast. Here are some of the most common (and my personal favs):
* Spacebar (page down)
* Shift-Spacebar (page up)
* Ctrl+F (find)
* Alt-N (find next)
* Ctrl+D (bookmark page)
* Ctrl+T (new tab)
* Ctrl+K (go to search box)
* Ctrl+L (go to address bar)
* Ctrl+= (increase text size)
* Ctrl+- (decrease text size)
* Ctrl-W (close tab)
* F5 (reload)
* Alt-Home (go to home page)
4) Auto-complete
This is another keyboard shortcut, but it’s not commonly known and very useful. Go to the address bar (Control-L) and type the name of the site without the “www” or the “.com”. Let’s say “google”. Then press Control-Enter, and it will automatically fill in the “www” and the “.com” and take you there - like magic! For .net addresses, press Shift-Enter, and for .org addresses, press Control-Shift-Enter.
5) Tab navigation.
Instead of using the mouse to select different tabs that you have open, use the keyboard. Here are the shortcuts:
* Ctrl+Tab (rotate forward among tabs)
* Ctrl+Shft+Tab (rotate to the previous tab)
* Ctrl+1-9 (choose a number to jump to a specific tab)
6) Mouse shortcuts.
Sometimes you’re already using your mouse and it’s easier to use a mouse shortcut than to go back to the keyboard. Master these cool ones:
* Middle click on link (opens in new tab)
* Shift-scroll down (previous page)
* Shift-scroll up (next page)
* Ctrl-scroll up (decrease text size)
* Ctrl-scroll down (increase text size)
* Middle click on a tab (closes tab)
7) Delete items from address bar history.
Firefox’s ability to automatically show previous URLs you’ve visited, as you type, in the address bar’s drop-down history menu is very cool. But sometimes you just don’t want those URLs to show up (I won’t ask why). Go to the address bar (Ctrl-L), start typing an address, and the drop-down menu will appear with the URLs of pages you’ve visited with those letters in them. Use the down-arrow to go down to an address you want to delete, and press the Delete key to make it disappear.
1. About:config - fetch only the content you view Firefox 2.0 and later likes to prepare itself for the next link you may click; to make clicked links load fast, it pre-loads content from pages which are linked to the page you’re currently viewing. Pre-fetching only occurs when the browser is idle, so it shouldn’t affect your bandwidth. Bear in mind that the makers of browser extension Fasterfox seem to think pre-fetching speeds things up. If you find this pointless and/or creepy, you can turn it off.

-In about:config, pull up network.prefetch-next.
-The default value is true. Right click and toggle it to false. Restart Firefox and enjoy.


 2. About:config - limit memory usage On both Macs and PCs, our favorite browser can be quite the RAM hog. Tame the beast with browser.cache.memory.capacity. This preference must be added to your list; it won’t appear by default.
-First, check your memory usage with about:cache?device=memory in the URL bar. The window will display your current settings and the current cache contents. In the settings below, Firefox’s current maximum storage size is 1 percent of the RAM capacity of the computer.


Type about:config in the address bar, Then look for the following entries, and make the corresponding changes.
1.network.http.max-connections = 64
2.network.http.max-connections-per-server =32
3.network.http.max-persistent-connections-per-proxy =16
4.network.http.max-persistent-connections-per-server = 10
5.network.http.pipelining = true
6.network.http.pipelining.maxrequests = 200
7.network.http.proxy.pipelining = true
8.network.http.proxy.version = 1.0
9.network.http.request.max-start-delay = 0
Lastly right-click anywhere and select New- Integer. Name it nglayout.initialpaint.delay and set its value to 0. This value is the amount of time the browser waits before it acts on information it recieves.
Move or remove the close tab button.
Do you accidentally click on the close button of Firefox’s tabs? You can move them or remove them, again through about:config. Edit the preference for “browser.tabs.closeButtons”. Here are the meanings of each value:
* 0: Display a close button on the active tab only
* 1:(Default) Display close buttons on all tabs
* 2:Don’t display any close buttons
* 3:Display a single close button at the end of the tab bar (Firefox 1.x behavior)
Lastly right-click anywhere and select New- Integer. Name it nglayout.initialpaint.delay and set its value to 0. This value is the amount of time the browser waits before it acts on information it recieves.

FireFox Tips 3.6.4 and Thunderbird

Clear the cache

  1. At the top of the Firefox window, click on the Tools menu, and select Options....
  2. Select the Advanced panel.
  3. Click on the Network tab.
  4. In the Offline Storage section, click Clear Now. 
  5. Click OK to close the Options window
 

Automatically clear the cache

You can set Firefox to automatically clear the cache when Firefox closes:
  1. At the top of the Firefox window, click on the Tools menu, and select Options....
  2. Select the Privacy panel.
  3. In the History section, set Firefox will: to Use custom settings for history.
  4. Select the check box for Clear history when Firefox closes.

     5.Beside Clear history when Firefox closes, click the Settings... button. The Settings for
        Clearing History window will open.
    6. In the Settings for Clearing History window, click the check mark box next to Cache.
 
7. Click OK to close the Settings for Clearing History window.

                                   8. Click OK to close the Options window

Mozilla Thunderbird FAQ

This is the Thunderbird FAQ, which contains the most frequently asked questions about the mail client.

Contents

General Questions

What is Thunderbird?
Thunderbird is a free, open-source and cross-platform mail client for most operating systems including, but not limited to, Windows, Linux and Macintosh. It is based on the Mozilla codebase. It is a robust and easy to use client, similar to competing products like Outlook Express, but with some major advantages such as junk mail classification. Read more about the mail client at the Product Page.
Why should I use Thunderbird instead of other mail clients?
There are too many reasons to list them all here. Read why you should use Thunderbird instead of other mail clients on the market.
Is Thunderbird free?
Yes! Thunderbird is open source software, meaning that anyone has the right to download and use the program for free, and view and modify the source code under the terms of the license.
Where can I download Thunderbird?
To download Thunderbird, go to mozilla.com.
How do I install Thunderbird?
See the release notes for more information.
How do I uninstall Thunderbird?
See the release notes for more information.
Is Thunderbird available in my language?
Possibly. Since Mozilla Thunderbird is an open-source project, contributors are constantly translating Mozilla Thunderbird into other languages. You can check if Mozilla Thunderbird is available in your language in the localized builds list.
Where are my mail, passwords and other personal information saved?
Thunderbird stores your personal settings in a profile folder. See the next frequently asked question for more information on how to manage the profiles.
How do I start the Profile Manager?
The Profile Manager is used to manage multiple profiles. To start the Profile Manager, follow the steps in the Manage Profiles How-To.
How do I move my profile or restore a backed up copy?
It's possible to move the location of a profile folder. This could be useful if you have a backed up profile folder somewhere on your hard drive and want to tell Thunderbird to use that as your profile. Read about moving an existing profile or restore a backed up profile for detailed instructions.

 For more Tips on Mozilla and Thunderbird Click HERE to see The Full list OF FAQ