
(Works with Windows Vista and Windows 7)
If you have problems with one or more of your Windows desktop icons not displaying correctly or showing the wrong icons for your programs, you might want to rebuild your icon cache. Here's how you do it.
1. Open Windows Explorer, and configure your Folder Options > Views to show Hidden/System Files.
2. Go to C:\\Users\\Owner\\AppData\\Local folder and delete the hidden IconCache.db file.
3. Reboot your computer.
These actions will purge and rebuild the icon cache, and hopefully fix any of the icon problems you were experiencing.
Showing posts with label windows 7. Show all posts
Showing posts with label windows 7. Show all posts
Sunday, December 5, 2010
Sunday, November 28, 2010
Block Ad's on FaceBook
So you are using Chrome in Facebook or just Browsing the internet and you do not want to see all the ADS ! well get this Extention and All the ads in FB are blocked, I have not seen one ad in a long time. There is also one for Firefox.
And yes FREE !!
Click HERE for Chrome Users
Click HERE for Firefox users.
Click HERE for Internet Explorer
And yes FREE !!
Click HERE for Chrome Users
Click HERE for Firefox users.
Click HERE for Internet Explorer
Wednesday, October 6, 2010
Customise the log-on screen
Changing the Windows log-on screen used to involve some complicated and potentially dangerous hacks, but not any more - Windows 7 makes it easy.
First, browse to HKEY_LOCAL_MACHINE\Software\Microsoft\Windows\CurrentVersion\Authentication\LogonUI\Background in REGEDIT, double-click the DWORD key called OEMBackground (not there? Create it) and set its value to 1.
Now find a background image you'd like to use. Make sure it's less than 256KB in size, and matches the aspect ratio of your screen as it'll be stretched to fit.
Next, copy that image into the %windir%\system32\oobe\info\backgrounds folder (create the info\backgrounds folders if they don't exist). Rename the image to backgroundDefault.jpg, reboot, and you should now have a custom log-on image.
Alternatively, use a free tweaking tool to handle everything for you. Logon Changer displays a preview so you can see how the log-on screen will look without rebooting, while the Logon Screen Rotator accepts multiple images and will display a different one every time you log on.
Wednesday, September 22, 2010
how to make an ICS (Internet Connection Sharing) without a router.
Using ICS (Internet Connection Sharing)
In this articleHow does ICS work?
Enabling ICS
Configure TCP/IP
ICS and VPN connections
ICS and ad hoc networks
If you want to share one Internet connection among several computers, you have two options:
Use Internet Connection Sharing (ICS).
Use a router.
How does ICS work?
First, you'll need one computer, called the host computer, that's connected to the Internet and that has a separate connection to the other computers on your network. You'll enable ICS on the Internet connection. The other computers on your network then connect to the host computer, and from there to the Internet through the host computer's shared Internet connection.
A network using Internet Connection Sharing (ICS)
Enabling ICS
To enable ICS, on your host computer:
Click to open Network Connections.
Right-click the connection that you want to share, and then click Properties. If you're prompted for an administrator password or confirmation, type the password or provide confirmation.
Click the Sharing tab, and then select the Allow other network users to connect through this computer’s Internet connection check box.
Notes
The Sharing tab won't be available if you have only one network connection.
You can choose whether to select the Allow other network users to control or disable the shared Internet connection check box.
Optionally, to allow other network users to use services running on your network, click Settings, and then select the services you want to allow.
When you enable ICS, your local area network (LAN) connection gets a new static IP address and configuration, so you'll need to reestablish any TCP/IP connections between your host computer and the other network computers.
To test your network and Internet connection, see if you can share files between computers and make sure each computer can reach a website.
Configure TCP/IP
To use ICS, make sure the local area network (LAN) connection on each network computer is configured to get an IP address automatically. To do this:
Click to open Network Connections.
Right-click the LAN connection, and then click Properties. If you're prompted for an administrator password or confirmation, type the password or provide confirmation.
Click Internet Protocol Version 4 (TCP/IPv4) or Internet Protocol Version 6 (TCP/IPv6), and then click Properties.
Click Obtain an IP address automatically or Obtain an IPv6 address automatically, and then click OK.
The Internet options on your network computers should also be configured for ICS. For more information, see Change Internet settings for ICS (Internet Connection Sharing).
Don't use ICS on a network with domain controllers, DNS servers, gateways, or DHCP servers. And don't use ICS on systems configured for static IP addresses.
ICS and VPN connections
If you create a virtual private network (VPN) connection on your host computer to a corporate network and then enable ICS on that connection, all Internet traffic is routed to the corporate network and all of the computers on your home network can access the corporate network. If you don't enable ICS on the VPN connection, other computers won't have access to the Internet or corporate network while the VPN connection is active on the host computer.
ICS and ad hoc networks
If you share your Internet connection on an ad hoc network, ICS will be disabled if:
You disconnect from the ad hoc network.
You create a new ad hoc network without disconnecting from the ad hoc network for which you enabled ICS.
You log off and then log back on (without disconnecting from the ad hoc network).
Labels:
default programs,
hackers,
internet explorer,
Vista,
windows 7,
windows 8,
wireless,
XP
0
comments


Monday, August 30, 2010
Why won't my computer turn on or off quickly?
If your computer seems to shut down slowly (or not at all) or start up slowly, or if it doesn't enter power-saving modes, it's possible that a program or device driver is interfering with Windows power settings. You can use Performance Information and Tools to try to detect these programs or device drivers.
To check for performance issues
1.Click to open Performance Information and Tools.
Control Panel\All Control Panel Items\Performance Information and Tools
2. In the left pane, click Advanced tools.

3.In Advanced Tools, under Performance issues, click any issues that are listed.

4.Read the information in the dialog box that appears to learn which programs or drivers are causing problems.
If a program or driver prevents your computer from turning on quickly
You can try the following tasks to fix the problem:
Manage the programs that run at startup. Some programs start automatically when you start Windows. Too many of these programs opening at the same time can slow down your computer. To disable these programs from startup and improve performance, use Windows Defender. For more information, see Stop a program from running automatically when Windows starts.
Check with the manufacturer of the program or driver for an update. A newer version of the program might include a resolution to the problem.
If a program or driver prevents your computer from turning off quickly
You can try the following tasks to fix the problem:
Close the program before shutting down. It's possible that the problem occurs only if the program is running. Try closing the program before shutting down Windows, and then see if your computer turns off properly.
Check with the manufacturer of the program or driver for an update. A newer version of the program might include a resolution to the problem.
If these options don't solve the problem, then the program or driver might be incompatible with Windows. If you installed the program or device yourself and you no longer use it, consider removing the device, or uninstalling the program or driver.
In windows 7 you can also Generate a System health report.
This comes in handy to let you know how your PC is doing. If you do one you first get your PC and do one every few motnhs and then you can see how and if your computer is going to crash
you can find it here
Control Panel\All Control Panel Items\Performance Information and Tools\Advanced Tools

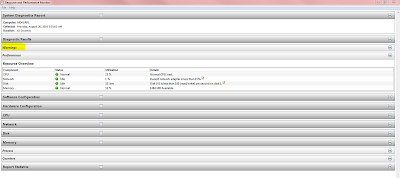 You can check the warnings and follow the links with-in the warnings, Also you can check memory, hard drive and pretty much your whole Computer.
Good Luck
Thanks
MD4URPC.com
To check for performance issues
1.Click to open Performance Information and Tools.
Control Panel\All Control Panel Items\Performance Information and Tools
2. In the left pane, click Advanced tools.

3.In Advanced Tools, under Performance issues, click any issues that are listed.

4.Read the information in the dialog box that appears to learn which programs or drivers are causing problems.
If a program or driver prevents your computer from turning on quickly
You can try the following tasks to fix the problem:
Manage the programs that run at startup. Some programs start automatically when you start Windows. Too many of these programs opening at the same time can slow down your computer. To disable these programs from startup and improve performance, use Windows Defender. For more information, see Stop a program from running automatically when Windows starts.
Check with the manufacturer of the program or driver for an update. A newer version of the program might include a resolution to the problem.
If a program or driver prevents your computer from turning off quickly
You can try the following tasks to fix the problem:
Close the program before shutting down. It's possible that the problem occurs only if the program is running. Try closing the program before shutting down Windows, and then see if your computer turns off properly.
Check with the manufacturer of the program or driver for an update. A newer version of the program might include a resolution to the problem.
If these options don't solve the problem, then the program or driver might be incompatible with Windows. If you installed the program or device yourself and you no longer use it, consider removing the device, or uninstalling the program or driver.
In windows 7 you can also Generate a System health report.
This comes in handy to let you know how your PC is doing. If you do one you first get your PC and do one every few motnhs and then you can see how and if your computer is going to crash
you can find it here
Control Panel\All Control Panel Items\Performance Information and Tools\Advanced Tools

This will run for 60 seconds or longer depending on your system.
In most cases 60 secs is default.

Good Luck
Thanks
MD4URPC.com
Sunday, August 29, 2010
10 tips to help you with windows 7
1.Minimise quickly with shake If you have multiple windows open on your desktop and things are getting too cluttered, it used to be a time-consuming process to close them all down. In Windows 7 you can use the Aero Shake feature to minimise everything in seconds, using a cool mouse gesture. Grab the title bar of the window you wish to keep open and give it a shake, and rejoice in a clear desktop area.
2. Configure your favourite music
The Windows 7 Media Centre now comes with an option to play your favourite music, which by default creates a changing list of songs based on your ratings, how often you play them, and when they were added (it's assumed you'll prefer songs you've added in the last 30 days). If this doesn't work then you can tweak how Media Centre decides what a "favourite" tune is- click Tasks > Settings > Music > Favourite Music and configure the program to suit your needs.
3. Customise System Restore
There was very little you could do to configure System Restore in Vista, but Windows 7 improves the situation with a couple of useful setup options.
Click the Start orb, right-click Computer and select Properties > System Protection > Configure, and set the Max Usage value to a size that suits your needs (larger to hold more restore points, smaller to save disk space).
And if you don't need System Restore to save Windows settings then choose the "Only restore previous versions of files" option. Windows 7 won't back up your Registry, which means you'll squeeze more restore points and file backups into the available disk space. System Restore is much less likely to get an unbootable PC working again, though, so use this trick at your own risk.
4. Run As
Hold down Shift, right-click any program shortcut, and you'll see an option to run the program as a different user, handy if you're logged in to the kids' limited account and need to run something with higher privileges. This isn't really a new feature - Windows XP had a Run As option that did the same thing - but Microsoft stripped it out of Vista, so it's good to see it's had a change of heart.
5. Search privacy
By default Windows 7 will remember your PC search queries, and display the most recent examples when searching in Windows Explorer. If you're sharing a PC and don't want everyone to see your searches, then launch GPEDIT.MSC, go to User Configuration > Administrative Templates > Windows Components > Windows Explorer, double-click "Turn off display of recent search entries..." and click Enabled > OK.
6. Tweak PC volume
By default Windows 7 will now automatically reduce the volume of your PC's sounds whenever it detects you're making or receiving PC-based phone calls. If this proves annoying (or maybe you'd like it to turn off other sounds altogether) then you can easily change the settings accordingly. Just right-click the speaker icon in your taskbar, select Sounds > Communications, and tell Windows what you'd like it to do.
7. Rearrange the system tray
With Windows 7 we finally see system tray icons behave in a similar way to everything else on the taskbar. So if you want to rearrange them, then go right ahead, just drag and drop them into the order you like. You can even move important icons outside of the tray, drop them onto the desktop, then put them back when you no longer need to keep an eye on them.
8. Extend your battery life
Windows 7 includes new power options that will help to improve your notebook's battery life. To see them, click Start, type Power Options and click the Power Options link, then click Change Plan Settings for your current plan and select Change Advanced Settings. Expand Multimedia Settings, for instance, and you'll see a new "playing video" setting that can be set to optimise power savings rather than performance. Browse through the other settings and ensure they're set up to suit your needs.
9. Write crash dump files
Windows 7 won't create memory.dmp crash files if you've less than 25GB of free hard drive space, annoying if you've installed the Windows debugging tools and want to diagnose your crashes. You can turn this feature off, though: browse to HKEY_LOCAL_MACHINE\SYSTEM\CurrentControlSet\Control\CrashControl, create a new DWORD value called AlwaysKeepMemoryDump, set it to 1, and the crash dump file will now always be saved.
10. Find bottlenecks
From what we've seen so far Windows 7 is already performing better than Vista, but if your PC seems sluggish then it's now much easier to uncover the bottleneck. Click Start, type RESMON and press Enter to launch the Resource Monitor, then click the CPU, Memory, Disk or Network tabs. Windows 7 will immediately show which processes are hogging the most system resources.
The CPU view is particularly useful, and provides something like a more powerful version of Task Manager. If a program has locked up, for example, then right-click its name in the list and select Analyze Process. Windows will then try to tell you why it's hanging - the program might be waiting for another process, perhaps - which could give you the information you need to fix the problem.
To have quik access to Resmon you can make a Desktop shortcut
1. Right click the desktop
2. click on NEW then create shortcut
3. Type in resmon
4. click ok
Labels:
back up,
Battery,
cache,
Help,
shut down,
system restore,
Tips,
tune up,
windows 7
0
comments
Customise the log-on screen
Changing the Windows log-on screen used to involve some complicated and potentially dangerous hacks, but not any more - Windows 7 makes it easy.
First, browse to HKEY_LOCAL_MACHINE\Software\Microsoft\Windows\CurrentVersion\Authentication\LogonUI\Background in REGEDIT, double-click the DWORD key called OEMBackground (not there? Create it) and set its value to 1.
Now find a background image you'd like to use. Make sure it's less than 256KB in size, and matches the aspect ratio of your screen as it'll be stretched to fit.
Next, copy that image into the %windir%\system32\oobe\info\backgrounds folder (create the info\backgrounds folders if they don't exist). Rename the image to backgroundDefault.jpg, reboot, and you should now have a custom log-on image.
Alternatively, use a free tweaking tool to handle everything for you. Logon Changer displays a preview so you can see how the log-on screen will look without rebooting, while the Logon Screen Rotator accepts multiple images and will display a different one every time you log on.
First, browse to HKEY_LOCAL_MACHINE\Software\Microsoft\Windows\CurrentVersion\Authentication\LogonUI\Background in REGEDIT, double-click the DWORD key called OEMBackground (not there? Create it) and set its value to 1.
Now find a background image you'd like to use. Make sure it's less than 256KB in size, and matches the aspect ratio of your screen as it'll be stretched to fit.
Next, copy that image into the %windir%\system32\oobe\info\backgrounds folder (create the info\backgrounds folders if they don't exist). Rename the image to backgroundDefault.jpg, reboot, and you should now have a custom log-on image.
Alternatively, use a free tweaking tool to handle everything for you. Logon Changer displays a preview so you can see how the log-on screen will look without rebooting, while the Logon Screen Rotator accepts multiple images and will display a different one every time you log on.
Tuesday, July 20, 2010
How to use Windows Live Mail and Import Outlook Contacts, windows 7 and Vista
If you need a mail client, install Windows Live Mail which supports messages and contacts from Outlook Express, you can import them into Windows Live Mail.
Importing your e-mail, contacts, and calendar into Windows Live Mail:
http://www.sevenforums.com/tutorials/3798-windows-live-mail-import-windows-mail-messages.html
Windows Live Mail - Import Windows Mail Messages
How to Import Vista Contacts and Contact Groups into Windows Live Mail
http://www.sevenforums.com/tutorials/3818-windows-live-mail-import-vista-contacts-contact-groups.html
How to Identify Your Windows Mail, Live Mail or Outlook Express Store Folder
http://email.about.com/od/outlookexpresstips/ss/wt101202.htm
The links might reference Windows Vista, but the same principles apply to Windows 7 too.
Monday, July 19, 2010
PAyPal Security Through EMAILS .Don't get scammed
Use this checklist to make sure your email came from
PayPal:
Check the greeting:
We always address you by your first and last name, or by
the business
name on your PayPal account.
Check the link before you click:
Before you click a link in an email, hover your cursor over
the link and
check the web address. If the web address doesn't start
with
"https://www.paypal.com," don't click the link.( Try it here)
Check for requests for your personal information:
We?ll never use a PayPal email to ask you for any of the
following:
* Your bank account numbers
* Your debit and credit card numbers
* Your driver's license number
* Your email addresses
* Your full name
Check for a shipping number request:
Be on alert for emails that ask you to provide the shipping
number
before the buyer pays you.
Check for attachments or software updates:
We?ll never send an email with an attachment, or ask you to
install
software updates on your computer.
If anything on this checklist matches your email, someone
may be trying
to "spoof" or "phish" your account. Spoofing and phishing
are illegal
attempts to steal your identity, passwords, or other
personal or
financial information. If you?ve already clicked on a link
in the email
and entered personal information, you should change your
PayPal account
password and security questions immediately.
Just to be on the safe side, you should also review your
most recent
payment history for anything unusual or unauthorized. If
anything on
your account looks out of the ordinary, please let us know
about it as
soon as you can.
Here?s how you can report an unauthorized transaction:
1. Log into your PayPal account.
2. Select "Resolution Center.?
3. Click "Open a dispute."
4. Select "Unauthorized transaction," and then click
"Continue."
5. Enter or select the transaction ID for the transaction
you want to
dispute, and then click "Continue."
6. Complete the report for Unauthorized Use on a PayPal
Account, and
then click "Continue."
7. Confirm that the claim is correct, and then click
"Submit."
To learn more about protecting your account, click
"Security Center" on
any PayPal webpage.
PayPAls office
Registered Office:
5th Floor 22-24 Boulevard Royal L-2449, Luxembourg RCS
Luxembourg B 118
349.
Labels:
Anti-spyware,
md4urpc,
money,
system restore,
Tech support,
Tips,
trojan,
trojans,
upgrade,
Viruses,
Vista,
windows 7,
windows 7 starter,
windows 8,
wireless
0
comments
Thursday, July 15, 2010
Windows 7 wireless networking wont let me set my location as home it says it is set as unidentified
Windows 7 wireless trouble shooting the "Home Network settings"
1. Take the LAN cable out ( from the router )
2. Restart and allow the WiFi to function or find nothing
3. Plug the LAN cable in. From this point on (until the next time you Restart), no "Unidentified Networt" (two conflicting Networks) and Internet Access.
To troubleshoot your issue you may try the below methods one by one.
Method 1: Update the network driver.
Steps to update network driver:
1. Click on start button.
2. In the search box type devmgmt.msc and then press enter.
3. Select the network card device and right click on it
4. Now select properties.
5. In the properties window, under Driver tab, click on Update Driver button.
6. After the installing the updates restart the computer.
For more information visit: http://windows.microsoft.com/en-us/windows7/Update-a-driver-for-hardware-that-isnt-working-properly
Method 2: Try resetting the TCP/IP stack.
To reset the TCP/IP stack go to this article and either click on "Fix it for me" or follow the instructions to fix it yourself: http://support.microsoft.com/kb/299357 .
If still the same problem persists then try the next method.
Method 3: Here you need to troubleshoot using the Network troubleshooter in Windows 7 and check for the issue to do that follow the below provided link.
http://windows.microsoft.com/en-US/windows7/Using-the-Network-troubleshooter-in-Windows-7
Use Windows Easy Transfer to copy your files, photos, music, e-mail, settings, and more from a computer running Windows Vista to a computer running Windows 7. You can transfer data using an Easy Transfer Cable, removable media, or across a network.
Use Windows Easy Transfer to copy your files, photos, music, e-mail, settings, and more from a computer running Windows Vista to a computer running Windows 7. You can transfer data using an Easy Transfer Cable, removable media, or across a network.
Download details: Windows Easy Transfer for transferring from Windows Vista (32 bit) to Windows 7
www.microsoft.com
Use Windows Easy Transfer to copy your files, photos, music, e-mail, settings, and more from a computer running Windows Vista to a computer running Windows 7. You can transfer data using an Easy Transfer Cable, removable media, or across a network.
Use Windows Easy Transfer to copy your files, photos, music, e-mail, settings, and more from a computer running Windows XP to a computer running Windows 7. You can transfer data using an Easy Transfer Cable, removable media, or across a network
Use Windows Easy Transfer to copy your files, photos, music, e-mail, settings, and more from a computer running Windows XP to a computer running Windows 7. You can transfer data using an Easy Transfer Cable, removable media, or across a network

Download details: Windows Easy Transfer for transferring from Windows XP (32 bit) to Windows 7
www.microsoft.com
Use Windows Easy Transfer to copy your files, photos, music, e-mail, settings, and more from a computer running Windows XP to a computer running Windows 7. You can transfer data using an Easy Transfer Cable, removable media, or across a network
Monday, July 12, 2010
HP Refurbished SALE: $244 250GB Netbook . $539 Core i3 500GB Laptop . $395 Quad-Core 6GB PC


HP
HP Pavilion Elite 2.8GHz Phenom II Quad-Core Desktop w/ Blu-ray Player and 1TB Hard Drive - Model HPE-112y - VT637AAR#ABA
Only $594.99

2.8GHz Phenom II X4-925 Quad-Core Processor, 8GB RAM, 1TB Hard Drive, DVD+RW w/ LightScribe, Blu-ray Player, Wirless 802.11 a/b/g/n, ATI Radeon HD4350, Windows 7 Home Premium 64-Bit - HP Refurbished / Recertified
eCOST Part# 55494773

Dell
Dell Latitude D620 1.83GHz Intel Core 2 Duo Notebook - D620
Only $297.99
1.83GHz Intel 2 Core Duo, 1GB RAM, 60GB Hard Disk Drive, DVD/CD-RW, 14.1" LCD, Wi-Fi, Windows XP Professional - Refurbished / Recertified
eCOST Part# 56388340

HP
This is a great site to get computers from and parts, I have and still do use this site, I signed up as a member and get great offers through my email. So sign up today and checthem out,
Thanks,
MD4URPC.com
Labels:
Anti-spyware,
CD/DVD,
desktop,
hard drive,
md4urpc.com,
network,
PC accessories,
Tech support,
Utilities,
Vista,
Windows,
windows 7,
windows 7 starter,
wireless,
word,
XP
0
comments
Friday, July 9, 2010
Windows 7 start button changer.
Windows users have been customizing their desktops in a variety of ways for years. Whether by downloading themes and backgrounds, or using third party applications to change more obscure settings like the default logon screen, many people seem intent on personalizing every aspect of their operating system to something that fits their individual taste. And what better to alter than an icon that's always visible?
1. Download the Zipped File and Extract it into a folder of it's own.
2. Open the MUST READ.TXT file for more detailed instructions.

Leave all of the files in the W7SBC folder and run Windows 7 Start Button Changer.exe. Click Select & Change Start Button to browse for a new set of icons -- a few are included with the utility. Once selected, the program will backup explorer.exe and swap the icons.
 Windows x64 users: if you receive an "unhandled exception" error, the utility's creator suggests that you try to run it as an admin, so it's probably best to just do that from the get-go (right click on the program > Run as administrator). For what it's worth, I've used this tool trouble free on Windows 7 Home Premium x64 without running it as an admin.
Note: Do a system back up, and a system restore point Before making any changes to your system.
1. Download the Zipped File and Extract it into a folder of it's own.
2. Open the MUST READ.TXT file for more detailed instructions.

Leave all of the files in the W7SBC folder and run Windows 7 Start Button Changer.exe. Click Select & Change Start Button to browse for a new set of icons -- a few are included with the utility. Once selected, the program will backup explorer.exe and swap the icons.

Note: Do a system back up, and a system restore point Before making any changes to your system.
Windows 7 Starter, How to Change the wallpaper.
Here's How:
1. Download the Oceanis Change Background Windows 7 ZIP file above provided by Oceanis.
2. Open the ZIP file and extract the Oceanis_Change_Background_W7.exe file, then run it to install it.
NOTE: Restarting the computer will be required to finish installing this program.
3. When your computer restarts, you will see this as your desktop background. Click on the Oceanis Change Background Windows 7 shortcut to change your desktop background. (see screenshot below)

4. Browse to the images that you want to use and select one, or more to have a desktop slideshow. Select the Picture position for how you want the images displayed, and any desktop slideshow settings if you selected more than one image. (see screenshots below)


NOTE: These options are just like the default ones in the other editions of Windows 7 here that are now being allowed by this program by Oceanis for the Windows 7 Starter edition.
5. When done, click on Save changes. (see screenshots above)
Restart the computer after installing the program.
Do you have a modified skin or theme, or other 3rd party theme or skin program installed?
Do you have UAC turned on?
Did you do this in a administrator or standard account?
You might see if right clicking on the program's shortcut, and clicking on "Run as administrator" may help.
Check all the above.
1. Download the Oceanis Change Background Windows 7 ZIP file above provided by Oceanis.
2. Open the ZIP file and extract the Oceanis_Change_Background_W7.exe file, then run it to install it.
NOTE: Restarting the computer will be required to finish installing this program.
3. When your computer restarts, you will see this as your desktop background. Click on the Oceanis Change Background Windows 7 shortcut to change your desktop background. (see screenshot below)

4. Browse to the images that you want to use and select one, or more to have a desktop slideshow. Select the Picture position for how you want the images displayed, and any desktop slideshow settings if you selected more than one image. (see screenshots below)


NOTE: These options are just like the default ones in the other editions of Windows 7 here that are now being allowed by this program by Oceanis for the Windows 7 Starter edition.
5. When done, click on Save changes. (see screenshots above)
Trouble shooting the program
Restart the computer after installing the program.
Do you have a modified skin or theme, or other 3rd party theme or skin program installed?
Do you have UAC turned on?
Did you do this in a administrator or standard account?
You might see if right clicking on the program's shortcut, and clicking on "Run as administrator" may help.
Check all the above.
Saturday, June 19, 2010
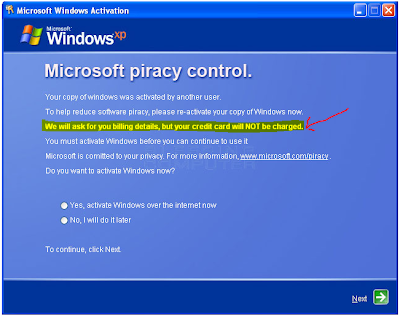
How to remove the Fake Windows Activation screen
This seems to be going around a lot more these days then a Fake Anti-virus program, Due to the Authenticity of the look and how convincing it really looks.
2. Once you have activated your Windows You will never be asked to do it again.
3. Never Put you Credit card number or personal Information into a Window from a pop up unless you have requested it and or have a direct Phone Number to call or contact someone.
4. The Windows Fake Activation Looks pretty real, And it's a Trojan, Ransom malware.
To make sure this is a fake
1. It will ask you for a Credit card period !
Microsoft will not do this on the actual Activation, They give you a choice of calling them over the phone or going to their website.
Now how to remove it.
1.Reboot your computer into Safe Mode with Networking. To do this, turn your computer off and then back on and immediately when you see anything on the screen, start tapping the F8 key on your keyboard. Eventually you will be brought to a menu similar to the one below:

2. Using the arrow keys on your keyboard, select Safe Mode with Networking and press Enter on your keyboard. See Video on how to get into Safe Mode if you need more Help Click HERE
3. By selecting with networking This should let you get on the Internet, So now you will need to Download Malwarebytes Click HERE
4. Once downloaded, close all programs and Windows on your computer.
5. Double-click on the icon on your desktop named mbam-setup.exe. This will start the installation of MBAM onto your computer.
6. Once the Install is Finished Malwarebytes will open automatically.
(make sure you have clicked on update when doing install if not you can update it NOW)
7. Once open you will see the options, Do a Full system Scan.
Note: This can take 5 min, or two hours Depending on how bad your system is infected and how fast it is.
8. When Malwarebytes has finished the scan you will get a pop up window telling you that it is complete. Click OK
9. Now you should see the results from the scan, As seen below

Just a reminder
1. Microsoft will not ask for your Credit Card Ever while installing windows Any version.2. Once you have activated your Windows You will never be asked to do it again.
3. Never Put you Credit card number or personal Information into a Window from a pop up unless you have requested it and or have a direct Phone Number to call or contact someone.
4. The Windows Fake Activation Looks pretty real, And it's a Trojan, Ransom malware.

Notice The highlighted area, They Will charge you.
To make sure this is a fake
1. It will ask you for a Credit card period !
Microsoft will not do this on the actual Activation, They give you a choice of calling them over the phone or going to their website.
Now how to remove it.
1.Reboot your computer into Safe Mode with Networking. To do this, turn your computer off and then back on and immediately when you see anything on the screen, start tapping the F8 key on your keyboard. Eventually you will be brought to a menu similar to the one below:

3. By selecting with networking This should let you get on the Internet, So now you will need to Download Malwarebytes Click HERE
4. Once downloaded, close all programs and Windows on your computer.
5. Double-click on the icon on your desktop named mbam-setup.exe. This will start the installation of MBAM onto your computer.
6. Once the Install is Finished Malwarebytes will open automatically.
(make sure you have clicked on update when doing install if not you can update it NOW)
7. Once open you will see the options, Do a Full system Scan.
Note: This can take 5 min, or two hours Depending on how bad your system is infected and how fast it is.
8. When Malwarebytes has finished the scan you will get a pop up window telling you that it is complete. Click OK
9. Now you should see the results from the scan, As seen below

10. Click on Remove selected.
11. It will open a scan log in NotePad, You can save this log or Just close it all together.
12. Once Notepad is closed scan is finished you can close Malwarebytes and Reboot your Computer in Normal Mode.
13. Now back in to Normal mode and if things seem to be running fine, Open Malwarebytes again and do a Quick scan. Should take 5-10 min. if nothing is found you should be ok and no need for another reboot.
See our website for More great Offers and Video Tutorials.
Comments welcome
Monday, June 14, 2010
Defragment your hard disk drive
This Speeds your PC up after weeks or months of use Installing and or removing programs,

Reading from a Unfragmented File it goes in Assending order 1,2,3

When The programs gets installed if places it all over the Hard Drive finding the first Empty place on it.
Sometimes, a newspaper article skips from the front page to somewhere in the middle of the paper. You have to stop reading the article and flip through the paper to find the page on which it continues. You could read the article much faster if it were printed on a single page.
Files on your computer can either be fragmented, like newspaper articles, or unfragmented, like a book. Over time, more and more files become fragmented. When a file is fragmented, it takes longer for the computer to read it because it has to skip to different sections of the hard disk drive—just like it takes you a few seconds to find a page in the middle of a newspaper.
So reading From a Fragmented file it would be going from page 1 to page 3 to page 2 and so on.

Reading from a Unfragmented File it goes in Assending order 1,2,3

To Defrag your Computer You can Go to Start>My Computer
Right Click then to Properties.
Click on the Tools Tab and in the Middle there should be a DeFrag Button left Click it, and it will open a new windows and you can select the Hard Drive you want to Defrag if you have more then one.
Note: always Run Analyze Before Defrag.
Also See System Short Cuts can use these Short cuts to find Internal programs that are hard to find.
Tired of chasing your mouse? Use keyboard shortcuts
Tired of chasing your mouse? Use keyboard shortcuts
You can use your keyboard instead of your mouse to do these three tasks:
• Start a program
• Navigate menus
• Minimize, maximize, and close windows
Start a program using a keyboard shortcut
The Start menu is great for finding programs, but its multiple levels of folders can be time consuming to navigate. If there is a program you start frequently, you should set a keyboard shortcut for it so that you can start the program without taking your hands off the keyboard.
To set a keyboard shortcut to start a program
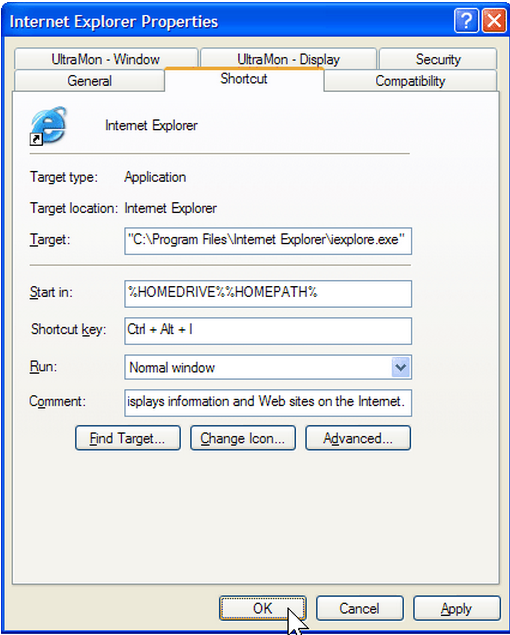
1.Click the Start menu, and then click All Programs. Right-click the program that you want to start with a keyboard shortcut, and then click Properties.

2.Click in the Shortcut key box. Now press the letter on your keyboard that you want to use to start the program. Make it easy to remember—for example, press I for Microsoft Internet Explorer.
Note: You can use either uppercase or lowercase letters when creating your keyboard shortcuts—and when accessing them later. In the Shortcut key box, Microsoft Windows XP automatically adds Ctrl + Alt + before the key you pressed. When you want to start the program, hold down both the CTRL and ALT keys simultaneously, while also pressing the letter you chose. This way, your program won't start every time you type that letter.

3. Click OK.

4.Now test your shortcut. Hold down the CTRL and ALT keys, and then press the letter you chose. If you find it difficult to hold down two keys at once, read Turn on the Sticky Keys feature. Your program should start.
Here Is a fast Cheat Sheet
Control windows using your keyboard
If you like to keep four or five windows open while you work (or play) on your computer, you'll appreciate knowing these keyboard shortcuts. You can quickly switch between your Web browser, e-mail, instant message windows, and other programs without taking your hands off the keyboard.
Action Shortcut
Minimize a window to your taskbar
ALT, SPACEBAR, N
Maximize a window so it takes up your whole desktop
ALT, SPACEBAR, X
Restore a window so it's visible but doesn't take up your whole desktop
ALT, SPACEBAR, R
Close a window
ALT+F4
Switch to the last window you had open
ALT+TAB
Switch to any window
Hold down the ALT key, and press TAB until the window you want is active
Programs often start up in a "restored" state, where the window takes up only part of the screen. To maximize the window so that it takes up the entire screen, press the ALT key, press the SPACEBAR, and then press X. This will feel natural after you do it a few times, and you will feel much more efficient while using your computer.
This also helps if your mouse is wireless and getting weak on power.
1. To activate mouse keys all you do is press Alt+Left shift key (the one below the caps lock key) and the Num Lock key.
To deactivate just press the above combination again.
All you do is use your numeric keypad to move the mouse pointer.
Here are some tips that might improve the Mouse Keys experience:
- You might want to set your options to something like the following (to change the options just double click on the mouse icon in the systray and click on settings)
1) Select ‘Hold down Ctrl to speed up Shift to slow down’ (this might be helpful if you want to go to a point quickly with your cursor)
2) Change the option to ‘off‘ where it says ‘Use Mouse Keys when NumLock is:‘ (this way you can use your numeric keypad to key in numbers)
And here are the functions that you can do with the Numeric Keypad:
5 = a left click on your normal mouse
Press 0 and navigate the pointer= Selecting the text in a normal keyboard
Pressing * or - and then pressing 5 = right click on your normal mouse (to use 5 to perform the left click action press the / key).
To scroll up and down you can either use arrow keys or the Page Up and Page Down keys. You can also use the spacebar to get to the bottom of the page.
You can use your keyboard instead of your mouse to do these three tasks:
• Start a program
• Navigate menus
• Minimize, maximize, and close windows
Start a program using a keyboard shortcut
The Start menu is great for finding programs, but its multiple levels of folders can be time consuming to navigate. If there is a program you start frequently, you should set a keyboard shortcut for it so that you can start the program without taking your hands off the keyboard.
To set a keyboard shortcut to start a program
1.Click the Start menu, and then click All Programs. Right-click the program that you want to start with a keyboard shortcut, and then click Properties.

2.Click in the Shortcut key box. Now press the letter on your keyboard that you want to use to start the program. Make it easy to remember—for example, press I for Microsoft Internet Explorer.
Note: You can use either uppercase or lowercase letters when creating your keyboard shortcuts—and when accessing them later. In the Shortcut key box, Microsoft Windows XP automatically adds Ctrl + Alt + before the key you pressed. When you want to start the program, hold down both the CTRL and ALT keys simultaneously, while also pressing the letter you chose. This way, your program won't start every time you type that letter.

3. Click OK.
4.Now test your shortcut. Hold down the CTRL and ALT keys, and then press the letter you chose. If you find it difficult to hold down two keys at once, read Turn on the Sticky Keys feature. Your program should start.
Here Is a fast Cheat Sheet
Control windows using your keyboard
If you like to keep four or five windows open while you work (or play) on your computer, you'll appreciate knowing these keyboard shortcuts. You can quickly switch between your Web browser, e-mail, instant message windows, and other programs without taking your hands off the keyboard.
Action Shortcut
Minimize a window to your taskbar
ALT, SPACEBAR, N
Maximize a window so it takes up your whole desktop
ALT, SPACEBAR, X
Restore a window so it's visible but doesn't take up your whole desktop
ALT, SPACEBAR, R
Close a window
ALT+F4
Switch to the last window you had open
ALT+TAB
Switch to any window
Hold down the ALT key, and press TAB until the window you want is active
Programs often start up in a "restored" state, where the window takes up only part of the screen. To maximize the window so that it takes up the entire screen, press the ALT key, press the SPACEBAR, and then press X. This will feel natural after you do it a few times, and you will feel much more efficient while using your computer.
This also helps if your mouse is wireless and getting weak on power.
1. To activate mouse keys all you do is press Alt+Left shift key (the one below the caps lock key) and the Num Lock key.
To deactivate just press the above combination again.
All you do is use your numeric keypad to move the mouse pointer.
Here are some tips that might improve the Mouse Keys experience:
- You might want to set your options to something like the following (to change the options just double click on the mouse icon in the systray and click on settings)
1) Select ‘Hold down Ctrl to speed up Shift to slow down’ (this might be helpful if you want to go to a point quickly with your cursor)
2) Change the option to ‘off‘ where it says ‘Use Mouse Keys when NumLock is:‘ (this way you can use your numeric keypad to key in numbers)
And here are the functions that you can do with the Numeric Keypad:
5 = a left click on your normal mouse
Press 0 and navigate the pointer= Selecting the text in a normal keyboard
Pressing * or - and then pressing 5 = right click on your normal mouse (to use 5 to perform the left click action press the / key).
To scroll up and down you can either use arrow keys or the Page Up and Page Down keys. You can also use the spacebar to get to the bottom of the page.
Sunday, June 13, 2010
System Shortcuts,
There are thousands of programs out their that you can get for free and or pay for, But did you know on you PC there are programs all ready on it.
Windows XP ( Vista and windows 7 Just type it in the Search window on the start button
1. Click Start
2. Click Run
3. Type in cleanmgr.exe
This cleans the Hard Drive the same way as if you were to Go to My computer and right click your C:\ drive and then to properties. Just a faster way of doing it.
To make a shortCut on your Desktop Just
1. Right click the Wall paper ( Empty spot)
2. New ShortCut
3.Copy and Past
4. C:\Windows\System32\cleanmgr.exe
 Simple.
Now lets get creative.
If you open the Folder ( Click Start> My Computer" Computer for Vista an 7" Then double Click the drive with your Operating System ( C:\ normally) then scroll down to Windows then open it then scroll down to System32
C:\Windows\System32
you will see a few Applications, These are some of the applications you can use to make shortcuts, What ever you do , Don't Delete them
On any of them you can Double Click it and it will open the program related to it, If it does not open then it is a Command lind program, Meaning another program Needed to run it it short term
If it does open then if you like what it is you can Right click it and scroll down to Make a shortCut
it will make the shortCut in the same folder then you can drag and drop it to the desktop
To see a video Visit our YouTune channel
http:\\youtube.com/md4urpc
Here is a list of some of the ones that will Run Just copy and past these into the New shortCut
C:\Windows\System32\Netplwiz.exe ( all )
 C:\Windows\System32\resmon.exe (Vista and win 7)
 C:\Windows\System32\msconfig.exe (all)

charmap ( shows you all the Characters )
lpksetup
 chkdsk ( check the Hard Drive for errors )
calc ( Calculator )
cmd ( Command Line )
UAC ( User Account Control ) Vista win 7
C:\Windows\System32\CompMgmtLauncher.exe ( Computer Management Launcher )
taskmgr ( Task Manager )
SoundRecorder ( record sound from a mic to your PC )
perfmon ( Performance Monitor ) Vista and 7
psr ( Problem Steps Recorder ) Windows 7 only
osk ( On screen KeyBoard )
Magnify ( Magnifys the Screen )
OptionalFeatures ( Lets you see other options you may have not installed on your PC)
MdSched ( Windows Memory Diagnostics )

Well Enjoy.
To see a short Video Click HERE
Windows XP ( Vista and windows 7 Just type it in the Search window on the start button
1. Click Start
2. Click Run
3. Type in cleanmgr.exe
This cleans the Hard Drive the same way as if you were to Go to My computer and right click your C:\ drive and then to properties. Just a faster way of doing it.
To make a shortCut on your Desktop Just
1. Right click the Wall paper ( Empty spot)
2. New ShortCut
3.Copy and Past
4. C:\Windows\System32\cleanmgr.exe

Now lets get creative.
If you open the Folder ( Click Start> My Computer" Computer for Vista an 7" Then double Click the drive with your Operating System ( C:\ normally) then scroll down to Windows then open it then scroll down to System32
C:\Windows\System32
you will see a few Applications, These are some of the applications you can use to make shortcuts, What ever you do , Don't Delete them
On any of them you can Double Click it and it will open the program related to it, If it does not open then it is a Command lind program, Meaning another program Needed to run it it short term
If it does open then if you like what it is you can Right click it and scroll down to Make a shortCut
it will make the shortCut in the same folder then you can drag and drop it to the desktop
To see a video Visit our YouTune channel
http:\\youtube.com/md4urpc
Here is a list of some of the ones that will Run Just copy and past these into the New shortCut
C:\Windows\System32\Netplwiz.exe ( all )


charmap ( shows you all the Characters )
lpksetup

calc ( Calculator )
cmd ( Command Line )
UAC ( User Account Control ) Vista win 7
C:\Windows\System32\CompMgmtLauncher.exe ( Computer Management Launcher )
taskmgr ( Task Manager )
SoundRecorder ( record sound from a mic to your PC )
perfmon ( Performance Monitor ) Vista and 7
psr ( Problem Steps Recorder ) Windows 7 only
osk ( On screen KeyBoard )
Magnify ( Magnifys the Screen )
OptionalFeatures ( Lets you see other options you may have not installed on your PC)
MdSched ( Windows Memory Diagnostics )

Well Enjoy.
To see a short Video Click HERE
Wednesday, June 9, 2010
How To Revert Back To XP Or Vista From Windows 7.
If the computer has the Windows.old folder - Reverting Windows 7 back to a previous Windows system:
http://support.microsoft.com/default.aspx/kb/971760
Windows.old on your C: drive - Usually, but not always, after installing Windows 7 you will have a Windows.old folder on your C: drive that contains data from the previous Windows installation. Open Windows Explorer and under "Computer" click on the C: drive - if the Windows.old folder is there you should be able to revert back to XP/Vista.
If it's not there, make sure you can see the Windows.old folder:
1. Click Start, type: hidden
2. Click "Show hidden files and folders"
3. Click to select "Show hidden files and folders"
4. Uncheck the next three items:
Hide empty drives
Hide extensions from known file types
Hide protected operating system files
5. Click OK and look for the folder
(Note: after you are done go back and recheck "Hide protected operating system files." If you want to change the other settings back do so.)
If there is no Windows.old folder:
If you have a restore partition (check your manual) you can use that, or if you have XP/Vista disks you can use those. If you don't have either and Windows came installed on your computer contact the OEM computer manufacturer and ask them to send you an install disk - they may or may not do it. If they agree to send you one they may charge a small fee.
___
STEP 1 – Locate Windows folder
The first step is to open the Windows 7 drive and locate the Windows.old folder in the drive. This is essential to change from Windows 7 to Vista and without it, this process would not be possible. Now you need to ensure that ample free space is available in the Windows 7 drive as all contents of Windows 7 is moved to a folder and the Vista contents from the Windows.old folder is copied.
STEP 2 – Reboot your PC
Now it is time to insert the Windows 7 installation disk in the DVD drive. Once this is done, reboot your PC. When the first screen shows up select your language, time and currency format and keyboard input method and click the ‘Next’ button.
Step 3 – Launching Windows7
Now the Install Windows window appears. Simply click on the ‘Repair your computer’ option to launch System Recovery Options dialog-box. You now need to select your Window 7 OS and click the ‘Next’ button again. Now you click on ‘Command Prompt’ to launch it.
STEP 4 – Move Windows 7 folders
In the next step, you will type the following commands in a serial manner and hit ‘Enter’ after typing each one of them. This action moves all the contents of Windows 7 to a new folder.
C:
Md Win7
Move Windows Win7\Windows
Move “Program Files” “Win7\Program Files”
Move Users Win7\Users
Attrib –h –s –r ProgramData
Move ProgramData Win7\ProgramData
Rd “Documents and Settings”
Step 5 – Copy Windows Vista files
Again the same process is repeated with a different set of commands that are given below and this ensures that the contents from Windows.old folder are copied to the drive.
move /y c:\Windows.old\Windows c:\
move /y “c:\Windows.old\Program Files” c:\
move /y c:\Windows.old\ProgramData c:\
move /y c:\Windows.old\Users c:\
move /y “c:\Windows.old\Documents and Settings” c:\
STEP 6 – Restore the Boot Sector
You have to restore the boot sector of your Vista OS by giving the following command.
D:\boot\bootsect /nt60 c:
Finally type ‘Exit’ to reboot your PC
Subscribe to:
Posts (Atom)


