
Changing the Windows log-on screen used to involve some complicated and potentially dangerous hacks, but not any more - Windows 7 makes it easy.
First, browse to HKEY_LOCAL_MACHINE\Software\Microsoft\Windows\CurrentVersion\Authentication\LogonUI\Background in REGEDIT, double-click the DWORD key called OEMBackground (not there? Create it) and set its value to 1.
Now find a background image you'd like to use. Make sure it's less than 256KB in size, and matches the aspect ratio of your screen as it'll be stretched to fit.
Next, copy that image into the %windir%\system32\oobe\info\backgrounds folder (create the info\backgrounds folders if they don't exist). Rename the image to backgroundDefault.jpg, reboot, and you should now have a custom log-on image.
Alternatively, use a free tweaking tool to handle everything for you. Logon Changer displays a preview so you can see how the log-on screen will look without rebooting, while the Logon Screen Rotator accepts multiple images and will display a different one every time you log on.
Showing posts with label Windows. Show all posts
Showing posts with label Windows. Show all posts
Wednesday, October 6, 2010
Friday, September 17, 2010
Preventing low memory problems
When your computer doesn't have enough memory for all of the actions it's trying to perform, Windows and your programs can stop working. To help prevent information loss, Windows will notify you when your computer is low on memory. You can also learn to recognize the signs of low memory and take steps to prevent the problem.
Signs of low memory include poor performance, low-memory or out-of-memory notifications, and display problems. For example, if you try to open a menu in a program when your computer is low on memory, the program might respond slowly or appear to stop responding. If the menu appears, it might not respond when you try to click an item or it might not display all items. If you click a menu item, the menu might also disappear and leave a blank area on the screen instead of displaying the contents of the document or file you're working in.
Why do low memory problems occur?
Your computer has two types of memory, random access memory (RAM) and virtual memory. All programs use RAM, but when there isn't enough RAM for the program you're trying to run, Windows temporarily moves information that would normally be stored in RAM to a file on your hard disk called a paging file. The amount of information temporarily stored in a paging file is also referred to as virtual memory. Using virtual memory—in other words, moving information to and from the paging file—frees up enough RAM for programs to run correctly.
Low memory problems occur when your computer runs out of RAM and becomes low on virtual memory. This can happen when you run more programs than the RAM installed on the computer is designed to support. Low memory problems can also occur when a program doesn't free up memory that it no longer needs. This problem is called memory overuse or a memory leak.
How to prevent low memory problems
Running fewer programs at one time can help prevent low memory problems and information loss. It's a good idea to observe which programs show signs of low memory conditions and try not to run them at the same time.
However, it’s not always convenient or practical to run a limited number of programs. Signs of low memory can indicate that the computer needs more RAM to support the programs you use. Here are the recommended ways to solve or prevent low memory problems:
•Increase the paging file (virtual memory) size
Windows automatically attempts to increase the paging file size the first time your computer becomes low on memory, but you can also manually increase it up to a maximum size that is determined by the amount of RAM installed. Although increasing the paging file size can help prevent low memory problems, it can also make your programs run more slowly. Because your computer reads information from RAM much faster than from a hard disk (where the paging file is), making too much virtual memory available to programs will slow them down.
For more information, see Change the size of virtual memory.
•Install more RAM
If you see signs of low memory, or if Windows warns you about a low memory problem, check the information that came with your computer or contact the computer manufacturer to determine which type of RAM is compatible with your computer, and then install more RAM. To install RAM, check the information provided by the manufacturer.
For more information, see Find out how much RAM your computer has.
•Determine if a program overuses memory
If the computer becomes low on memory whenever you run certain programs, one or more of those programs might have a memory leak. To stop a memory leak, you need to close the program. To repair a memory leak, you need to check for updates for the program or contact the publisher of the software.
To determine which program is using the most memory, follow these steps:
1.Open Task Manager by right-clicking the taskbar, and then clicking Start Task Manager.
2.Click the Processes tab.
3.To sort programs by memory usage, click Memory (Private Working Set).
You can also check for program errors and troubleshooting information using Event Viewer.
1.Open Event Viewer by clicking the Start button , clicking Control Panel, clicking System and Security, clicking Administrative Tools, and then double-clicking Event Viewer. If you're prompted for an administrator password or confirmation, type the password or provide confirmation.
2.In the left pane, click Applications and Services Logs to view error events. To see a description of the problem, double-click the event. To see if troubleshooting information is available, look for a link to online Help.
What are the signs of low memory?
Signs of low memory include poor performance, low-memory or out-of-memory notifications, and display problems. For example, if you try to open a menu in a program when your computer is low on memory, the program might respond slowly or appear to stop responding. If the menu appears, it might not respond when you try to click an item or it might not display all items. If you click a menu item, the menu might also disappear and leave a blank area on the screen instead of displaying the contents of the document or file you're working in.
Why do low memory problems occur?
Your computer has two types of memory, random access memory (RAM) and virtual memory. All programs use RAM, but when there isn't enough RAM for the program you're trying to run, Windows temporarily moves information that would normally be stored in RAM to a file on your hard disk called a paging file. The amount of information temporarily stored in a paging file is also referred to as virtual memory. Using virtual memory—in other words, moving information to and from the paging file—frees up enough RAM for programs to run correctly.
Low memory problems occur when your computer runs out of RAM and becomes low on virtual memory. This can happen when you run more programs than the RAM installed on the computer is designed to support. Low memory problems can also occur when a program doesn't free up memory that it no longer needs. This problem is called memory overuse or a memory leak.
How to prevent low memory problems
Running fewer programs at one time can help prevent low memory problems and information loss. It's a good idea to observe which programs show signs of low memory conditions and try not to run them at the same time.
However, it’s not always convenient or practical to run a limited number of programs. Signs of low memory can indicate that the computer needs more RAM to support the programs you use. Here are the recommended ways to solve or prevent low memory problems:
•Increase the paging file (virtual memory) size
Windows automatically attempts to increase the paging file size the first time your computer becomes low on memory, but you can also manually increase it up to a maximum size that is determined by the amount of RAM installed. Although increasing the paging file size can help prevent low memory problems, it can also make your programs run more slowly. Because your computer reads information from RAM much faster than from a hard disk (where the paging file is), making too much virtual memory available to programs will slow them down.
For more information, see Change the size of virtual memory.
•Install more RAM
If you see signs of low memory, or if Windows warns you about a low memory problem, check the information that came with your computer or contact the computer manufacturer to determine which type of RAM is compatible with your computer, and then install more RAM. To install RAM, check the information provided by the manufacturer.
For more information, see Find out how much RAM your computer has.
•Determine if a program overuses memory
If the computer becomes low on memory whenever you run certain programs, one or more of those programs might have a memory leak. To stop a memory leak, you need to close the program. To repair a memory leak, you need to check for updates for the program or contact the publisher of the software.
To determine which program is using the most memory, follow these steps:
1.Open Task Manager by right-clicking the taskbar, and then clicking Start Task Manager.
2.Click the Processes tab.
3.To sort programs by memory usage, click Memory (Private Working Set).
You can also check for program errors and troubleshooting information using Event Viewer.
1.Open Event Viewer by clicking the Start button , clicking Control Panel, clicking System and Security, clicking Administrative Tools, and then double-clicking Event Viewer. If you're prompted for an administrator password or confirmation, type the password or provide confirmation.
2.In the left pane, click Applications and Services Logs to view error events. To see a description of the problem, double-click the event. To see if troubleshooting information is available, look for a link to online Help.
Wednesday, September 1, 2010
How to use the Backup utility to back up files and folders in Windows XP Home Edition
Before you can back up important information on your computer, you must install the Backup utility. The Backup utility is included on the Windows XP Home Edition CD.
Note If Windows XP Home Edition was preinstalled on your computer and you do not have the original Windows XP CD, contact the computer manufacturer or visit the manufacturer's Web site for more information. You can also use backup software that you purchase separately.
To install the Backup utility from the Windows XP CD:
Insert your Windows XP CD into the CD drive or DVD drive of the computer.
Click Exit.
Locate the CDDrive:\ValueAdd\Msft\Ntbackup folder on the CD.
Double-click Ntbackup.msi to install the Backup utility.
When the Backup or Restore Wizard prompts you, click Finish.
Remove the Windows XP CD.
Now that you have installed the Backup utility, you are ready to back up your important information.
How to back up files and foldersTo back up your files and folders, follow these steps: Note In order to back up...To back up your files and folders, follow these steps:
Note In order to back up files and folders, you must be logged on to the computer as an administrator or as a user who is part of the Administrators group. To verify that you are logged on to Windows with a user account that is a computer administrator, visit the following Microsoft Web site:
http://support.microsoft.com/gp/admin (http://support.microsoft.com/gp/admin)
Note The following steps explain how to use the Backup utility to back up your files and folders manually. You can also use the Backup and Restore Wizard to back up your files and folders. However, the steps will be slightly different from those that are listed in the following section.
Step 1: Start the Backup utility
Click Start, and then click Run.
Type ntbackup.exe in the Open box, and then click OK.
Note If you receive the following error message, make sure that you followed the steps in the "How to install the Backup utility" section correctly:
Windows cannot find 'ntbackup.exe'
Step 2: Select items to back up and select the location for the backup file
Click Advanced Mode.
Note If the Backup and Restore Wizard starts, the utility is running in Wizard mode. You can click to clear the Always start in wizard mode check box, and then restart the Backup utility. If you continue to use the Backup and Restore Wizard, the steps will be slightly different from those that are listed in the following section.
Click the Backup tab.
On the Job menu, click New.
Select the check boxes next to the drives that you want to back up. If you select specific files or folders, expand the drive where these files or folders are located. Then, select the check boxes for the files or for the folders that you want to back up.
Select the System State check box that is located under My Computer in the navigation pane.
Note If you want to back up system settings and data files, back up all the data on your computer and the System State data. The System State data includes the registry, the COM+ class registration database, files that are under Windows File Protection, boot files, and other system files.
If the Backup destination list is available, click the backup destination that you want to use.
Note If you selected File in this step, type the full path and file name for which you want to back up data in the Backup media or file name box.
You can specify a network share as a destination for the backup file. Typically, backup files have the .bkf file name extension. However, you can use any file name extension that you want.
Step 3: Start the backup
Click Start Backup to open the Backup Job Information dialog box.
Under If the media already contains backups, do either of the following:
If you want to append this backup file to previous backup files, click Append this backup to the media. This option adds the new backup to the existing backup file so that you can maintain all previous backups in one file. This option is useful if you ever want to restore a backup from a specific day. Be aware that the size of the backup file will grow with each new backup. You might want to monitor the file size to make sure that it does not fill up your hard disk over time. If the file becomes too large, you might consider saving the file to an external hard disk. Or, if you are concerned about the file using too much hard disk space, select Replace the data on the media with this backup instead.
If you want to overwrite previous backup files with this backup file, click Replace the data on the media with this backup. This option is useful if you only want to maintain the current backup and do not care about keeping the previous backups. Or, use this option if you are concerned about the file using too much hard disk space on your computer.
Click Advanced.
Select the Verify data after backup check box.
In the Backup Type box, click the kind of backup that you want to create. For a description of each backup type, click the backup type and the description appears under "Description." You can select any of the following backup types:
Normal
Copy
Incremental
Differential
Daily
Click OK, and then click Start Backup. A Backup Progress dialog box is displayed, and the backup starts.
Step 4: Exit the Backup utility
When the backup is complete, click Close.
On the Job menu, click Exit.
NEXT STEPS If these steps do not work or you have problems during the backup, you can use t...If these steps do not work or you have problems during the backup, you can use the Microsoft Customer Support Services Web site to find solutions to your problem. You can also visit this Web site to learn more about how to back up your important information on your computer. Some services that the Microsoft Customer Support Services Web site provides include the following:
Searchable Knowledge Base (http://support.microsoft.com/search/?adv=1) : Search technical support information and self-help tools for Microsoft products.
Solution Centers (http://support.microsoft.com/select/?target=hub) : View product-specific frequently asked questions and support highlights.
Microsoft Customer Support Newsgroups (http://www.microsoft.com/communities/newsgroups/default.mspx) : Contact counterparts, peers, and Microsoft Most Valuable Professionals (MVPs).
Other Support Options (http://support.microsoft.com/default.aspx?pr=csshome) : Use the Web to ask a question, contact Microsoft Customer Support Services, or provide feedback.
If you cannot find the help you are looking for through the Microsoft Customer Support Services Web site, you might want to contact Support:
http://support.microsoft.com/contactus
Note If Windows XP Home Edition was preinstalled on your computer and you do not have the original Windows XP CD, contact the computer manufacturer or visit the manufacturer's Web site for more information. You can also use backup software that you purchase separately.
To install the Backup utility from the Windows XP CD:
Insert your Windows XP CD into the CD drive or DVD drive of the computer.
Click Exit.
Locate the CDDrive:\ValueAdd\Msft\Ntbackup folder on the CD.
Double-click Ntbackup.msi to install the Backup utility.
When the Backup or Restore Wizard prompts you, click Finish.
Remove the Windows XP CD.
Now that you have installed the Backup utility, you are ready to back up your important information.
How to back up files and foldersTo back up your files and folders, follow these steps: Note In order to back up...To back up your files and folders, follow these steps:
Note In order to back up files and folders, you must be logged on to the computer as an administrator or as a user who is part of the Administrators group. To verify that you are logged on to Windows with a user account that is a computer administrator, visit the following Microsoft Web site:
http://support.microsoft.com/gp/admin (http://support.microsoft.com/gp/admin)
Note The following steps explain how to use the Backup utility to back up your files and folders manually. You can also use the Backup and Restore Wizard to back up your files and folders. However, the steps will be slightly different from those that are listed in the following section.
Step 1: Start the Backup utility
Click Start, and then click Run.
Type ntbackup.exe in the Open box, and then click OK.
Note If you receive the following error message, make sure that you followed the steps in the "How to install the Backup utility" section correctly:
Windows cannot find 'ntbackup.exe'
Step 2: Select items to back up and select the location for the backup file
Click Advanced Mode.
Note If the Backup and Restore Wizard starts, the utility is running in Wizard mode. You can click to clear the Always start in wizard mode check box, and then restart the Backup utility. If you continue to use the Backup and Restore Wizard, the steps will be slightly different from those that are listed in the following section.
Click the Backup tab.
On the Job menu, click New.
Select the check boxes next to the drives that you want to back up. If you select specific files or folders, expand the drive where these files or folders are located. Then, select the check boxes for the files or for the folders that you want to back up.
Select the System State check box that is located under My Computer in the navigation pane.
Note If you want to back up system settings and data files, back up all the data on your computer and the System State data. The System State data includes the registry, the COM+ class registration database, files that are under Windows File Protection, boot files, and other system files.
If the Backup destination list is available, click the backup destination that you want to use.
Note If you selected File in this step, type the full path and file name for which you want to back up data in the Backup media or file name box.
You can specify a network share as a destination for the backup file. Typically, backup files have the .bkf file name extension. However, you can use any file name extension that you want.
Step 3: Start the backup
Click Start Backup to open the Backup Job Information dialog box.
Under If the media already contains backups, do either of the following:
If you want to append this backup file to previous backup files, click Append this backup to the media. This option adds the new backup to the existing backup file so that you can maintain all previous backups in one file. This option is useful if you ever want to restore a backup from a specific day. Be aware that the size of the backup file will grow with each new backup. You might want to monitor the file size to make sure that it does not fill up your hard disk over time. If the file becomes too large, you might consider saving the file to an external hard disk. Or, if you are concerned about the file using too much hard disk space, select Replace the data on the media with this backup instead.
If you want to overwrite previous backup files with this backup file, click Replace the data on the media with this backup. This option is useful if you only want to maintain the current backup and do not care about keeping the previous backups. Or, use this option if you are concerned about the file using too much hard disk space on your computer.
Click Advanced.
Select the Verify data after backup check box.
In the Backup Type box, click the kind of backup that you want to create. For a description of each backup type, click the backup type and the description appears under "Description." You can select any of the following backup types:
Normal
Copy
Incremental
Differential
Daily
Click OK, and then click Start Backup. A Backup Progress dialog box is displayed, and the backup starts.
Step 4: Exit the Backup utility
When the backup is complete, click Close.
On the Job menu, click Exit.
NEXT STEPS If these steps do not work or you have problems during the backup, you can use t...If these steps do not work or you have problems during the backup, you can use the Microsoft Customer Support Services Web site to find solutions to your problem. You can also visit this Web site to learn more about how to back up your important information on your computer. Some services that the Microsoft Customer Support Services Web site provides include the following:
Searchable Knowledge Base (http://support.microsoft.com/search/?adv=1) : Search technical support information and self-help tools for Microsoft products.
Solution Centers (http://support.microsoft.com/select/?target=hub) : View product-specific frequently asked questions and support highlights.
Microsoft Customer Support Newsgroups (http://www.microsoft.com/communities/newsgroups/default.mspx) : Contact counterparts, peers, and Microsoft Most Valuable Professionals (MVPs).
Other Support Options (http://support.microsoft.com/default.aspx?pr=csshome) : Use the Web to ask a question, contact Microsoft Customer Support Services, or provide feedback.
If you cannot find the help you are looking for through the Microsoft Customer Support Services Web site, you might want to contact Support:
http://support.microsoft.com/contactus
Monday, August 30, 2010
Why won't my computer turn on or off quickly?
If your computer seems to shut down slowly (or not at all) or start up slowly, or if it doesn't enter power-saving modes, it's possible that a program or device driver is interfering with Windows power settings. You can use Performance Information and Tools to try to detect these programs or device drivers.
To check for performance issues
1.Click to open Performance Information and Tools.
Control Panel\All Control Panel Items\Performance Information and Tools
2. In the left pane, click Advanced tools.

3.In Advanced Tools, under Performance issues, click any issues that are listed.

4.Read the information in the dialog box that appears to learn which programs or drivers are causing problems.
If a program or driver prevents your computer from turning on quickly
You can try the following tasks to fix the problem:
Manage the programs that run at startup. Some programs start automatically when you start Windows. Too many of these programs opening at the same time can slow down your computer. To disable these programs from startup and improve performance, use Windows Defender. For more information, see Stop a program from running automatically when Windows starts.
Check with the manufacturer of the program or driver for an update. A newer version of the program might include a resolution to the problem.
If a program or driver prevents your computer from turning off quickly
You can try the following tasks to fix the problem:
Close the program before shutting down. It's possible that the problem occurs only if the program is running. Try closing the program before shutting down Windows, and then see if your computer turns off properly.
Check with the manufacturer of the program or driver for an update. A newer version of the program might include a resolution to the problem.
If these options don't solve the problem, then the program or driver might be incompatible with Windows. If you installed the program or device yourself and you no longer use it, consider removing the device, or uninstalling the program or driver.
In windows 7 you can also Generate a System health report.
This comes in handy to let you know how your PC is doing. If you do one you first get your PC and do one every few motnhs and then you can see how and if your computer is going to crash
you can find it here
Control Panel\All Control Panel Items\Performance Information and Tools\Advanced Tools

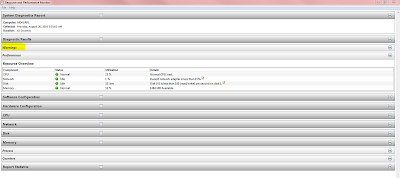 You can check the warnings and follow the links with-in the warnings, Also you can check memory, hard drive and pretty much your whole Computer.
Good Luck
Thanks
MD4URPC.com
To check for performance issues
1.Click to open Performance Information and Tools.
Control Panel\All Control Panel Items\Performance Information and Tools
2. In the left pane, click Advanced tools.

3.In Advanced Tools, under Performance issues, click any issues that are listed.

4.Read the information in the dialog box that appears to learn which programs or drivers are causing problems.
If a program or driver prevents your computer from turning on quickly
You can try the following tasks to fix the problem:
Manage the programs that run at startup. Some programs start automatically when you start Windows. Too many of these programs opening at the same time can slow down your computer. To disable these programs from startup and improve performance, use Windows Defender. For more information, see Stop a program from running automatically when Windows starts.
Check with the manufacturer of the program or driver for an update. A newer version of the program might include a resolution to the problem.
If a program or driver prevents your computer from turning off quickly
You can try the following tasks to fix the problem:
Close the program before shutting down. It's possible that the problem occurs only if the program is running. Try closing the program before shutting down Windows, and then see if your computer turns off properly.
Check with the manufacturer of the program or driver for an update. A newer version of the program might include a resolution to the problem.
If these options don't solve the problem, then the program or driver might be incompatible with Windows. If you installed the program or device yourself and you no longer use it, consider removing the device, or uninstalling the program or driver.
In windows 7 you can also Generate a System health report.
This comes in handy to let you know how your PC is doing. If you do one you first get your PC and do one every few motnhs and then you can see how and if your computer is going to crash
you can find it here
Control Panel\All Control Panel Items\Performance Information and Tools\Advanced Tools

This will run for 60 seconds or longer depending on your system.
In most cases 60 secs is default.

Good Luck
Thanks
MD4URPC.com
Monday, August 23, 2010
Customizing windows
Did you know that you can customize the Links bar in Windows XP SP2,SP3 and Windows Vista? You can add, remove, or rearrange shortcuts to your Favorites and folders of Favorites. Customizing the Links bar gives you one-click access to your favorite folders, and webpages.
Here's how:
To enable the Links bar in Windows XP SP2,SP3 and Windows Vista
• Right-click on the Windows Taskbar. Click on Toolbars, and then click Links to select it (a checkmark will be displayed beside it)


To add a shortcut to the Links bar
• Drag the webpage's icon from the Address bar of the browser
• Drag a link from a webpage directly to the Links bar
• Drag a folder path from a search window to the Links bar
• In the Add to Favorites dialog box, click the Create In dropdown list, and then select Links
To remove a shortcut from the Links bar
• On the Links bar, drag a shortcut to a new location
To enable the Links bar in your browser
• In the Favorites Center, drag a shortcut to a new location in the Links folder
Here's how:
To enable the Links bar in Windows XP SP2,SP3 and Windows Vista
• Right-click on the Windows Taskbar. Click on Toolbars, and then click Links to select it (a checkmark will be displayed beside it)

You will now see "Links" added just to the left of the system tray on the taskbar.

• Drag the webpage's icon from the Address bar of the browser
• Drag a link from a webpage directly to the Links bar
• Drag a folder path from a search window to the Links bar
• Click the Add to Favorites/Bookmarks button in your browser, and then click Add to Favorites/Bookmarks. NOTE: If you are using a different browser this feature may not be implemented, or may work differently
• In the Add to Favorites dialog box, click the Create In dropdown list, and then select Links
To remove a shortcut from the Links bar
• Right-click the shortcut in the Links bar, and then click Delete
To rearrange how your Favorites show on the Links bar
• On the Links bar, drag a shortcut to a new location
To enable the Links bar in your browser
NOTE: This feature may not be implemented, or may work differently, in different browsers.
• Click the Tools button, click Toolbars, and then click Links
To add a shortcut to the Links bar
• Click the Add to Favorites button, and then click Add to Favorites
• In the Add to Favorites dialog box, click the Create In dropdown list, and then select Links
You can also drag the webpage's icon from the Address bar or drag a link from a webpage directly to the Links bar.
• In the Favorites Center, drag a shortcut to a new location in the Links folder
Monday, July 12, 2010
HP Refurbished SALE: $244 250GB Netbook . $539 Core i3 500GB Laptop . $395 Quad-Core 6GB PC


HP
HP Pavilion Elite 2.8GHz Phenom II Quad-Core Desktop w/ Blu-ray Player and 1TB Hard Drive - Model HPE-112y - VT637AAR#ABA
Only $594.99

2.8GHz Phenom II X4-925 Quad-Core Processor, 8GB RAM, 1TB Hard Drive, DVD+RW w/ LightScribe, Blu-ray Player, Wirless 802.11 a/b/g/n, ATI Radeon HD4350, Windows 7 Home Premium 64-Bit - HP Refurbished / Recertified
eCOST Part# 55494773

Dell
Dell Latitude D620 1.83GHz Intel Core 2 Duo Notebook - D620
Only $297.99
1.83GHz Intel 2 Core Duo, 1GB RAM, 60GB Hard Disk Drive, DVD/CD-RW, 14.1" LCD, Wi-Fi, Windows XP Professional - Refurbished / Recertified
eCOST Part# 56388340

HP
This is a great site to get computers from and parts, I have and still do use this site, I signed up as a member and get great offers through my email. So sign up today and checthem out,
Thanks,
MD4URPC.com
Labels:
Anti-spyware,
CD/DVD,
desktop,
hard drive,
md4urpc.com,
network,
PC accessories,
Tech support,
Utilities,
Vista,
Windows,
windows 7,
windows 7 starter,
wireless,
word,
XP
0
comments


Tuesday, May 11, 2010
System Restore in Vista.
Follow these instructions for reverting important Windows Vista files back to a previous state using System Restore:
Difficulty: Easy
Time Required: Using System Restore to reverse system changes in Windows Vista usually takes several minutes
Here's How:
Navigate to the Start -> All Programs -> Accessories -> System Tools program group.
Click on the System Restore program icon.
Choose the Choose a different restore point radio button and then click Next >.
Note: The default choice is Recommended restore. This restore point is probably the most recent automatically created one and is likely the best choice. However, for purposes of demonstrating the entire System Restore process in Windows Vista, I'll be continuing with the longer process of choosing a restore point manually.
Choose the restore point that you want to use.
Note: Check the Show restore points older than 5 days checkbox to see more than the most recent restore points.
Note: Any restore points that you created, scheduled restore points that Windows Vista created, and those created automatically during the installation of certain programs will be listed here. You can not use System Restore to undo Windows Vista changes to a date that a restore point does not exist.
Click Next >.
Click Finish on the Confirm your restore point window to begin the System Restore.
Note: Windows Vista will shut down to complete the System Restore so be sure to save any work you might have open in other programs before proceeding.
Important: System Restore will not revert any of your non-system files like documents, email, music, etc. to a previous state. These types files are completely unaffected by System Restore. If your intention with this tool was to recover a deleted non-system file, try using a file recovery program instead of System Restore.
Click Yes to the Are you sure you want to continue? dialog box.
System Restore will now restore Windows Vista to the state that was recorded in the restore point you chose in Step 4.
Note: The System Restore process could take several minutes as you see the "Please wait while your Windows files and settings are being restored" message. Your computer will then reboot as normal when complete.
Immediately after logging in after the reboot, you should see a message that System Restore completed successfully.
Click Close.
Check to see if whatever Windows Vista problem you were troubleshooting has been corrected by this System Restore.
If the problem still persists, you can repeat the steps above and choose another restore point if one is available.
If this restoration caused a problem, you can always undo this particular System Restore.
Having trouble using System Restore in Windows Vista?
you can call 1-888-405-8769
Difficulty: Easy
Time Required: Using System Restore to reverse system changes in Windows Vista usually takes several minutes
Here's How:
Navigate to the Start -> All Programs -> Accessories -> System Tools program group.
Click on the System Restore program icon.
Choose the Choose a different restore point radio button and then click Next >.
Note: The default choice is Recommended restore. This restore point is probably the most recent automatically created one and is likely the best choice. However, for purposes of demonstrating the entire System Restore process in Windows Vista, I'll be continuing with the longer process of choosing a restore point manually.
Choose the restore point that you want to use.
Note: Check the Show restore points older than 5 days checkbox to see more than the most recent restore points.
Note: Any restore points that you created, scheduled restore points that Windows Vista created, and those created automatically during the installation of certain programs will be listed here. You can not use System Restore to undo Windows Vista changes to a date that a restore point does not exist.
Click Next >.
Click Finish on the Confirm your restore point window to begin the System Restore.
Note: Windows Vista will shut down to complete the System Restore so be sure to save any work you might have open in other programs before proceeding.
Important: System Restore will not revert any of your non-system files like documents, email, music, etc. to a previous state. These types files are completely unaffected by System Restore. If your intention with this tool was to recover a deleted non-system file, try using a file recovery program instead of System Restore.
Click Yes to the Are you sure you want to continue? dialog box.
System Restore will now restore Windows Vista to the state that was recorded in the restore point you chose in Step 4.
Note: The System Restore process could take several minutes as you see the "Please wait while your Windows files and settings are being restored" message. Your computer will then reboot as normal when complete.
Immediately after logging in after the reboot, you should see a message that System Restore completed successfully.
Click Close.
Check to see if whatever Windows Vista problem you were troubleshooting has been corrected by this System Restore.
If the problem still persists, you can repeat the steps above and choose another restore point if one is available.
If this restoration caused a problem, you can always undo this particular System Restore.
Having trouble using System Restore in Windows Vista?
you can call 1-888-405-8769
Friday, April 30, 2010
Add AeroSnap to XP, Vista FREE
If you have Seen Window7, Then you know About the AeroSnap.
This is where you can Snap the Explorer and/or IE window to one side or the other to make it Tile, Or from top to bottom.
Now you can have the same thing on windows Vista or XP.
Free
What is AeroSnap?
AeroSnap is a simple but powerful application that allows you to resize, arrange or maximize your desktop windows with just drag'n'drop.
Simple drag a window to a side of your desktop to snap it or drag it to the top to maximize.
It also works with multiple monitors!
Click HERE to get it today.
This is where you can Snap the Explorer and/or IE window to one side or the other to make it Tile, Or from top to bottom.
Now you can have the same thing on windows Vista or XP.
Free
What is AeroSnap?
AeroSnap is a simple but powerful application that allows you to resize, arrange or maximize your desktop windows with just drag'n'drop.
Simple drag a window to a side of your desktop to snap it or drag it to the top to maximize.
It also works with multiple monitors!
Click HERE to get it today.
Sunday, April 25, 2010
Windows 8 or Windows.Next ?
Windows 8( Windows.Next) is a future version of Microsoft Windows, expected for release in 2012 or later.[1] It will succeed Windows 7. It will be built on the same kernel MinWin in which the Windows 7 is being developed.
 In Windows 8,(Windows.Next) there is going to be a complete overhaul of the user interface. A new user experience is being developed for Windows 8. According to some sources, Windows 8 will not include Windows Explorer.
 Windows 8 is planned to bring a revamp of Windows Test Technologies (WTT), the technologies used to test Windows. The WTT team wants to address all the major testing problems by developing a "truly scalable and reliable testing infrastructure.
Maybe Windows Can learn something from Linux, The Operating System Is free for one thing.
If you have Never used or seen linux or Ubuntu it is a nice Program for Free. But not for the average user.
For Most people the ones that like to surf the net and Just check their Emails or play a game online. Ubuntu might not be for them, Now for the Geeks if you will or the more tech users if not or should be using this OS.
As good as it is I'm just surprised it's Free. Now you can even Get it installed when you buy a new computer. HP offers it.

The End Is Near For XP
Windows XP, the world’s most used operating system. Fast, clean and rock solid, it’s great for getting stuff done. However, like all good things, it has to come to an end.
Windows XP mysteriously dissaperaed from all store shelves last June, however, like all Microsoft’s products, it continued to receive support for about a year afterwards. Then, it happened.
As of today all mainstream Windows XP users will get almost completely cut off from support. Only critical updates will be received. People who want to continue to get support will have to pay for Microsoft’s extended service plan, which ends April 8,2014. Then it’s hello Windows 7!
Personal users and Business will need to get ready to Update their systems after 4/08/2014 since none will be available to them for Windows XP Can we say R.I.P. XP !


Maybe Windows Can learn something from Linux, The Operating System Is free for one thing.
If you have Never used or seen linux or Ubuntu it is a nice Program for Free. But not for the average user.
For Most people the ones that like to surf the net and Just check their Emails or play a game online. Ubuntu might not be for them, Now for the Geeks if you will or the more tech users if not or should be using this OS.
As good as it is I'm just surprised it's Free. Now you can even Get it installed when you buy a new computer. HP offers it.

Take a Tour of Ubuntu Click HERE
The End Is Near For XP
Windows XP, the world’s most used operating system. Fast, clean and rock solid, it’s great for getting stuff done. However, like all good things, it has to come to an end.
Windows XP mysteriously dissaperaed from all store shelves last June, however, like all Microsoft’s products, it continued to receive support for about a year afterwards. Then, it happened.
As of today all mainstream Windows XP users will get almost completely cut off from support. Only critical updates will be received. People who want to continue to get support will have to pay for Microsoft’s extended service plan, which ends April 8,2014. Then it’s hello Windows 7!
Personal users and Business will need to get ready to Update their systems after 4/08/2014 since none will be available to them for Windows XP Can we say R.I.P. XP !
Friday, April 23, 2010
msiexec.exe. What is it?
msiexec.exe. What is it?
diggMsiexec.exe is Windows® Installer.
This file is part of Windows Installer - Unicode. Msiexec.exe is developed by Microsoft Corporation. It is used to install new programs that use Windows Installer package files (MSI). It should only be running if you are running an installer. Msiexec is important for computer security and stability and should not be terminated. It’s a system and hidden file.
Msiexec.exe is usually located in the %PROGRAM_FILES% sub-folder and its usual size is 77,824 bytes.
If you are not installing anything, but msiexec is running, chances are it's a virus. Scan your computer with Malwarebytes to make sure it's not infected.
The msiexec.exe process may also be running all the time if the Windows Installer service is set to Automatic by mistake. You'll need to change the service startup type to manual. We recommend doing that using
You can also do it manually. Here's how:
1. Go to Start - Run, type in services.msc and hit Enter. A new window will open.
2. Find the Windows Installer service, right-click on it and click on Properties. A new window will open.
3. In the Startup type section, use the dropdown menu to select Manual.
4. Click Apply, then click OK
Windows XP Users: If you a getting an error saying "The Windows Installer Service Could Not Be Accessed", read this Microsoft article.
The Windows Installer Service Could Not Be Accessed"
Recommendation
Malwarebytes.org ( For Torjans, Viruses And some fake anti-virus programs)
Ccleaner.com ( does about the same as malwarebytes)
Here is a few other programs of interest Click HERE
This one is also in on of my other blogs I think, But you can get it here as well I have tested this Program and it does work. I tested it out on XP on my laptop. Since i did not have any fake viruses it didnt do nothing, So try it out if you think you have a fake Virus program It works Click HERE
--------------------------------------------------------------------------------
Do not terminate msiexec.exe if you are running an installer.
To go directly to the Online Chat room you can click HERE Enter your name and your in.
Also at the bottom of this BLOG you can leave a message or a question.
diggMsiexec.exe is Windows® Installer.
This file is part of Windows Installer - Unicode. Msiexec.exe is developed by Microsoft Corporation. It is used to install new programs that use Windows Installer package files (MSI). It should only be running if you are running an installer. Msiexec is important for computer security and stability and should not be terminated. It’s a system and hidden file.
Msiexec.exe is usually located in the %PROGRAM_FILES% sub-folder and its usual size is 77,824 bytes.
If you are not installing anything, but msiexec is running, chances are it's a virus. Scan your computer with Malwarebytes to make sure it's not infected.
The msiexec.exe process may also be running all the time if the Windows Installer service is set to Automatic by mistake. You'll need to change the service startup type to manual. We recommend doing that using
You can also do it manually. Here's how:
1. Go to Start - Run, type in services.msc and hit Enter. A new window will open.
2. Find the Windows Installer service, right-click on it and click on Properties. A new window will open.
3. In the Startup type section, use the dropdown menu to select Manual.
4. Click Apply, then click OK
Windows XP Users: If you a getting an error saying "The Windows Installer Service Could Not Be Accessed", read this Microsoft article.
The Windows Installer Service Could Not Be Accessed"
Recommendation
Malwarebytes.org ( For Torjans, Viruses And some fake anti-virus programs)
Ccleaner.com ( does about the same as malwarebytes)
Here is a few other programs of interest Click HERE
This one is also in on of my other blogs I think, But you can get it here as well I have tested this Program and it does work. I tested it out on XP on my laptop. Since i did not have any fake viruses it didnt do nothing, So try it out if you think you have a fake Virus program It works Click HERE
--------------------------------------------------------------------------------
Do not terminate msiexec.exe if you are running an installer.
To go directly to the Online Chat room you can click HERE Enter your name and your in.
Also at the bottom of this BLOG you can leave a message or a question.
Do you or have had one of These ?
These are some of the most common Fake Virus programs out. You can click on the picture or Icon to see a bigger view of the Fake Virus.
Antivirus 7

CleanUp Antivirus

Security Central

Antivirus security

Total PC Defender 2010

Vista Antivirus Pro 2010

Your PC Protector
Vista Internet Security 2010
XP Guardian
Vista Guardian 2010
Antivirus Soft
XP Internet Security 2010
Antivirus 2010
Live PC Care
Malware Defense
Internet Security 2010
Desktop Defender 2010
Security Tool

Antivirus Live
Personal Security
Cyber Security
Alpha Antivirus
Windows Enterprise Suite
Security Center
Control Center
Braviax
Windows Police Pro
Antivirus Pro 2010
PC Antispyware 2010
FraudTool.MalwareProtector.d
Winshield2009.com
Green AV
Windows Protection Suite
Total Security 2009
Windows System Suite
Antivirus BEST
System Security
Personal Antivirus
System Security 2009
Malware Doctor
Antivirus System Pro
WinPC Defender
Anti-Virus-1
Spyware Guard 2008
System Guard 2009
Antivirus 2009
Antivirus 2010
Antivirus Pro 2009
Antivirus 360
MS Antispyware 2009
IGuardPC or I Guard PC
Additional Guard
(all of them are fake antivirus which are
viruses or trojans) from your computer.
Remove Fake Antivirus is used to remove
fake antivirus which are viruses or trojans.
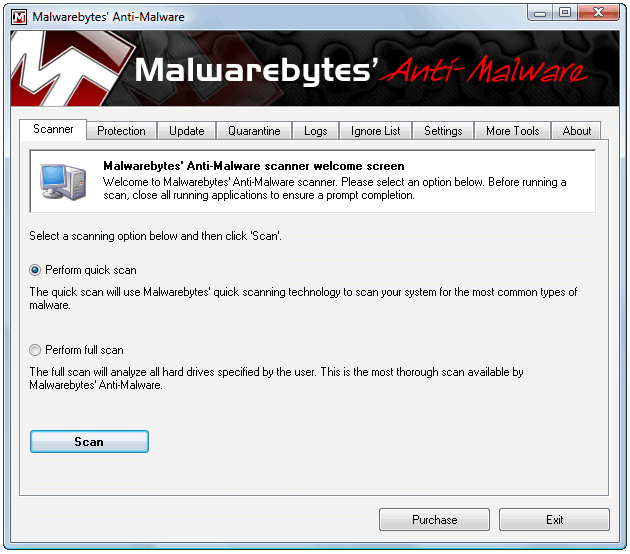
Also you can use Malwarebytes here is a Picture of the real Program
Just depends on what you like
Antivirus 7

CleanUp Antivirus

Security Central

Antivirus security

Total PC Defender 2010

Vista Antivirus Pro 2010

Your PC Protector
Vista Internet Security 2010
XP Guardian
Vista Guardian 2010
Antivirus Soft
XP Internet Security 2010
Antivirus 2010
Live PC Care
Malware Defense
Internet Security 2010
Desktop Defender 2010
Security Tool

Antivirus Live
Personal Security
Cyber Security
Alpha Antivirus
Windows Enterprise Suite
Security Center
Control Center
Braviax
Windows Police Pro
Antivirus Pro 2010
PC Antispyware 2010
FraudTool.MalwareProtector.d
Winshield2009.com
Green AV
Windows Protection Suite
Total Security 2009
Windows System Suite
Antivirus BEST
System Security
Personal Antivirus
System Security 2009
Malware Doctor
Antivirus System Pro
WinPC Defender
Anti-Virus-1
Spyware Guard 2008
System Guard 2009
Antivirus 2009
Antivirus 2010
Antivirus Pro 2009
Antivirus 360
MS Antispyware 2009
IGuardPC or I Guard PC
Additional Guard
(all of them are fake antivirus which are
viruses or trojans) from your computer.
Remove Fake Antivirus is used to remove
fake antivirus which are viruses or trojans.
Also you can use Malwarebytes here is a Picture of the real Program
Just depends on what you like
Thursday, April 22, 2010
Don't want to Re-Install windows ? try this
Uninstall all antivirus, antispyware, firewall software.
Start
run
cmd
Click OK
del %temp% /f /a /q /s
start msconfig
Click on the Startup TAB
uncheck everything
reboot
Poof, new computer for free.
Start
run
cmd
Click OK
del %temp% /f /a /q /s
start msconfig
Click on the Startup TAB
uncheck everything
reboot
Poof, new computer for free.
Tuesday, April 20, 2010
Why Fix it?As easy as "Click, click, fixed!"
This is a nice Free service from Microsoft,
Microsoft Fix it Center makes getting support easier than ever, with tools that help solve the issues you have now and prevent new ones.
Easy to Install and Run: Easy-to-use wizards will guide you through the set-up process and help you anytime you need support.
Automated: With automated troubleshooters, Fix it Center helps solve issues with your PC, even if you're not sure what the exact problem is. Fix It Center scans your device to diagnose and repair problems, then gives you the option to "Find and fix" or to "Find and report.
Preventive Care: By helping you find and fix issues before they become real problems, Fix it Center helps keep your PC running smoothly and automatically downloading the latest solutions.
To get more Information on this NEW service please Click HERE to see Microsofts website
Microsoft Fix it Center makes getting support easier than ever, with tools that help solve the issues you have now and prevent new ones.
Easy to Install and Run: Easy-to-use wizards will guide you through the set-up process and help you anytime you need support.
Automated: With automated troubleshooters, Fix it Center helps solve issues with your PC, even if you're not sure what the exact problem is. Fix It Center scans your device to diagnose and repair problems, then gives you the option to "Find and fix" or to "Find and report.
Preventive Care: By helping you find and fix issues before they become real problems, Fix it Center helps keep your PC running smoothly and automatically downloading the latest solutions.
To get more Information on this NEW service please Click HERE to see Microsofts website
Monday, April 19, 2010
Computer Problems ?

Power suit is an all in one fix.
This program you do not need windows CD. you can Boot from this CD to save your files to repair windows, ( all versions)
They even have a 24/7 Tech support. So if your having Trouble with your computer Try Power suit By : Spotmau or their online Tech support.

Sunday, April 18, 2010
Hide your IP address
Did you know your IP address is exposed every time you visit a website? Your IP address is your online identity and could be used by hackers to break into your computer, steal personal information, or commit other crimes against you. Hide My IP allows you to surf anonymously, change your IP address, prevent identity theft, and guard against hacker intrusions, all with the click of a button.
You can go to a website called Whats MY IP address Click HERE and it will show you what it is.
Then once you download the free trial (14days) you can go back to the site with the program running and see what it changed it to.
Now remember some sites will not let you go to them if your IP is blocked or can not be traced.
This just gives you a fake IP as if you do have one.
To see how this works Click HERE to get your free trial Today.
You can go to a website called Whats MY IP address Click HERE and it will show you what it is.
Then once you download the free trial (14days) you can go back to the site with the program running and see what it changed it to.
Now remember some sites will not let you go to them if your IP is blocked or can not be traced.
This just gives you a fake IP as if you do have one.
To see how this works Click HERE to get your free trial Today.
"How do I change my IP address?"
"How do I change my IP address?" and "Can I change my IP address?" are probably the most commonly asked questions. Please attempt the following then, if that does not work, visit the Change IP Address forum.
Before trying any other methods to change your IP address, try turning off (or unplugging the power of) your Cable/DSL modem for five minutes. In many cases this will change your IP address. However, if that does not change your IP address, repeat the process for 8 hours (overnight works well) instead of 5 minutes. Hopefully this will result in an IP change.
If the above does not result in your IP address changing, please look through the below for the situation that best matches yours and attempt to change your IP address that way. Unfortunately you are not able to get your IP address to change in all cases, as it is ultimate determined by your ISP's DHCP configuration (when you've got a dynamically assigned IP address, that is.)
Windows - Computer connected directly to the modem
Get to a command prompt. (START, run, cmd).

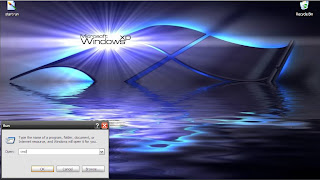
Type "ipconfig /release" (without the quotes, on the command line by itself).
Type "ipconfig /renew" (without the quotes, on the command line by itself).

Windows (second option) - Computer connected directly to the modem
Get to a command prompt. (START, run, cmd).
Type "ipconfig /release" (without the quotes).
Shut down computer.
Turn off computer.
Turn off all ethernet hubs/switches.
Turn off cable/DSL modem.
Leave off overnight.
Turn everything back on.
Network with Router
Log into the router's admin console. (Often http://192.168.1.1/)
Release the IP address. (Method varies by router manufacturer)
Turn off router, ethernet hubs/switches, and the cable/DSL modem.
Leave off overnight.
Turn everything back on.
If you are using a cable/DSL modem and a router, you may wish to connect your computer directly to the cable/DSL modem. Please note that this could significantly impact your system security. This allows your ISP's DHCP to issue you a new (hopefully changed) IP address based of the (hardware) MAC address of your computer's ethernet card.
If all the above has not worked to change your IP address and you have a router, check and see if there is a "Clone MAC Address" option. Using it should change your IP address; however, you'll only be able to do it once (in most cases).
These will not work in all cases. If all else fails contact your internet service provider (ISP) and ask them if they are able to change your IP address or how long your connection needs to be off for your IP address to change.
Click HERE to check your internet Speed From Cnet Reviews.
Also known as Downloads.com
Before trying any other methods to change your IP address, try turning off (or unplugging the power of) your Cable/DSL modem for five minutes. In many cases this will change your IP address. However, if that does not change your IP address, repeat the process for 8 hours (overnight works well) instead of 5 minutes. Hopefully this will result in an IP change.
If the above does not result in your IP address changing, please look through the below for the situation that best matches yours and attempt to change your IP address that way. Unfortunately you are not able to get your IP address to change in all cases, as it is ultimate determined by your ISP's DHCP configuration (when you've got a dynamically assigned IP address, that is.)
Windows - Computer connected directly to the modem
Get to a command prompt. (START, run, cmd).

Start then Click Run

Once you click on Run this window opens and you type in CMD. it means command.
Type "ipconfig /release" (without the quotes, on the command line by itself).
Type "ipconfig /renew" (without the quotes, on the command line by itself).

Once Iprelease is typed into the Command line it should kick you off line for a moment. Then type in IPRENEW and you should reconnect.
Get to a command prompt. (START, run, cmd).
Type "ipconfig /release" (without the quotes).
Shut down computer.
Turn off computer.
Turn off all ethernet hubs/switches.
Turn off cable/DSL modem.
Leave off overnight.
Turn everything back on.
Network with Router
Log into the router's admin console. (Often http://192.168.1.1/)
Release the IP address. (Method varies by router manufacturer)
Turn off router, ethernet hubs/switches, and the cable/DSL modem.
Leave off overnight.
Turn everything back on.
If you are using a cable/DSL modem and a router, you may wish to connect your computer directly to the cable/DSL modem. Please note that this could significantly impact your system security. This allows your ISP's DHCP to issue you a new (hopefully changed) IP address based of the (hardware) MAC address of your computer's ethernet card.
If all the above has not worked to change your IP address and you have a router, check and see if there is a "Clone MAC Address" option. Using it should change your IP address; however, you'll only be able to do it once (in most cases).
These will not work in all cases. If all else fails contact your internet service provider (ISP) and ask them if they are able to change your IP address or how long your connection needs to be off for your IP address to change.
Click HERE to check your internet Speed From Cnet Reviews.
Also known as Downloads.com
Friday, April 16, 2010
Computer accessories

Logitech webcams

Joysticks

Get a Mice today Wireless

Their Keyboards are Great.
Tuesday, April 13, 2010
Create a Shutdown Shortcut and/or Restart
Instead of having to navigate through the Start menu every time you want to shut down your computer, you can set it up so all you have to do is click a shortcut icon on your desktop. Here's how to create that aforementioned shortcut:
1. Right-click on an empty area of your Desktop.
2. In the pop-up menu, select New > Shortcut.
3. Type this code "shutdown -s" (without the quotes) in the empty field.
4. If you'd like a 'Goodbye' message, add: -c "TYPE MESSAGE HERE" to the end of the code.
5. Click on Next, and then Finish.
The above code shuts down Windows as it does normally (i.e. by closing each and every program, and then shutting down). But if you want your Windows to shut down instantly, just by stopping every program, then use the code "shutdown -s -t 00" (00 is the number of seconds till shutdown, if you put 100 it will take 100 seconds) in Step 3.
Desktop Reboot Icon
Right click on the desktop
Click [New] [Shortcut] to open the Create Shortcut Wizard
Type [shutdown -r -t 00] without the brackets.
Click [Next] and type a descriptive name of your choosing for the shortcut
Click [Finish]
1. Right-click on an empty area of your Desktop.
2. In the pop-up menu, select New > Shortcut.
3. Type this code "shutdown -s" (without the quotes) in the empty field.
4. If you'd like a 'Goodbye' message, add: -c "TYPE MESSAGE HERE" to the end of the code.
5. Click on Next, and then Finish.
The above code shuts down Windows as it does normally (i.e. by closing each and every program, and then shutting down). But if you want your Windows to shut down instantly, just by stopping every program, then use the code "shutdown -s -t 00" (00 is the number of seconds till shutdown, if you put 100 it will take 100 seconds) in Step 3.
Desktop Reboot Icon
Right click on the desktop
Click [New] [Shortcut] to open the Create Shortcut Wizard
Type [shutdown -r -t 00] without the brackets.
Click [Next] and type a descriptive name of your choosing for the shortcut
Click [Finish]
Monday, April 12, 2010

Personal Home page
Make your Own personal Home page.
http://the-page.net ( or click HERE)
Watch the Video. IT's Simple and only takes a few min.
http://search.conduit.com/?SearchSource=10&ctid=CT2436213
The above is My home page, From My toolbar. (or click HERE)
You can copy and paste it into yout address bar and click the logo and it takes you to the Remote assistance webpage.
http://the-page.net ( or click HERE)
Watch the Video. IT's Simple and only takes a few min.
http://search.conduit.com/?SearchSource=10&ctid=CT2436213
The above is My home page, From My toolbar. (or click HERE)
You can copy and paste it into yout address bar and click the logo and it takes you to the Remote assistance webpage.
Subscribe to:
Posts (Atom)


