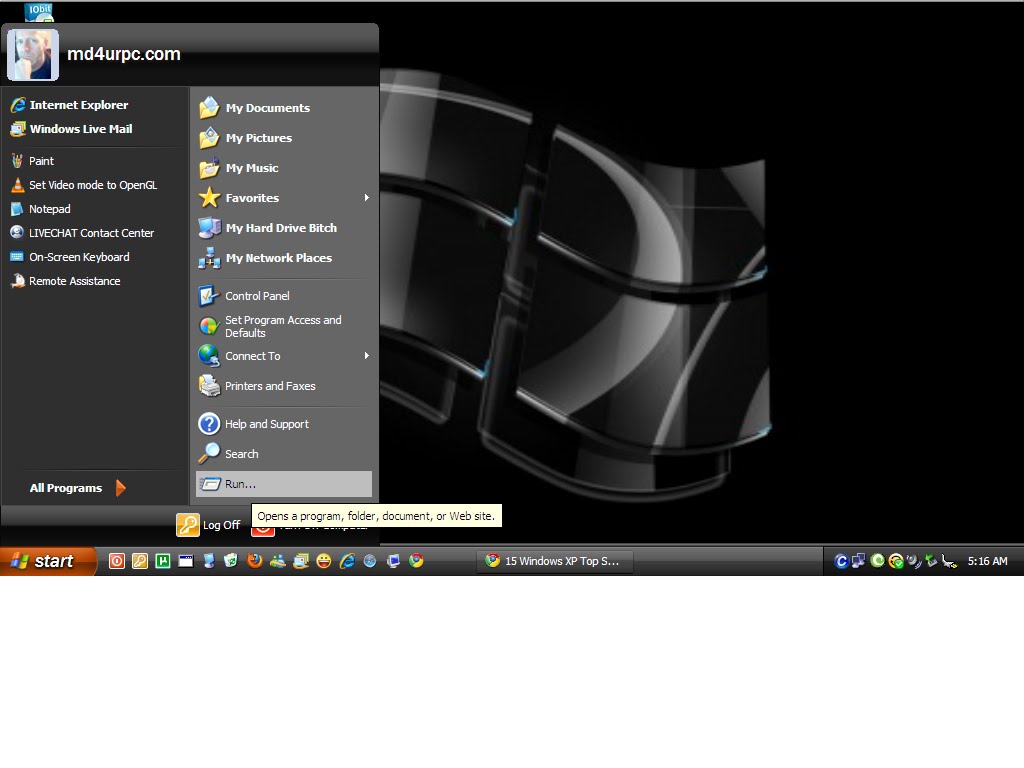
There are thousands of programs out their that you can get for free and or pay for, But did you know on you PC there are programs all ready on it.
Windows XP ( Vista and windows 7 Just type it in the Search window on the start button
1. Click Start
2. Click Run
3. Type in cleanmgr.exe
This cleans the Hard Drive the same way as if you were to Go to My computer and right click your C:\ drive and then to properties. Just a faster way of doing it.
To make a shortCut on your Desktop Just
1. Right click the Wall paper ( Empty spot)
2. New ShortCut
3.Copy and Past
4. C:\Windows\System32\cleanmgr.exe
Simple.
Now lets get creative.
If you open the Folder ( Click Start> My Computer" Computer for Vista an 7" Then double Click the drive with your Operating System ( C:\ normally) then scroll down to Windows then open it then scroll down to System32
C:\Windows\System32
you will see a few Applications, These are some of the applications you can use to make shortcuts, What ever you do , Don't Delete them
On any of them you can Double Click it and it will open the program related to it, If it does not open then it is a Command lind program, Meaning another program Needed to run it it short term
If it does open then if you like what it is you can Right click it and scroll down to Make a shortCut
it will make the shortCut in the same folder then you can drag and drop it to the desktop
To see a video Visit our YouTune channel
http:\\youtube.com/md4urpc
Here is a list of some of the ones that will Run Just copy and past these into the New shortCut
C:\Windows\System32\Netplwiz.exe ( all )
C:\Windows\System32\resmon.exe (Vista and win 7)
C:\Windows\System32\msconfig.exe (all)
charmap ( shows you all the Characters )
lpksetup
chkdsk ( check the Hard Drive for errors )
calc ( Calculator )
cmd ( Command Line )
UAC ( User Account Control ) Vista win 7
C:\Windows\System32\CompMgmtLauncher.exe ( Computer Management Launcher )
taskmgr ( Task Manager )
SoundRecorder ( record sound from a mic to your PC )
perfmon ( Performance Monitor ) Vista and 7
psr ( Problem Steps Recorder ) Windows 7 only
osk ( On screen KeyBoard )
Magnify ( Magnifys the Screen )
OptionalFeatures ( Lets you see other options you may have not installed on your PC)
MdSched ( Windows Memory Diagnostics )
Well Enjoy.
To see a short Video Click HERE
Sunday, June 13, 2010
Wednesday, June 9, 2010
How To Revert Back To XP Or Vista From Windows 7.
If the computer has the Windows.old folder - Reverting Windows 7 back to a previous Windows system:
http://support.microsoft.com/default.aspx/kb/971760
Windows.old on your C: drive - Usually, but not always, after installing Windows 7 you will have a Windows.old folder on your C: drive that contains data from the previous Windows installation. Open Windows Explorer and under "Computer" click on the C: drive - if the Windows.old folder is there you should be able to revert back to XP/Vista.
If it's not there, make sure you can see the Windows.old folder:
1. Click Start, type: hidden
2. Click "Show hidden files and folders"
3. Click to select "Show hidden files and folders"
4. Uncheck the next three items:
Hide empty drives
Hide extensions from known file types
Hide protected operating system files
5. Click OK and look for the folder
(Note: after you are done go back and recheck "Hide protected operating system files." If you want to change the other settings back do so.)
If there is no Windows.old folder:
If you have a restore partition (check your manual) you can use that, or if you have XP/Vista disks you can use those. If you don't have either and Windows came installed on your computer contact the OEM computer manufacturer and ask them to send you an install disk - they may or may not do it. If they agree to send you one they may charge a small fee.
___
STEP 1 – Locate Windows folder
The first step is to open the Windows 7 drive and locate the Windows.old folder in the drive. This is essential to change from Windows 7 to Vista and without it, this process would not be possible. Now you need to ensure that ample free space is available in the Windows 7 drive as all contents of Windows 7 is moved to a folder and the Vista contents from the Windows.old folder is copied.
STEP 2 – Reboot your PC
Now it is time to insert the Windows 7 installation disk in the DVD drive. Once this is done, reboot your PC. When the first screen shows up select your language, time and currency format and keyboard input method and click the ‘Next’ button.
Step 3 – Launching Windows7
Now the Install Windows window appears. Simply click on the ‘Repair your computer’ option to launch System Recovery Options dialog-box. You now need to select your Window 7 OS and click the ‘Next’ button again. Now you click on ‘Command Prompt’ to launch it.
STEP 4 – Move Windows 7 folders
In the next step, you will type the following commands in a serial manner and hit ‘Enter’ after typing each one of them. This action moves all the contents of Windows 7 to a new folder.
C:
Md Win7
Move Windows Win7\Windows
Move “Program Files” “Win7\Program Files”
Move Users Win7\Users
Attrib –h –s –r ProgramData
Move ProgramData Win7\ProgramData
Rd “Documents and Settings”
Step 5 – Copy Windows Vista files
Again the same process is repeated with a different set of commands that are given below and this ensures that the contents from Windows.old folder are copied to the drive.
move /y c:\Windows.old\Windows c:\
move /y “c:\Windows.old\Program Files” c:\
move /y c:\Windows.old\ProgramData c:\
move /y c:\Windows.old\Users c:\
move /y “c:\Windows.old\Documents and Settings” c:\
STEP 6 – Restore the Boot Sector
You have to restore the boot sector of your Vista OS by giving the following command.
D:\boot\bootsect /nt60 c:
Finally type ‘Exit’ to reboot your PC
http://support.microsoft.com/default.aspx/kb/971760
Windows.old on your C: drive - Usually, but not always, after installing Windows 7 you will have a Windows.old folder on your C: drive that contains data from the previous Windows installation. Open Windows Explorer and under "Computer" click on the C: drive - if the Windows.old folder is there you should be able to revert back to XP/Vista.
If it's not there, make sure you can see the Windows.old folder:
1. Click Start, type: hidden
2. Click "Show hidden files and folders"
3. Click to select "Show hidden files and folders"
4. Uncheck the next three items:
Hide empty drives
Hide extensions from known file types
Hide protected operating system files
5. Click OK and look for the folder
(Note: after you are done go back and recheck "Hide protected operating system files." If you want to change the other settings back do so.)
If there is no Windows.old folder:
If you have a restore partition (check your manual) you can use that, or if you have XP/Vista disks you can use those. If you don't have either and Windows came installed on your computer contact the OEM computer manufacturer and ask them to send you an install disk - they may or may not do it. If they agree to send you one they may charge a small fee.
___
STEP 1 – Locate Windows folder
The first step is to open the Windows 7 drive and locate the Windows.old folder in the drive. This is essential to change from Windows 7 to Vista and without it, this process would not be possible. Now you need to ensure that ample free space is available in the Windows 7 drive as all contents of Windows 7 is moved to a folder and the Vista contents from the Windows.old folder is copied.
STEP 2 – Reboot your PC
Now it is time to insert the Windows 7 installation disk in the DVD drive. Once this is done, reboot your PC. When the first screen shows up select your language, time and currency format and keyboard input method and click the ‘Next’ button.
Step 3 – Launching Windows7
Now the Install Windows window appears. Simply click on the ‘Repair your computer’ option to launch System Recovery Options dialog-box. You now need to select your Window 7 OS and click the ‘Next’ button again. Now you click on ‘Command Prompt’ to launch it.
STEP 4 – Move Windows 7 folders
In the next step, you will type the following commands in a serial manner and hit ‘Enter’ after typing each one of them. This action moves all the contents of Windows 7 to a new folder.
C:
Md Win7
Move Windows Win7\Windows
Move “Program Files” “Win7\Program Files”
Move Users Win7\Users
Attrib –h –s –r ProgramData
Move ProgramData Win7\ProgramData
Rd “Documents and Settings”
Step 5 – Copy Windows Vista files
Again the same process is repeated with a different set of commands that are given below and this ensures that the contents from Windows.old folder are copied to the drive.
move /y c:\Windows.old\Windows c:\
move /y “c:\Windows.old\Program Files” c:\
move /y c:\Windows.old\ProgramData c:\
move /y c:\Windows.old\Users c:\
move /y “c:\Windows.old\Documents and Settings” c:\
STEP 6 – Restore the Boot Sector
You have to restore the boot sector of your Vista OS by giving the following command.
D:\boot\bootsect /nt60 c:
Finally type ‘Exit’ to reboot your PC
Monday, June 7, 2010
Services ! Speeding up your PC
There are system services that you can disable to free up the system's load. To access the interface that permits you to make changes to system's services, type services.msc and the command prompt.
This is a list of services that are *usually* useless and can be safely disabled.
Application Layer Gateway Service,
Background Intelligent Transfer
Clipbook
Distributed Link Tracking Client
Distributed Transaction Coordinater
Error Reporting Service
Fast User Switching Compatibility
IMAPI CD-Burning
Indexing Service
IPSEC Services
Messenger
Net Logon
Net Meeting
Remote Desktop Sharing
Network DDE
Network DDE DSDM
Portable Media Serial Number
Remote Desktop Help Session Manager
Remote Registry
Secondary Logon
Smartcard
SSDP Discovery Service
Uninterruptible Power Supply
Universal Plug and Play Device Host
Upload Manager
Webclient
Wireless Zero Configuration (If you have Wirelss Internet LEAVE this on)
WMI Performance Adaptor
Read all of the descriptions on each service to determine if you need it or not, Most things you will not if on
a desktop. Do one at a time and make sure your PC does not start acting funny or things not working properly before ending the Service's session.
This is a list of services that are *usually* useless and can be safely disabled.
Alerter
Application Management
Automatic Updates
Background Intelligent Transfer
Clipbook
Distributed Link Tracking Client
Distributed Transaction Coordinater
Error Reporting Service
Fast User Switching Compatibility
IMAPI CD-Burning
Indexing Service
IPSEC Services
Messenger
Net Logon
Net Meeting
Remote Desktop Sharing
Network DDE
Network DDE DSDM
Portable Media Serial Number
Remote Desktop Help Session Manager
Remote Registry
Secondary Logon
Smartcard
SSDP Discovery Service
Uninterruptible Power Supply
Universal Plug and Play Device Host
Upload Manager
Webclient
Wireless Zero Configuration (If you have Wirelss Internet LEAVE this on)
WMI Performance Adaptor
Read all of the descriptions on each service to determine if you need it or not, Most things you will not if on
a desktop. Do one at a time and make sure your PC does not start acting funny or things not working properly before ending the Service's session.
1. Click Start
2. Click RUN
Once you click on Run the Above Box should open, TYPE in the Box
services.msc then hit ENTER
Then the above Window will open, Then scroll down to the above list to any single one, And double click on it. It will open another small window, With a drop down window for Automatic, Disable, Stop, start, manual.
On most you can put to manual, The ones you know your not going to use you can select Disable or stop.
Remember to read what it is before stopping it.
you can Email us with any questions
Windows 7 and Vista
1. click Start
2. in the seach window type in services.msc
3. Foloow the above directions.
Subscribe to:
Posts (Atom)